I do not think that would be possible as far as the C3_Max_Spark zones (s&d) I am messing around with adding some aspects of this indicator to the Bull_Bear_3x_Vix colored candles study. Before I combined Vix alert 4 and all that to bull bear I compared the big four to triple exhaustion and did not see the benefit but that being said I did not spend much time looking at it.@HODL-Lay-HE-hoo! how difficult would it be to combine the supply/demand zones from the Confirmation candles thread to this so that it would give a better idea of where the supply/demand zones are?
You are using an out of date browser. It may not display this or other websites correctly.
You should upgrade or use an alternative browser.
You should upgrade or use an alternative browser.
The Big Four Chart SetUp For ThinkOrSwim
- Thread starter TradingNumbers
- Start date
- Status
- Not open for further replies.
http://tos.mx/zqTWzDi@HODL-Lay-HE-hoo! how difficult would it be to combine the supply/demand zones from the Confirmation candles thread to this so that it would give a better idea of where the supply/demand zones are?
Try adding this.
Can you please let me know why the candles are all red? This is AMD today, M3 chart.
I see a few candles differentiated in pre-market, but once market opened, it's just all red. I thought it should have been in different colors, green after market opened, esp when it was so bullish till 10 AM.
I see a few candles differentiated in pre-market, but once market opened, it's just all red. I thought it should have been in different colors, green after market opened, esp when it was so bullish till 10 AM.
Last edited:
Can you please let me know why the candles are all red? This is AMD today, M3 chart.
I see a few candles differentiated in pre-market, but once market opened, it's just red. I thought it should have been the same after market opened, esp when it was so bullish till 10 AM.
This is how it's supposed to look. Make sure your settings are correct you might have TMO turned on
Thanks, yes, it was the Strategy with TMO as Yes. Turned that off, and it looks right now.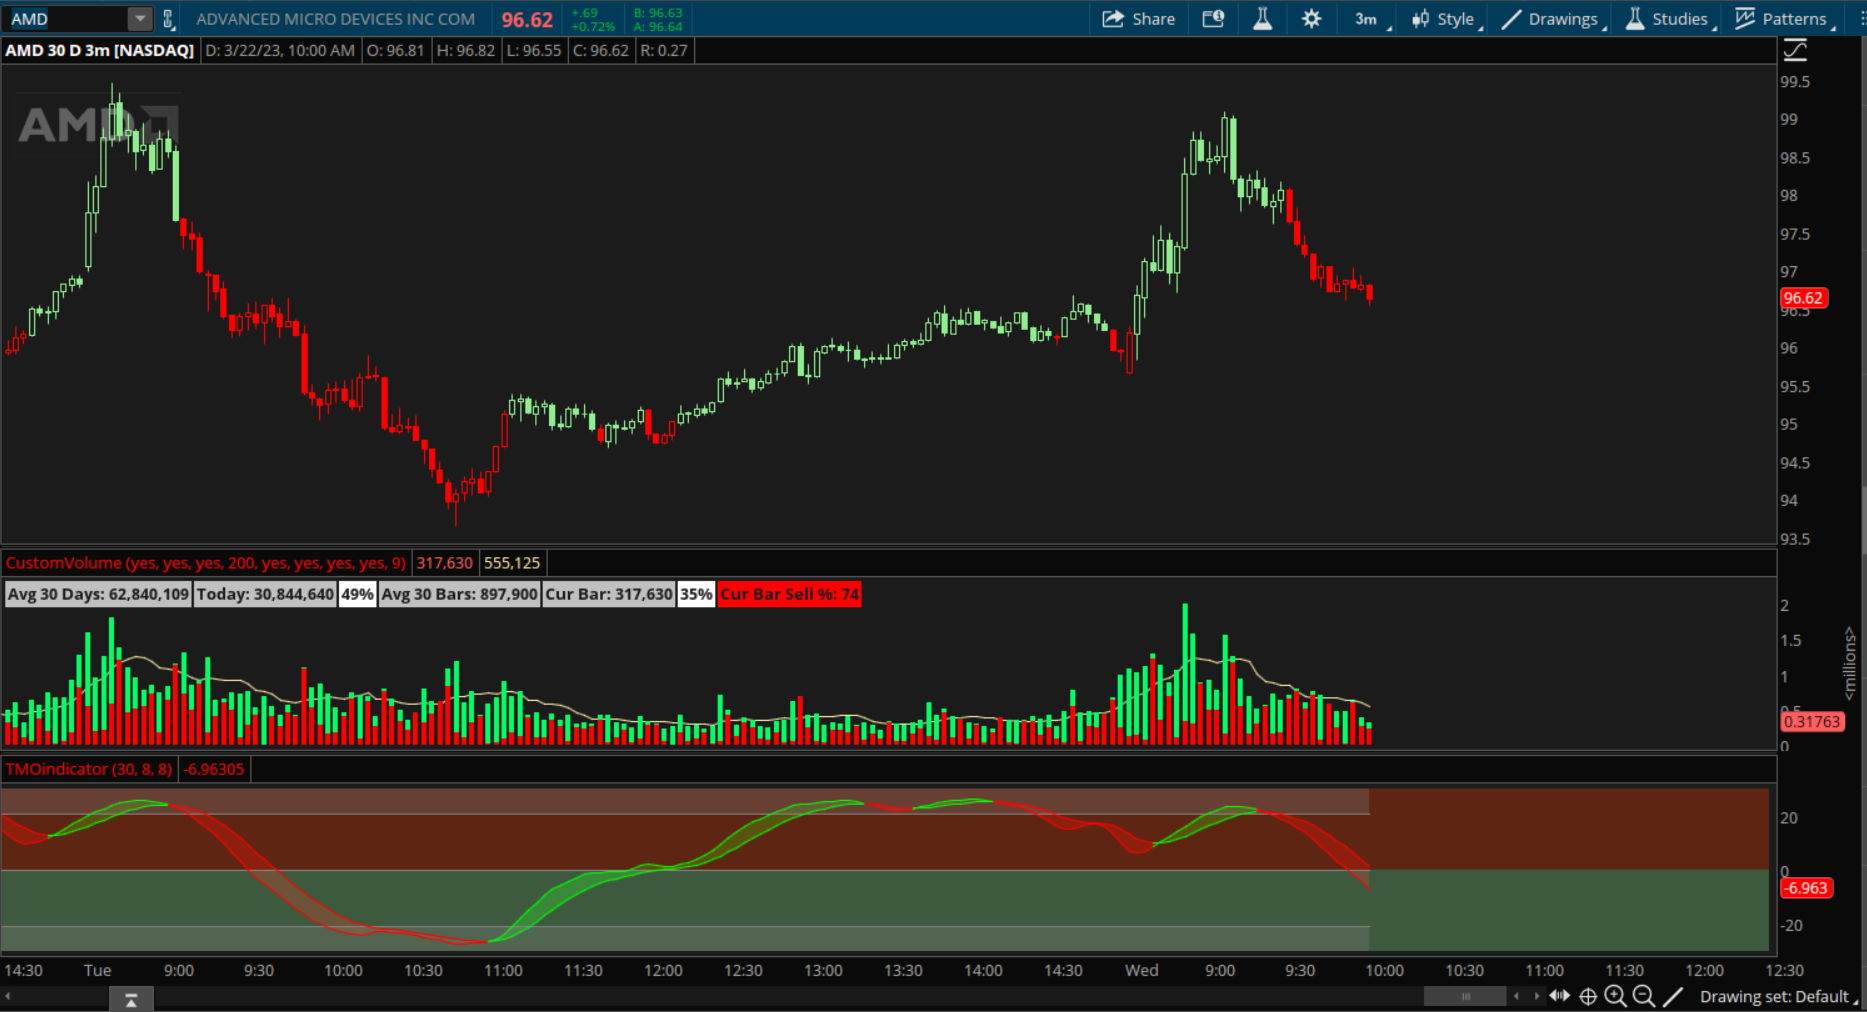
This is how it's supposed to look. Make sure your settings are correct you might have TMO turned on
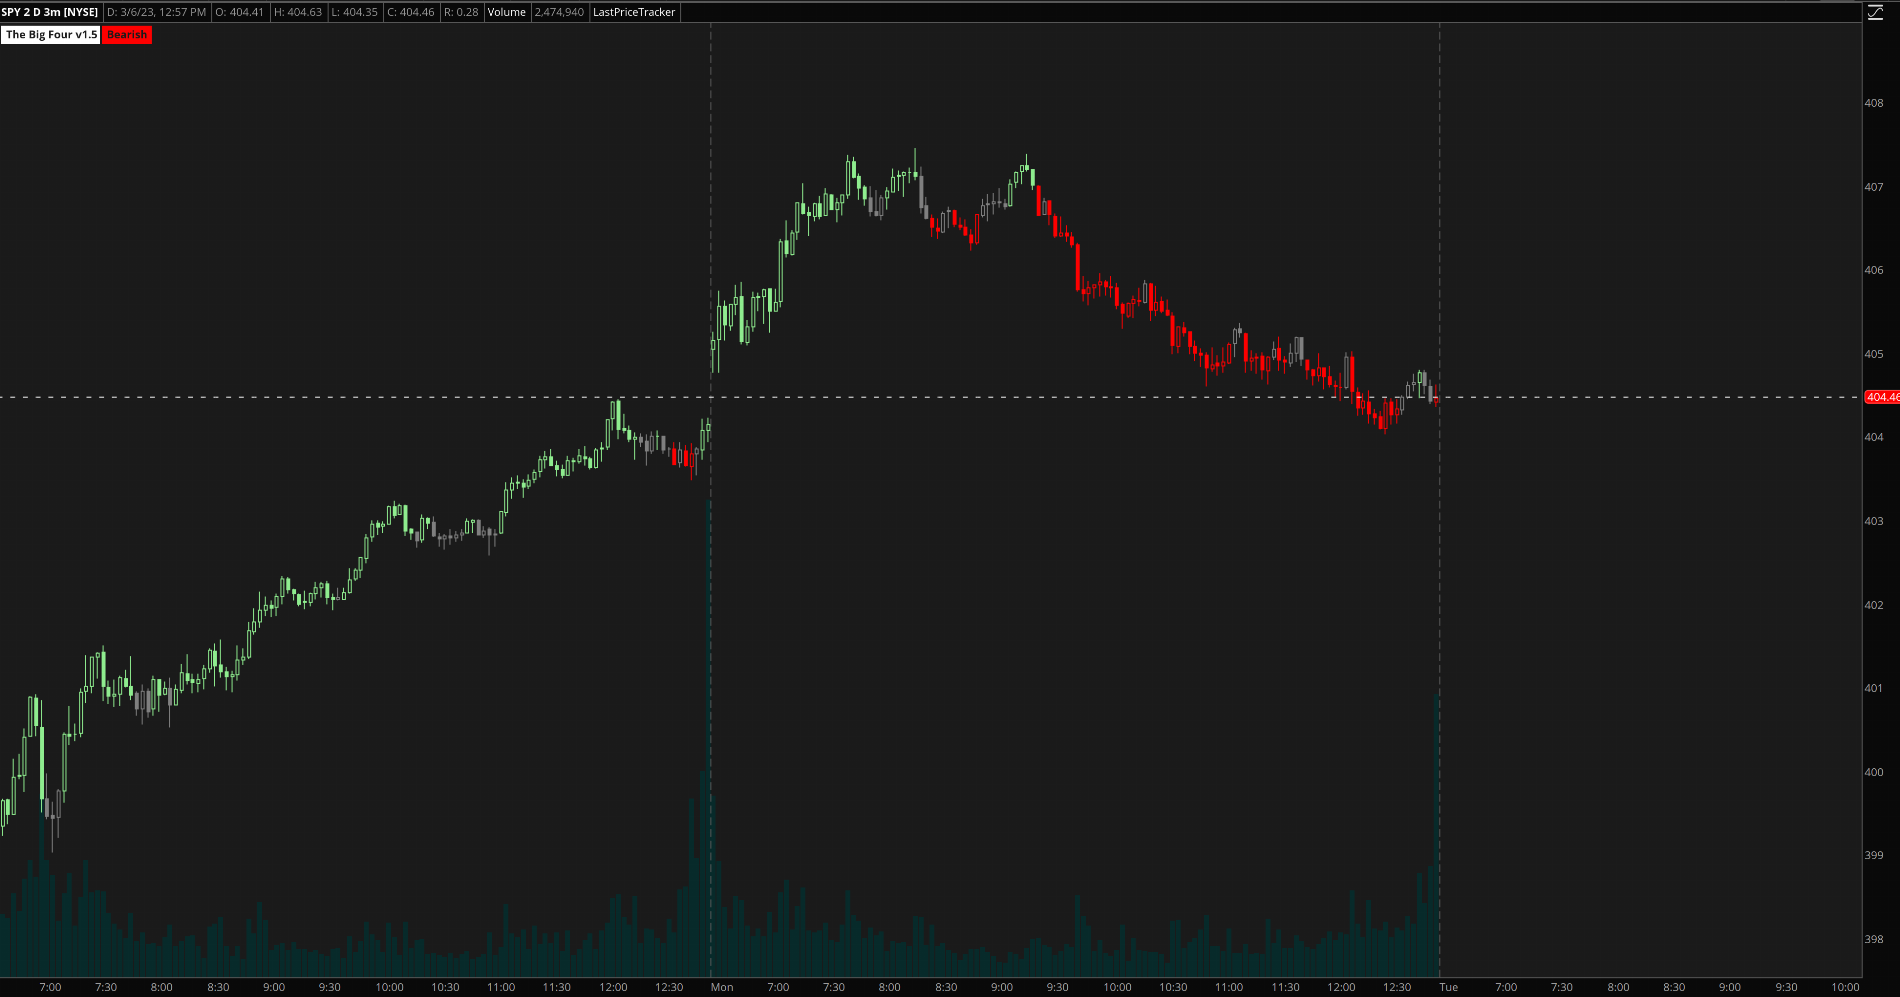
This is very interesting in combination with other indicators....Does this repaint? the up and down arrows.Newest Version v1.5
Here is the latest update. Also added labels.
Code:# The Big Four Indicator # https://usethinkscript.com/threads/the-big-four-chart-setup.14711/ # v1.0 - GiantBull and TradingNumbers # v1.1 - TradingNumbers - hiding vertical lines by ddefault and added arrows # v1.2 - TradingNumbers - added TMO # v1.3 - TradingNumbers - hold trend input added # v1.4 - TradingNumbers - simplified options, added filter with TMO, and set conditions per GianBull parameters # v1.5 - TradingNumbers - removed TMO color filter percentChg GiantBull, added labels # Info Labels input showLabels = yes; AddLabel(showLabels, " The Big Four v1.5 ", Color.WHITE); # AK Trend def aktrend_input1 = 3; def aktrend_input2 = 8; def aktrend_price = close; def aktrend_fastmaa = MovAvgExponential(aktrend_price, aktrend_input1); def aktrend_fastmab = MovAvgExponential(aktrend_price, aktrend_input2); def aktrend_bspread = (aktrend_fastmaa - aktrend_fastmab) * 1.001; def cond1_UP = if aktrend_bspread > 0 then 1 else 0; def cond1_DN = if aktrend_bspread <= 0 then -1 else 0; # ZSCORE def zscore_price = close; def zscore_length = 20; def zscore_ZavgLength = 20; def zscore_oneSD = StDev(zscore_price, zscore_length); def zscore_avgClose = SimpleMovingAvg(zscore_price, zscore_length); def zscore_ofoneSD = zscore_oneSD * zscore_price[1]; def zscore_Zscorevalue = ((zscore_price - zscore_avgClose) / zscore_oneSD); def zscore_avgZv = Average(zscore_Zscorevalue, 20); def zscore_Zscore = ((zscore_price - zscore_avgClose) / zscore_oneSD); def zscore_avgZscore = Average(zscore_Zscorevalue, zscore_ZavgLength); def cond2_UP = if zscore_Zscore > 0 then 1 else 0; def cond2_DN = if zscore_Zscore <= 0 then -1 else 0; # Ehlers def ehlers_length = 34; def ehlers_price = (high + low) / 2; def ehlers_coeff = ehlers_length * ehlers_price * ehlers_price - 2 * ehlers_price * Sum(ehlers_price, ehlers_length)[1] + Sum(ehlers_price * ehlers_price, ehlers_length)[1]; def ehlers_Ehlers = Sum(ehlers_coeff * ehlers_price, ehlers_length) / Sum(ehlers_coeff, ehlers_length); def cond3_UP = if close > ehlers_Ehlers then 1 else 0; def cond3_DN = if close <= ehlers_Ehlers then -1 else 0; # Anchored Momentum def amom_src = close; def amom_MomentumPeriod = 10; def amom_SignalPeriod = 8; def amom_SmoothMomentum = no; def amom_SmoothingPeriod = 7; def amom_p = 2 * amom_MomentumPeriod + 1; def amom_t_amom = if amom_SmoothMomentum == yes then ExpAverage(amom_src, amom_SmoothingPeriod) else amom_src; def amom_amom = 100 * ( (amom_t_amom / ( Average(amom_src, amom_p)) - 1)); def amom_amoms = Average(amom_amom, amom_SignalPeriod); def cond4_UP = if amom_amom > 0 then 1 else 0; def cond4_DN = if amom_amom <= 0 then -1 else 0; # TMO def tmo_length = 30; #def 14 def tmo_calcLength = 6; #def 5 def tmo_smoothLength = 6; #def 3 def tmo_data = fold i = 0 to tmo_length with s do s + (if close > GetValue(open, i) then 1 else if close < GetValue(open, i) then - 1 else 0); def tmo_EMA5 = ExpAverage(tmo_data, tmo_calcLength); def tmo_Main = ExpAverage(tmo_EMA5, tmo_smoothLength); def tmo_Signal = ExpAverage(tmo_Main, tmo_smoothLength); def tmo_color = if tmo_Main > tmo_Signal then 1 else -1; def cond5_UP = if tmo_Main <= 0 then 1 else 0; def cond5_DN = if tmo_Main >= 0 then -1 else 0; # Strategy input Strategy_Confirmation_Factor = 4; input Strategy_FilterWithTMO = no; input Strategy_ColoredCandlesOn = yes; input Strategy_VerticalLinesOn = no; input Strategy_HoldTrend = yes; def cond_UP = cond1_UP + cond2_UP + cond3_UP + cond4_UP; def cond_DN = cond1_DN + cond2_DN + cond3_DN + cond4_DN; def direction = if cond_UP >= Strategy_Confirmation_Factor and (!Strategy_FilterWithTMO or cond5_UP) then 1 else if cond_DN <= -Strategy_Confirmation_Factor and (!Strategy_FilterWithTMO or cond5_DN) then -1 else if !Strategy_HoldTrend and direction[1] == 1 and cond_UP < Strategy_Confirmation_Factor and cond_DN > -Strategy_Confirmation_Factor then 0 else if !Strategy_HoldTrend and direction[1] == -1 and cond_DN > -Strategy_Confirmation_Factor and cond_UP < Strategy_Confirmation_Factor then 0 else direction[1]; plot signal_up = direction == 1 and direction[1] < 1; signal_up.SetPaintingStrategy(PaintingStrategy.BOOLEAN_ARROW_UP); signal_up.SetDefaultColor(Color.WHITE); signal_up.Hide(); signal_up.HideBubble(); signal_up.HideTitle(); plot signal_dn = direction == -1 and direction[1] > -1; signal_dn.SetPaintingStrategy(PaintingStrategy.BOOLEAN_ARROW_DOWN); signal_dn.SetDefaultColor(Color.WHITE); signal_dn.Hide(); signal_dn.HideBubble(); signal_dn.HideTitle(); AssignPriceColor(if Strategy_ColoredCandlesOn then if direction == 1 then Color.LIGHT_GREEN else if direction == -1 then Color.RED else Color.GRAY else Color.CURRENT); AddLabel(showLabels, if Strategy_ColoredCandlesOn then if direction == 1 then " Bullish " else if direction == -1 then " Bearish " else " Neutral " else " N/A ", if Strategy_ColoredCandlesOn then if direction == 1 then Color.LIGHT_GREEN else if direction == -1 then Color.RED else Color.GRAY else Color.BLACK); AddVerticalLine(Strategy_VerticalLinesOn and signal_up, "Buy", Color.LIGHT_GREEN); AddVerticalLine(Strategy_VerticalLinesOn and signal_dn, "Sell", Color.RED); Alert(signal_up[1], "Buy", Alert.BAR, Sound.DING); Alert(signal_dn[1], "Sell", Alert.BAR, Sound.DING);
@kelhamawy It shouldn't repaint. Just wait for the candle to close for confirmation.
TigerWares
New member
HOLY CRAP!!! LOL, reminds me of that meme@GiantBull @TradingNumbers
Very nice indicator. The first indicator I have come across in a long time that I added to my trading chart. I also trade SPY options with price action and S/R levels that have proven their usefulness over time. With some modifications to the code to use both signals with and without consideration of TMO, I am really liking what I see.
Great work.
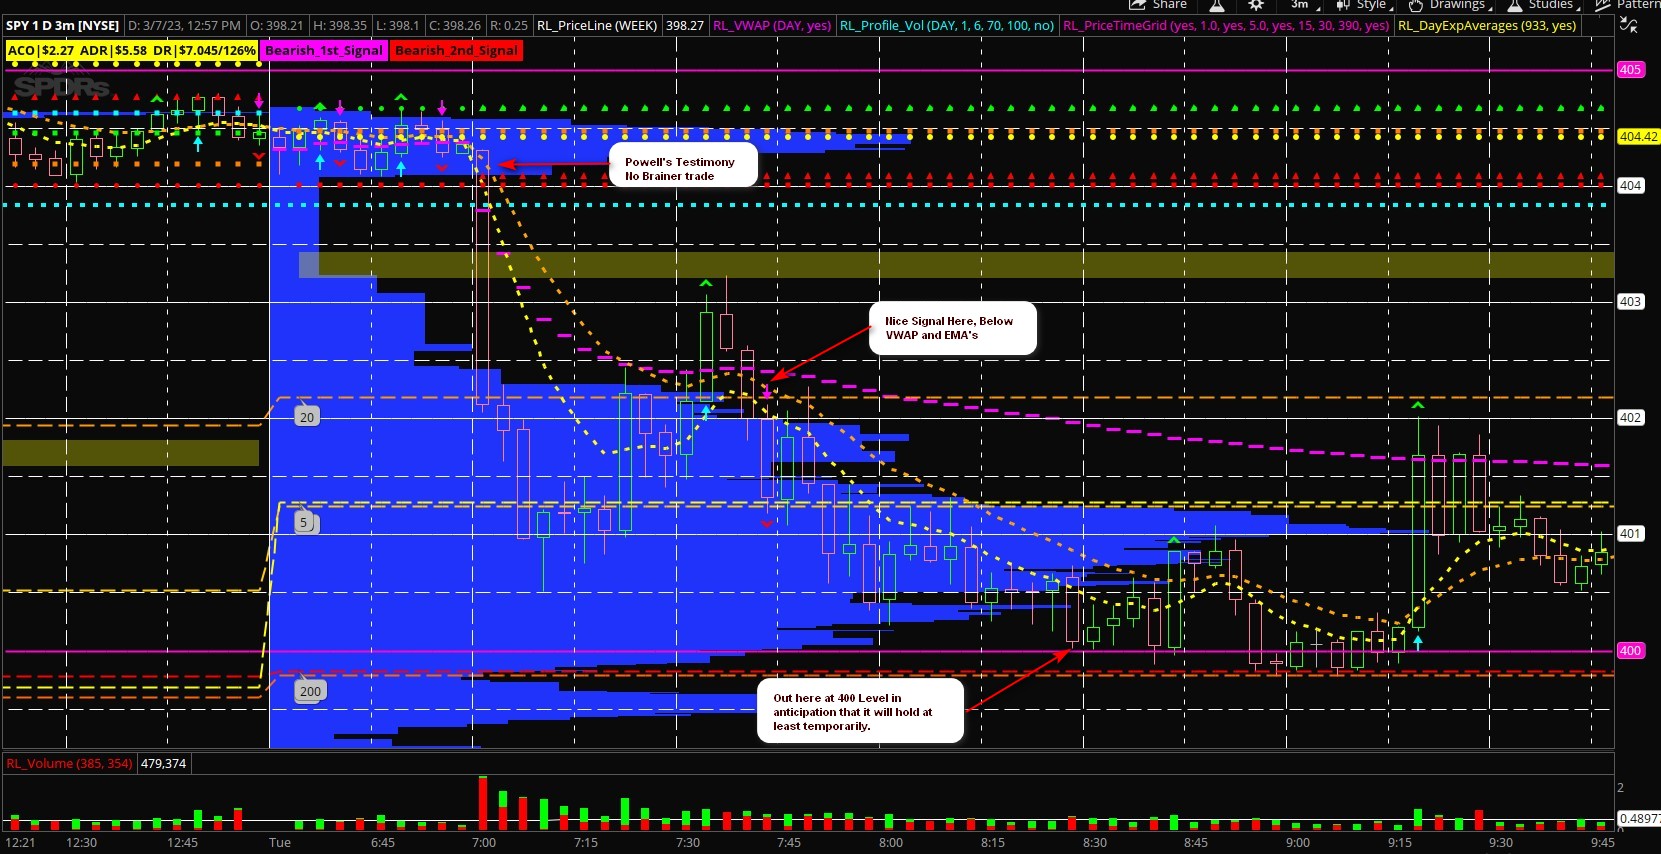
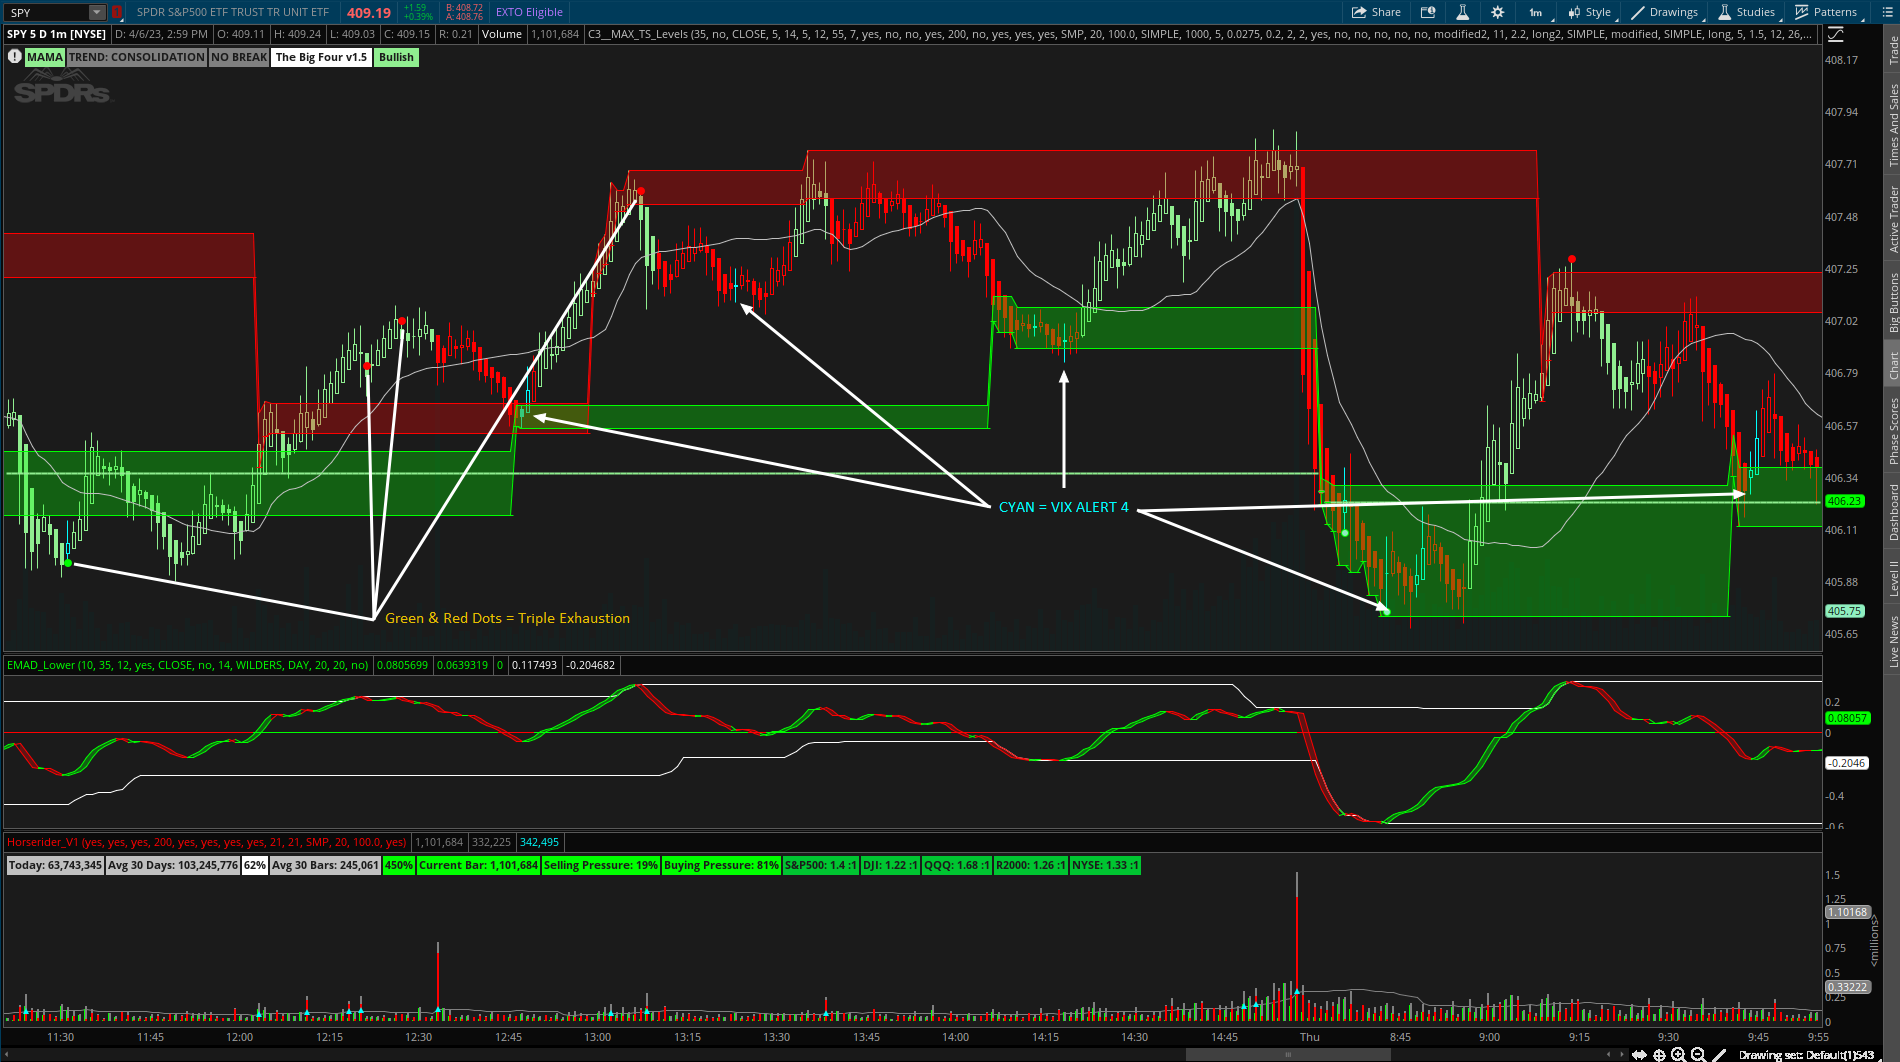
@jrock8903 - I added Vix Alert 4 to the Big four the study with the levels (C3_Max_Spark) contains the Triple_Exhaustion indication (dots) and can be turned off. Also included a less involved version with the Bull Bear Last Stand levels study. (no repaint)
Style with studies (with C3_Max_Spark): http://tos.mx/oCvX58m
/ES
SPY (AH off)
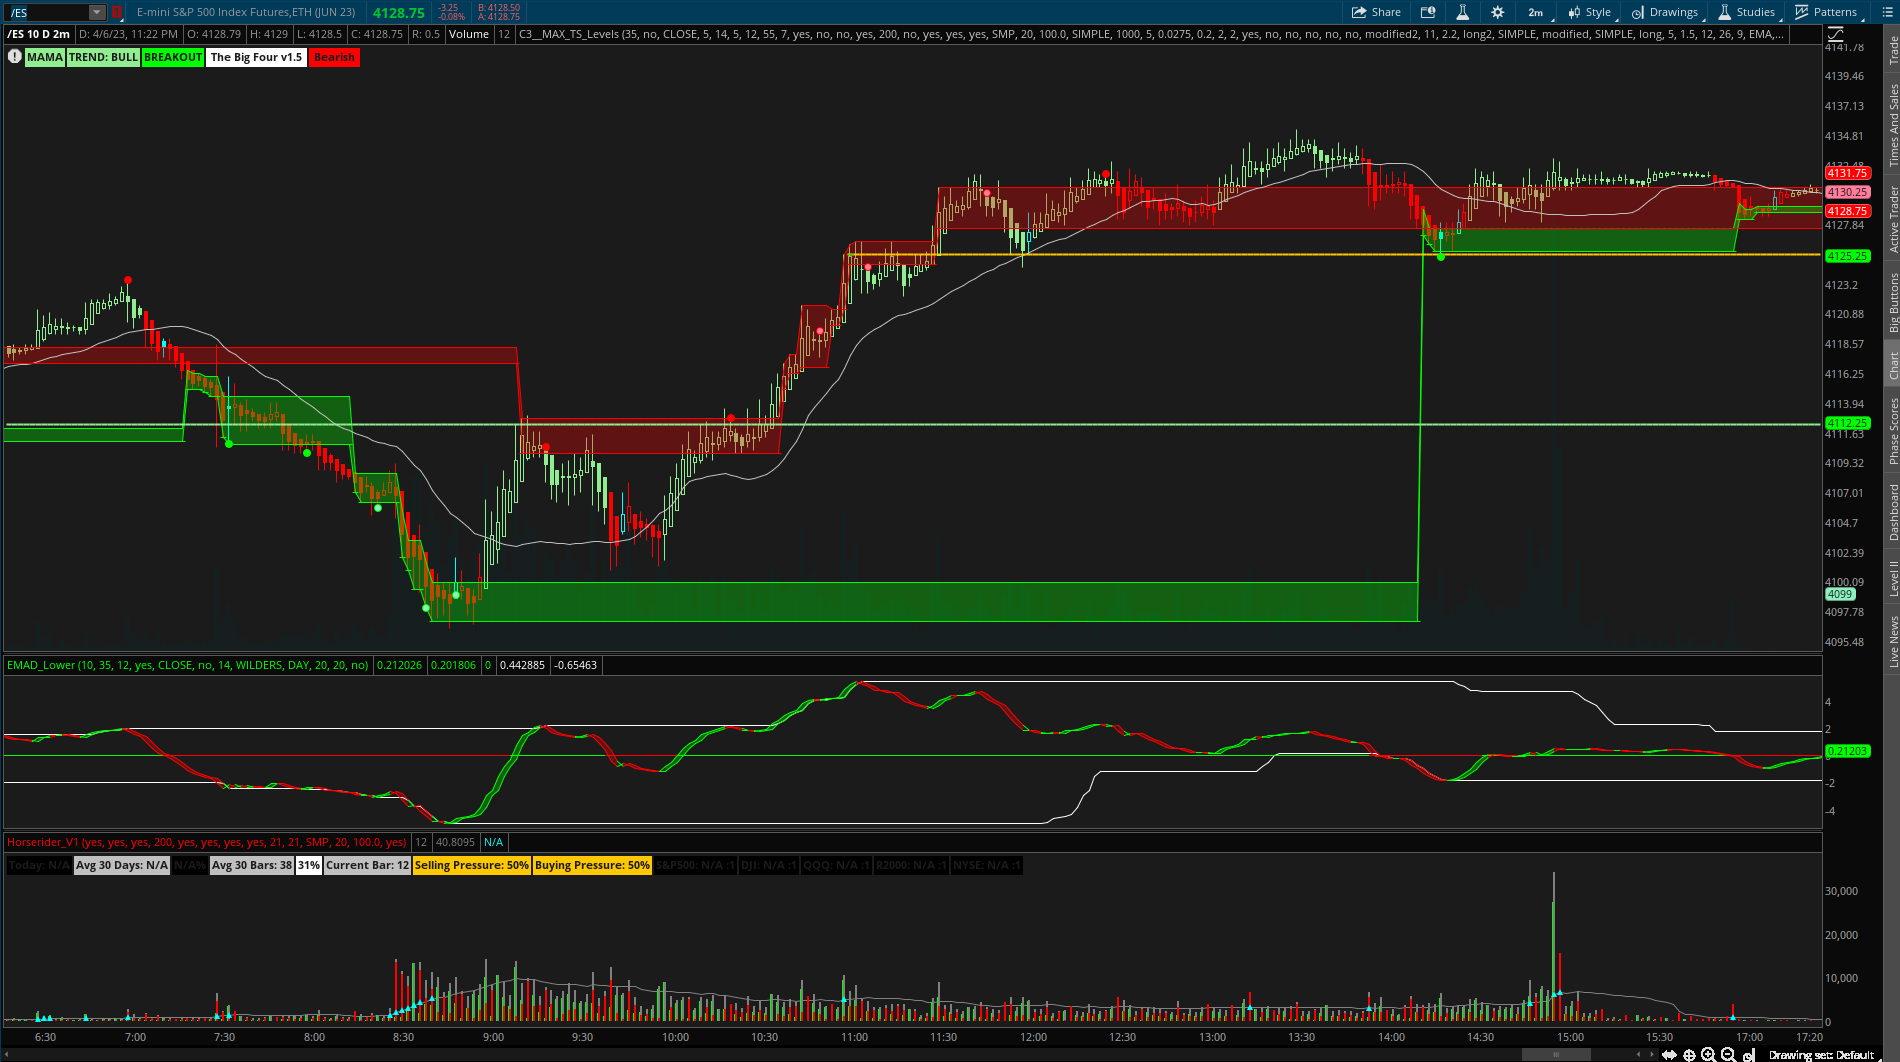
Style with studies (with Bull_Bear_Last_Stand): http://tos.mx/UvSjhZX
Last Stand Levels
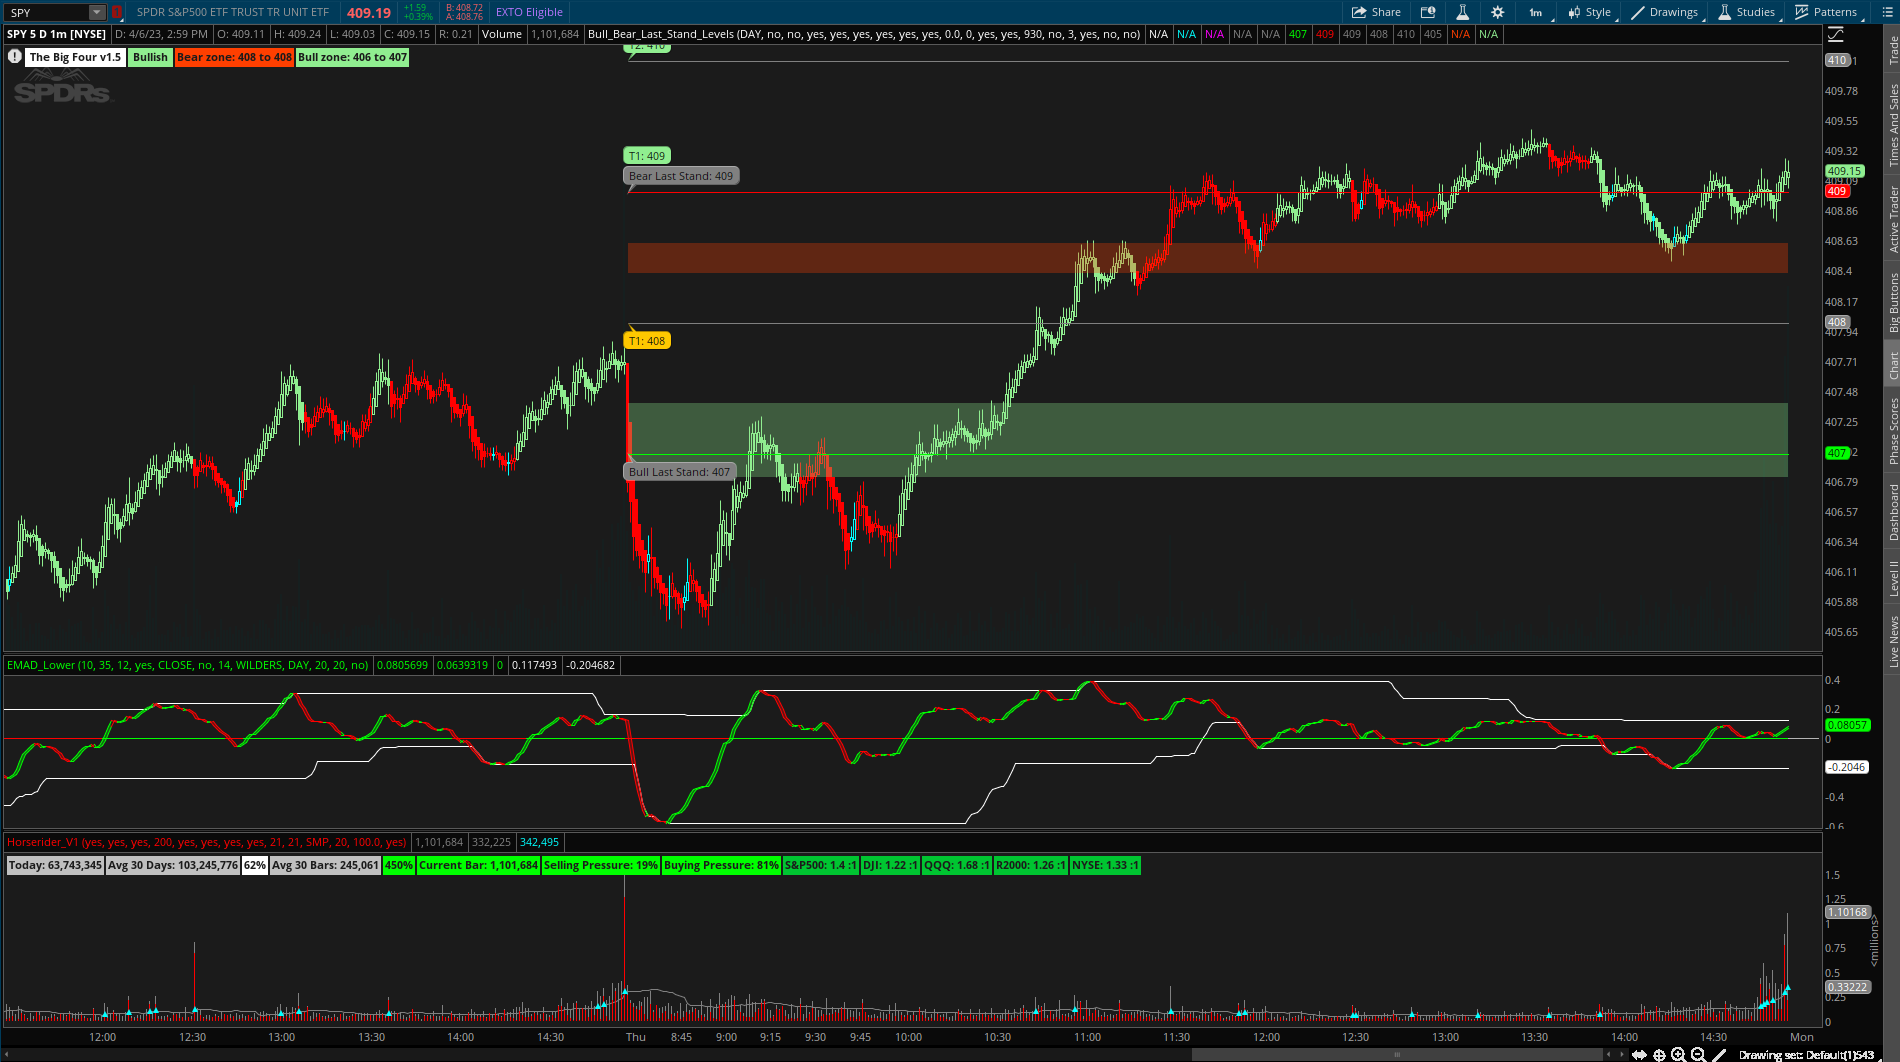
Style with studies (with C3_Max_Spark): http://tos.mx/oCvX58m
/ES
SPY (AH off)
Style with studies (with Bull_Bear_Last_Stand): http://tos.mx/UvSjhZX
Last Stand Levels
What leverage and lot size you have used?I can't remember, if the ak trend is on that thread.
Links for the 4 indicators:
Anchored Momentum: https://tos.mx/buzNdWK
AK trend: https://tos.mx/ymhoN5R
Zscore indicator: https://tos.mx/ibBpRr6
Ehlers: https://tos.mx/14yaHql
I forgot to mention that I trade on a 3 min chart and I only trade SPY. The important part is to figure out when a trend has exhausted itself. I use a combo of support and resistance and also the TMO. Whenever it is overbought or oversold, I wait for price to reach a near-term resistance/support area and then watch for a buy/sell signal from the 4 indicators. If 3 out of the 4 indicators have fired a signal I am in the trade. I have tested about almost every indicator that has been posted on this website and I find these 4 to be pretty powerful when used together. I know there's many coders who have posted multiple indicators in one study such as the confirmation candles or the CSA indicators but unfortunately, I couldn't make money off of those.
I have been on this website for about a year now have successfully made $10,000 only last month starting my account from $1,500 using 4 indicators posted on here. I call them the big 4. Ehlers, anchored momentum, ak trend, and zscore. My strategy is simple. I wait until 3 out 4 of the indicators are either bullish or bearish to take on a trade. Over the years I have used other indicators as well but lost.
Shared Chart Link: http://tos.mx/M3STTOx Click here for --> Easiest way to load shared links
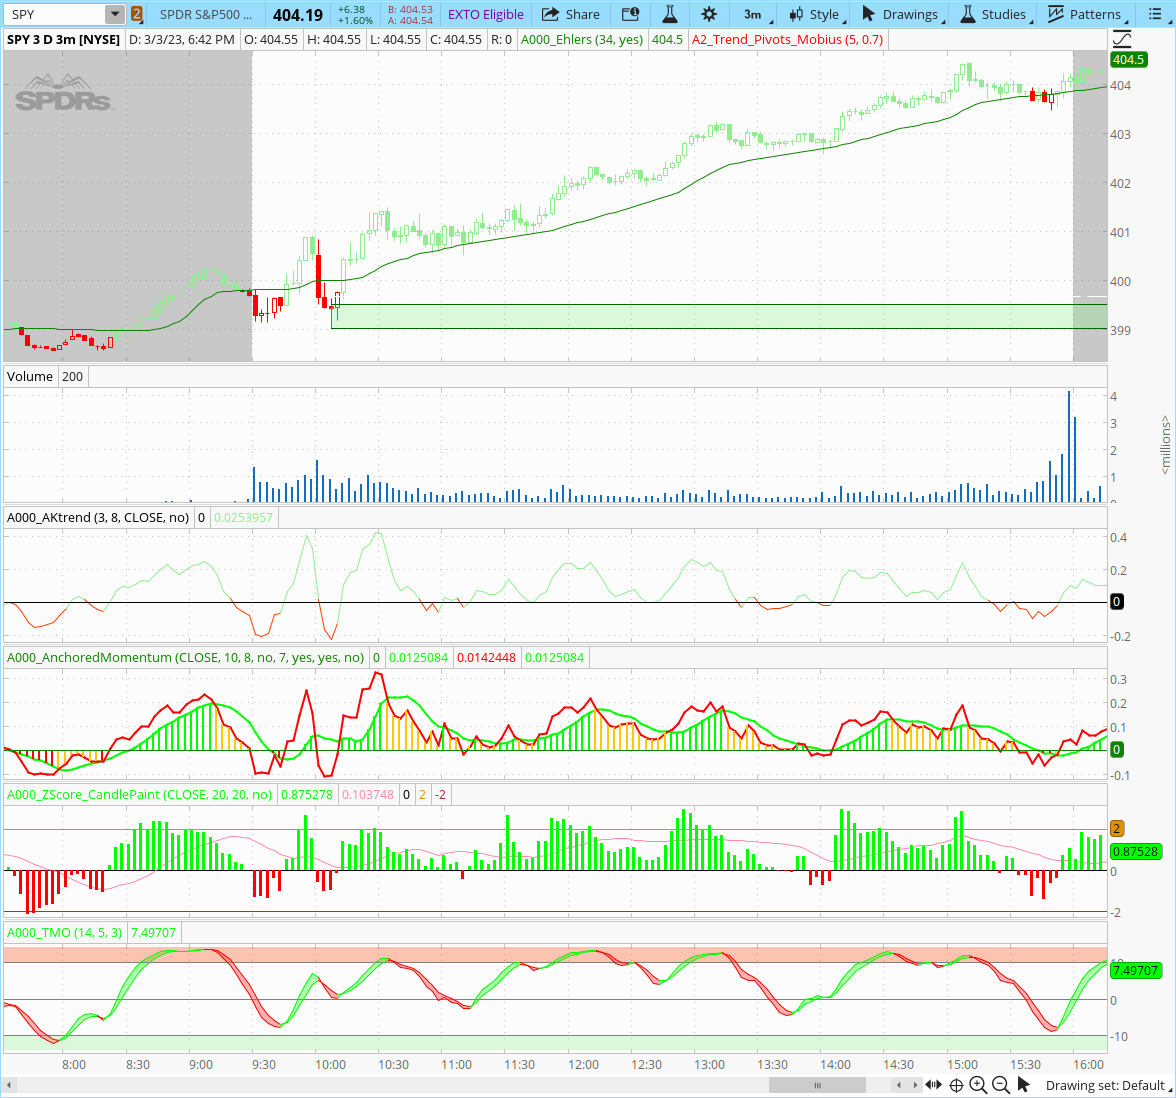
Good people... Hell may freeze over soon... I THINK I may put the official seal of approval on The BIG FOUR (+2) indicator... which is essentially meaningless... but oh well.
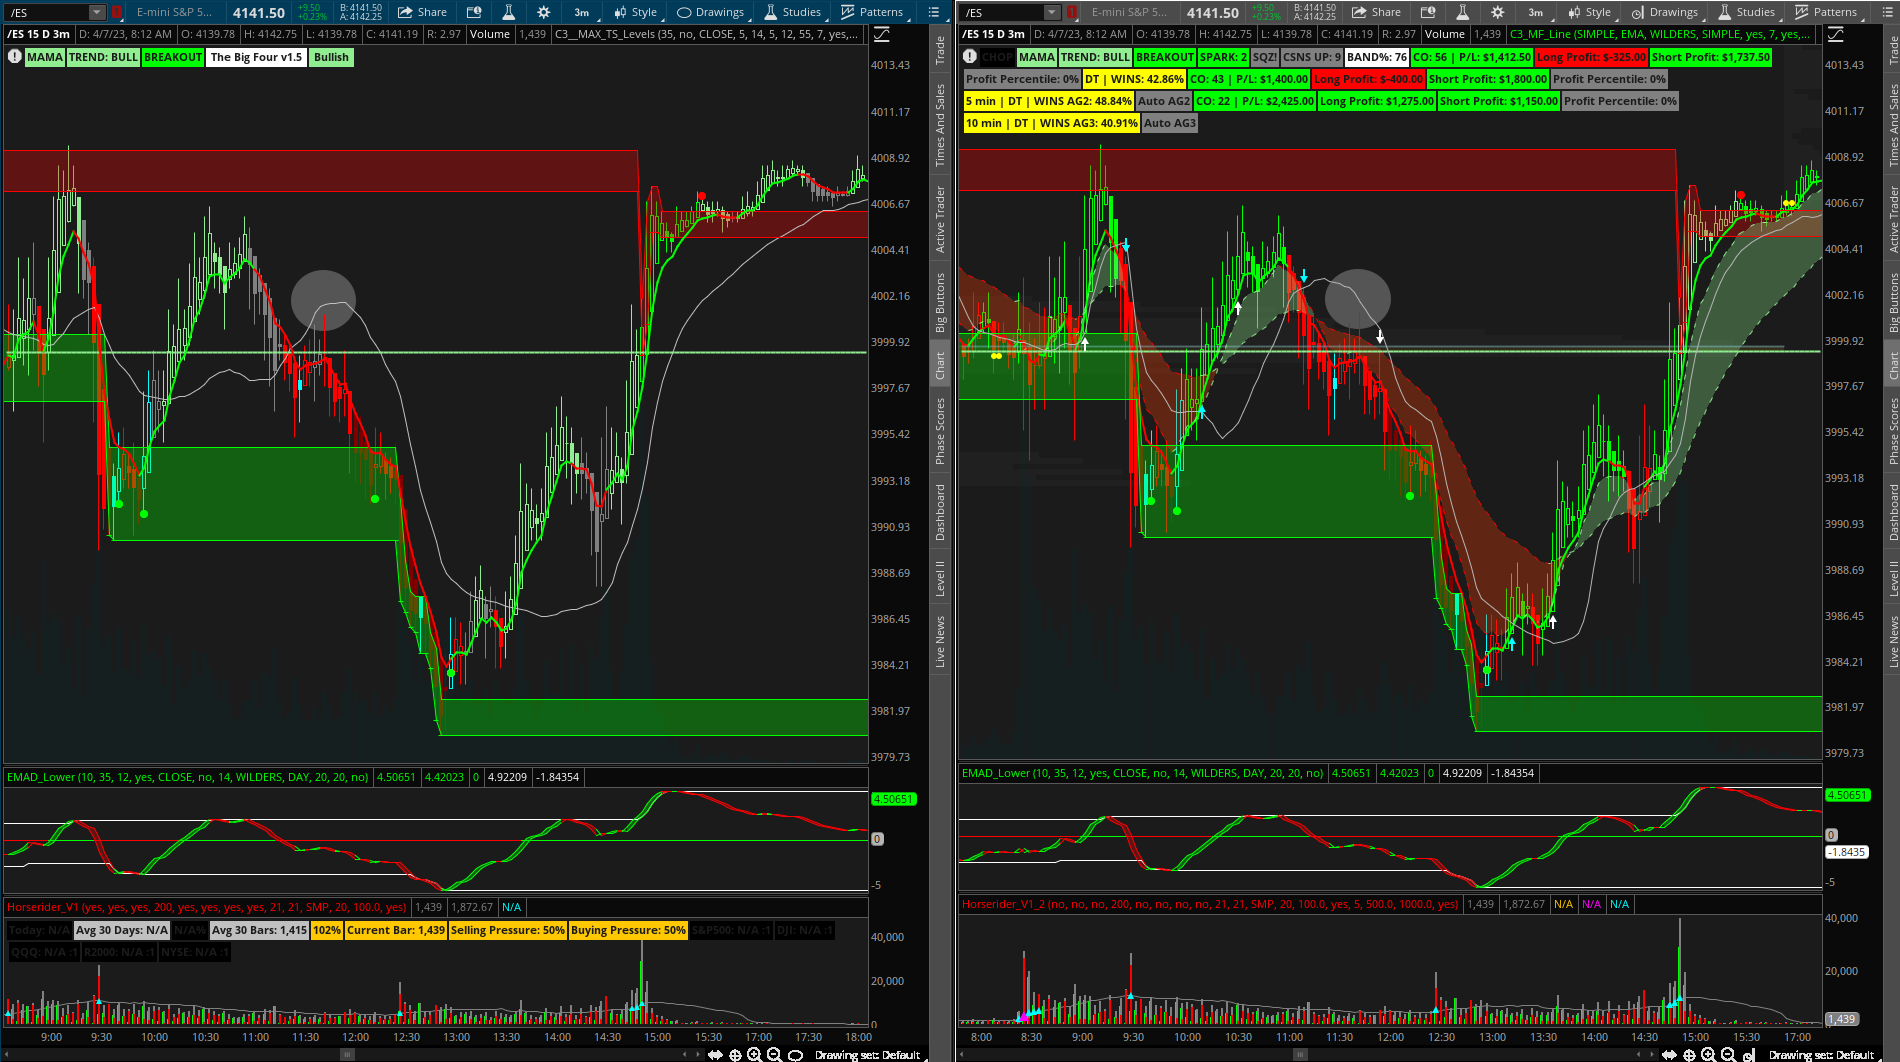
The big four is very similar to triple exhaustion but I like this more (that being said I added triple exhaustion candles and dots to the big four (hence the (+2) it also does not re paint and can help indicate when to exit or risk off) I have been using it with "hold trend" set to off as the grey candles are useful in that they seem helpful in identifying pullbacks leading to (possible) trend continuation (of course I have not watched it live but will report back)
My go to has been Bull_Bear_V5 (to paint candles)(which I combined vix4 and triple exhaustion with) however it uses two aggregations (but is still very good and meant to relate a longer term trend - though it works extremely well with lower time frames)
Anyway, A damn fine job on this indicator.
Good Day.
http://tos.mx/osLxEBO (the left hand chart style)
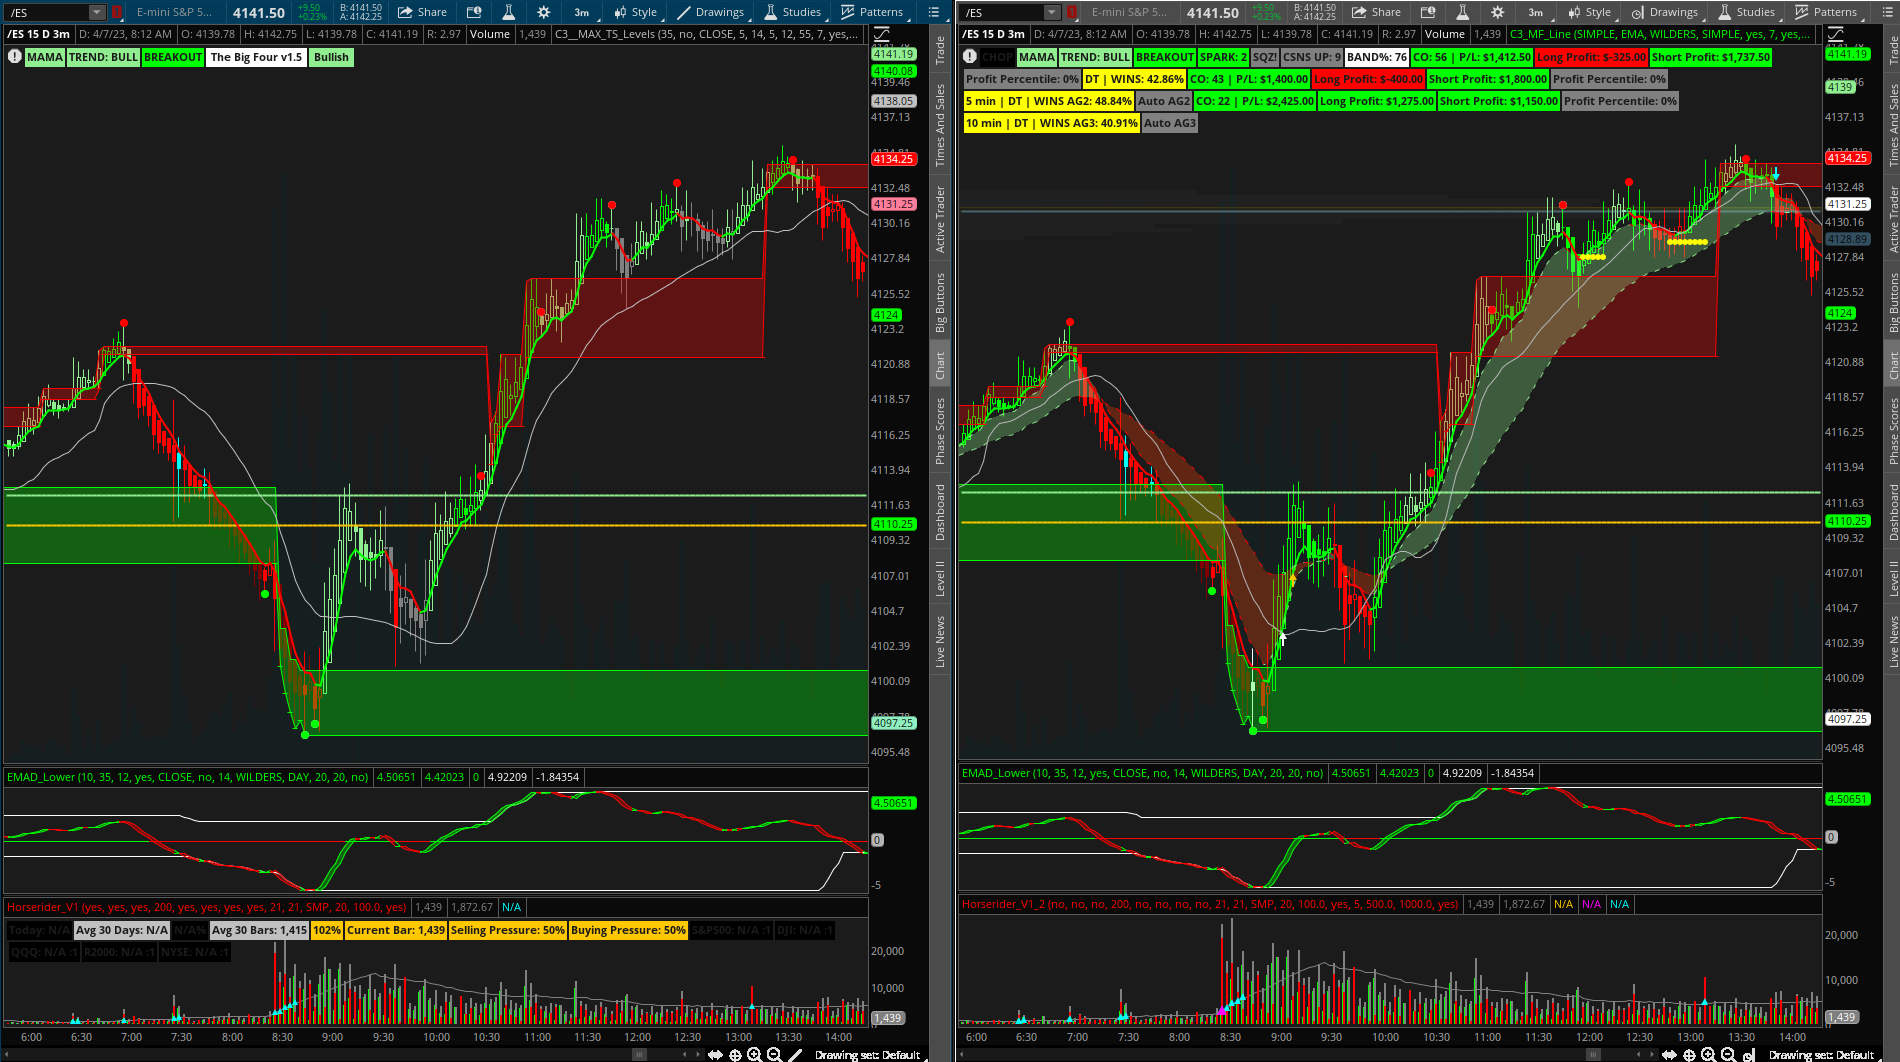
Last edited:
Approval granted.
The Big Four + 2 Study: http://tos.mx/jVUIwUx (the two additions are triple exhaustion (dark red candles and green candles) and vix alert 4 (cyan candles) (big four candles still light green gray and red)(settings TMO filter off - Hold trend off)
(drawings on chart not related)
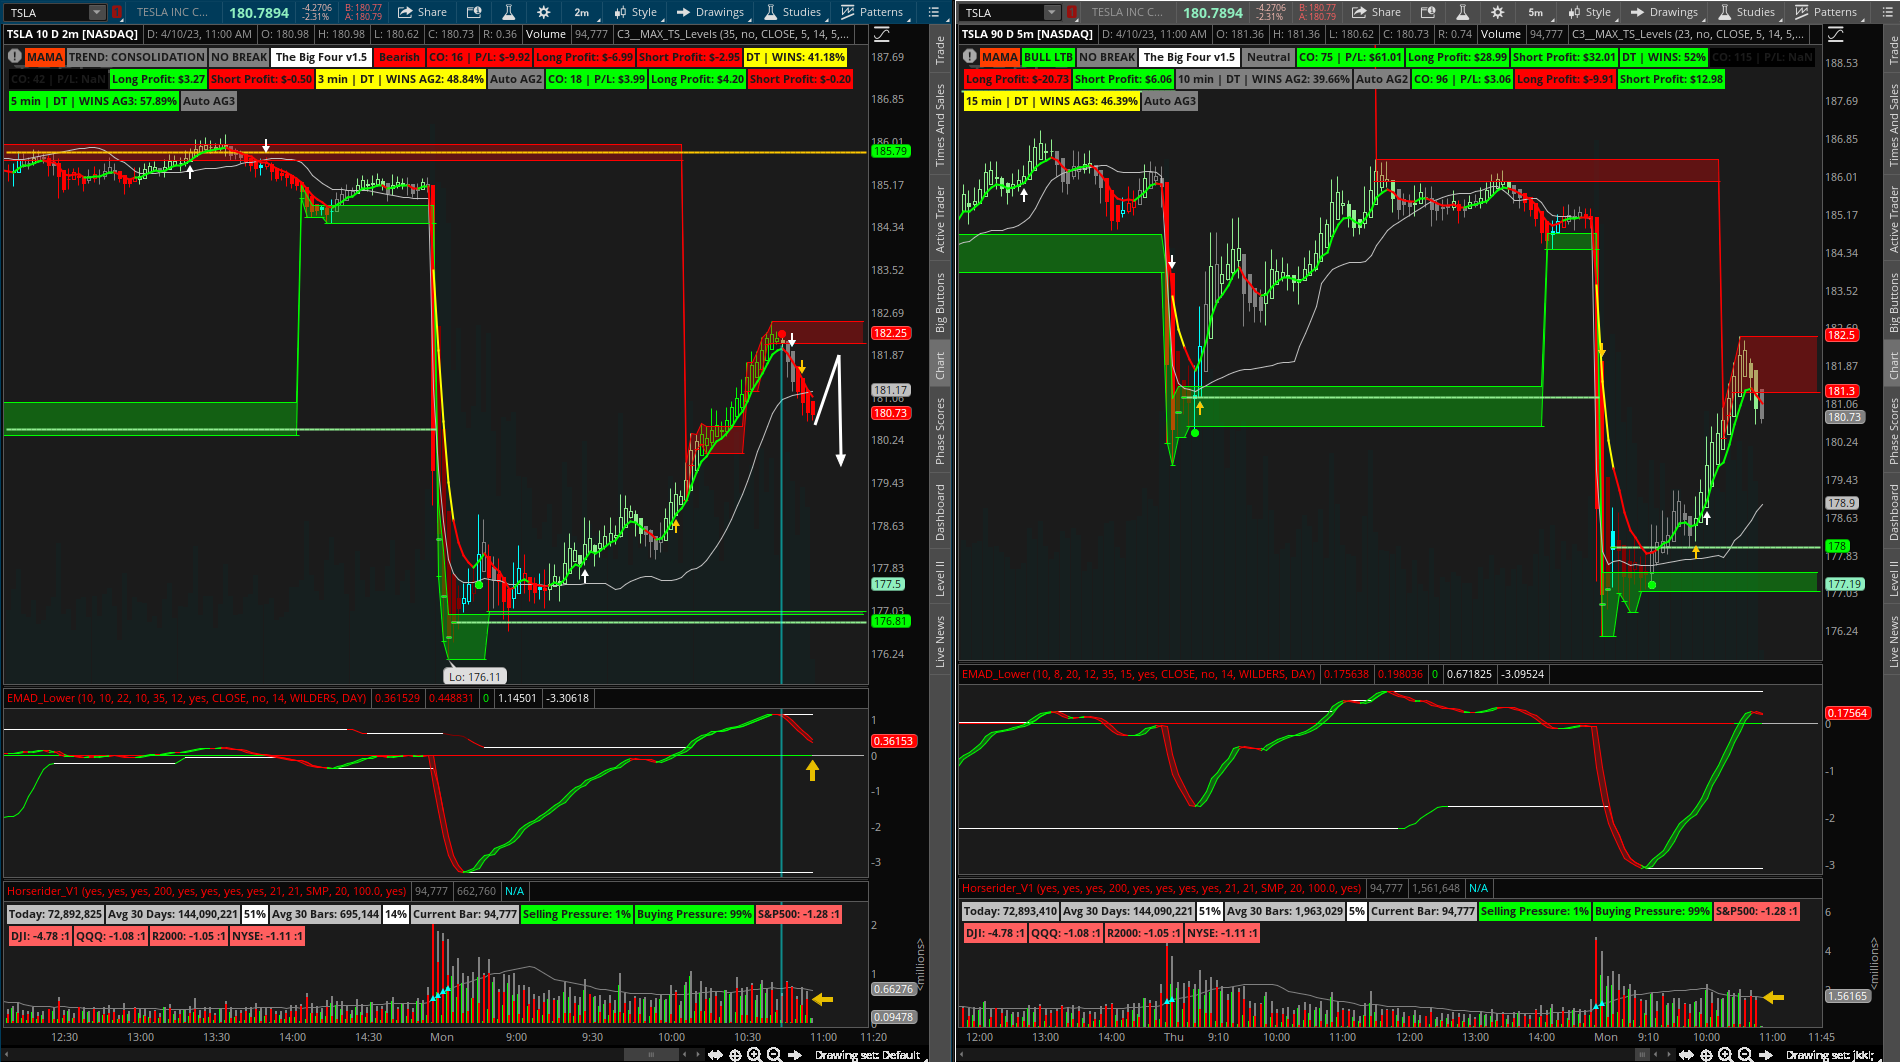
The Big Four + 2 Study: http://tos.mx/jVUIwUx (the two additions are triple exhaustion (dark red candles and green candles) and vix alert 4 (cyan candles) (big four candles still light green gray and red)(settings TMO filter off - Hold trend off)
(drawings on chart not related)
Last edited:
@HODL-Lay-HE-hoo! Are you scanning a watchlist for setups on this or was that just noticed after the fact. After a brief look, it appears the gold arrows seem to appear on many of the longer trends. But it was darn good on TSLA today. I can generally watch one or two, but would like to alert on about a dozen tickers. My thoughts are alert on the white on 2 minute, wait for gold and or confirm on longer time frame. Still looking at different options for entry criteria, but a white arrow followed by a gold arrow within 3 bars seems to work out well, need to do some more validation.
Last edited:
@HODL-Lay-HE-hoo! Are you entering a trade when the candle change colors based on the criteria of the big 4 or the cyan candles that go off of the triple exhaustion? Can you please also explain how you are incorporating the other indicators you have added on?
@GiantBull - Yes I will explain - I enter using a few different methods a key component of that method being the C3_Max_Spark study that plots the levels and whatnot… (Just mentioning that because I am not sure if you meant the indicators I added to just the Big 4 or the whole chart)
The short answer to your question is no. Any number of combinations of the End All Be All set of indicators I shared can be used to make a high probability trade. I will post some with the new setup linked above explaining the need to know and entry methods in short order.
@jrock8903 - Well... you know what they say... "if you werent thinkin you wouldnta' thought that" (its from the movie Sandlot...) joking... Anyway... not really - I have a watchlist but generally keeping an on it just gets in the way. I just go through them and look at the daily - weekly during afterhours and go from there. I usually stick to SPY TSLA NVDA COIN MU AAPL - the first two for the most part - whichever has the easiest chart to read is the one I choose.
Will update with the screenshots.
Will post others as I finish them
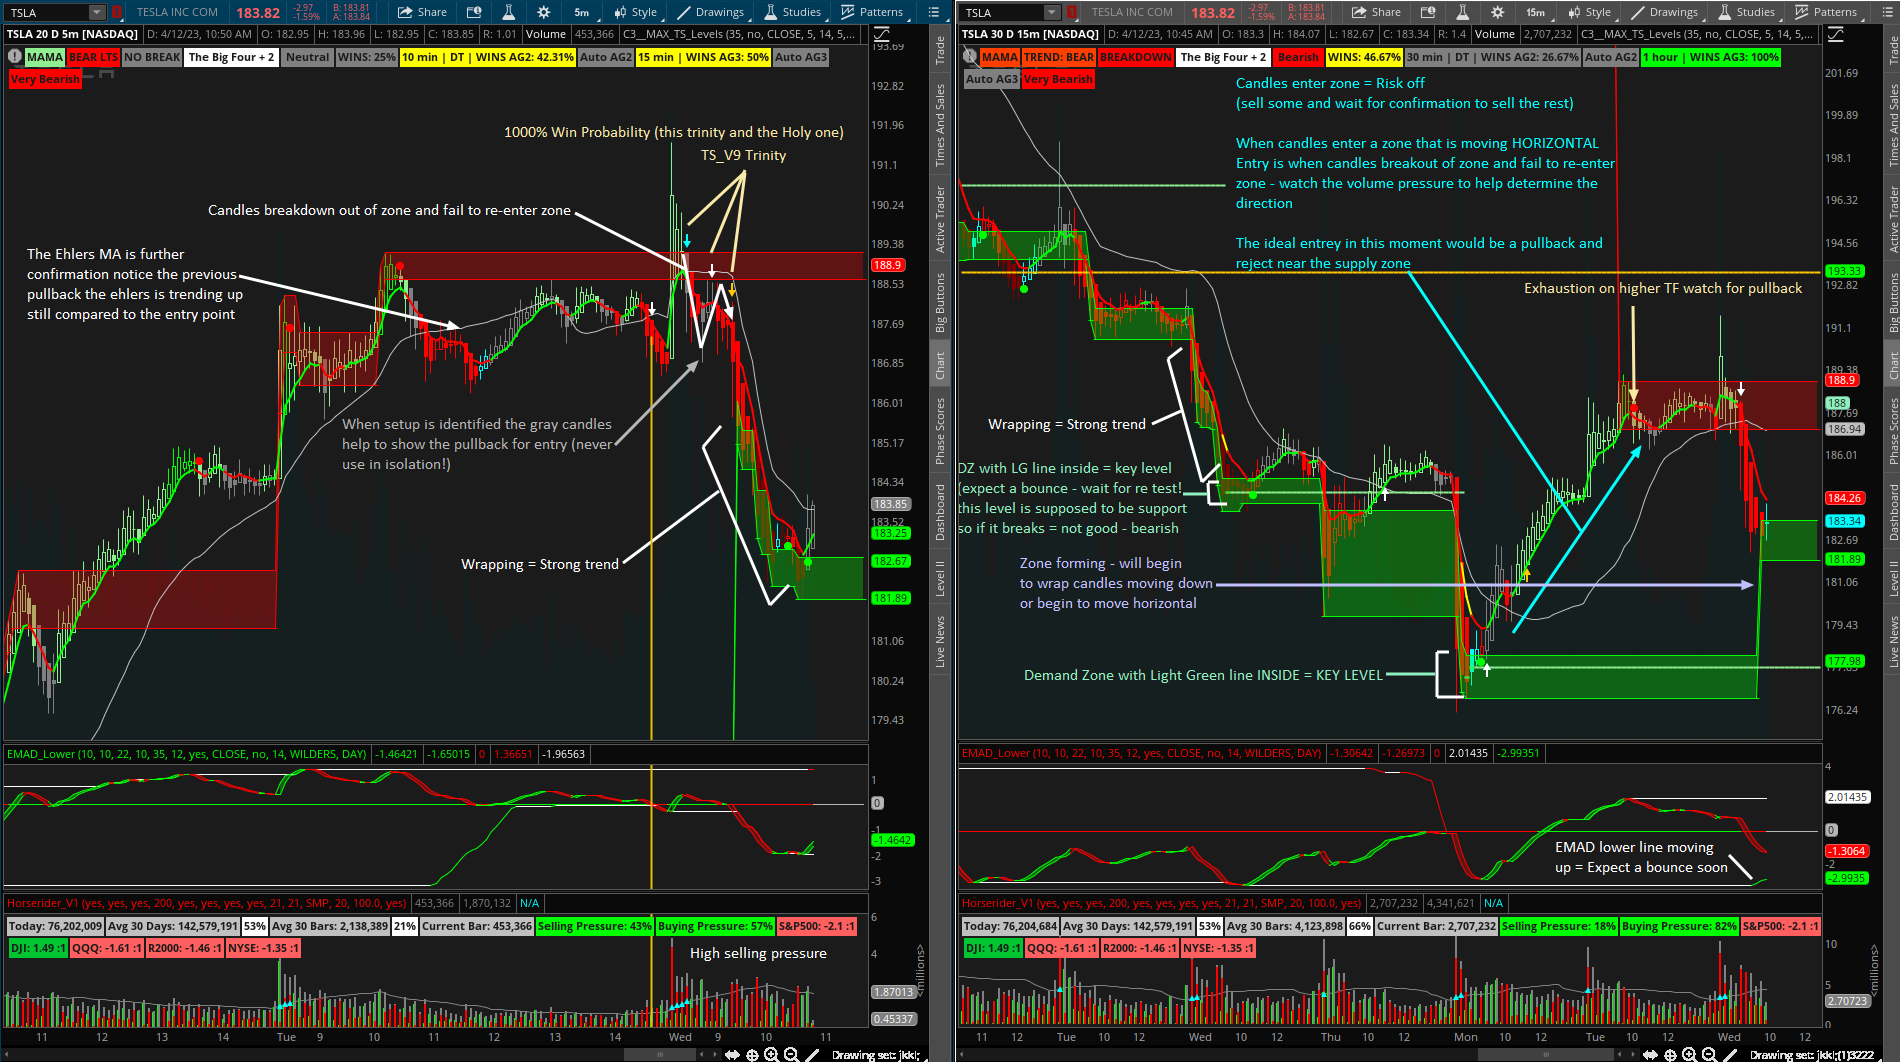
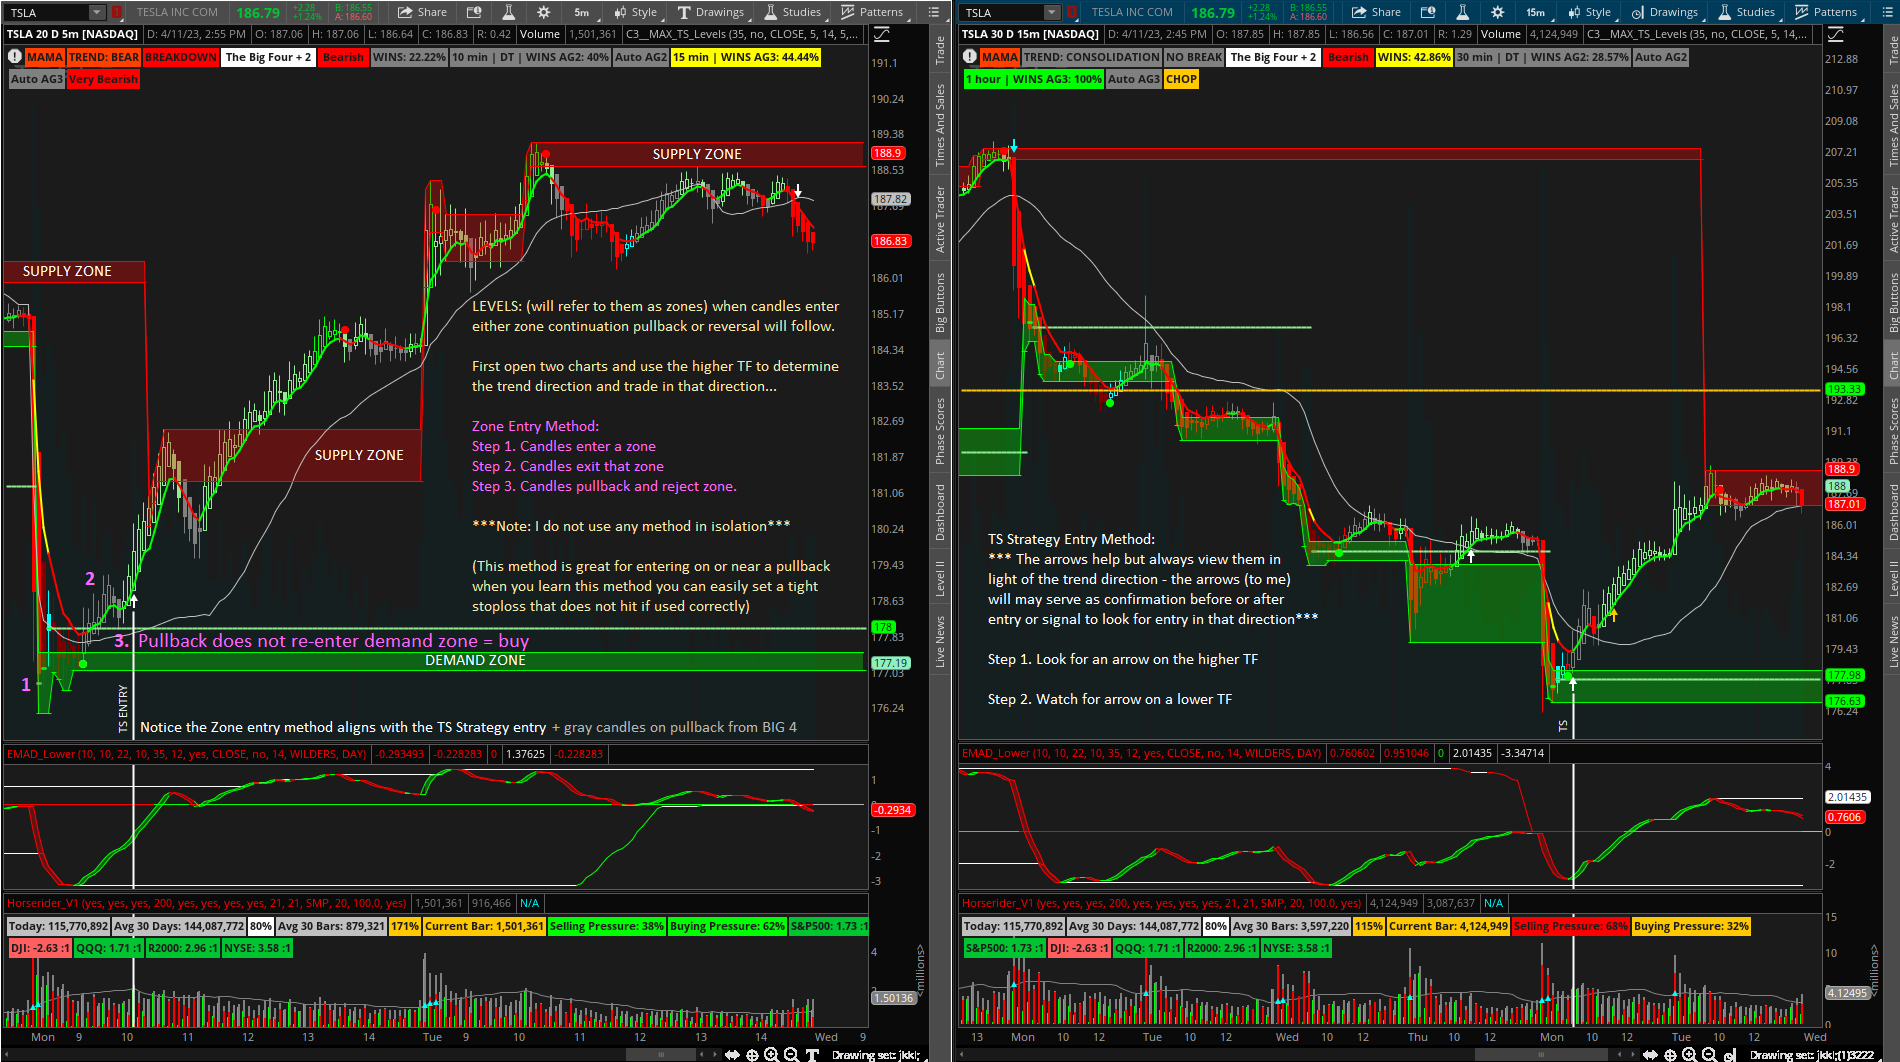
From older post (does not have Big 4 but explains the others)
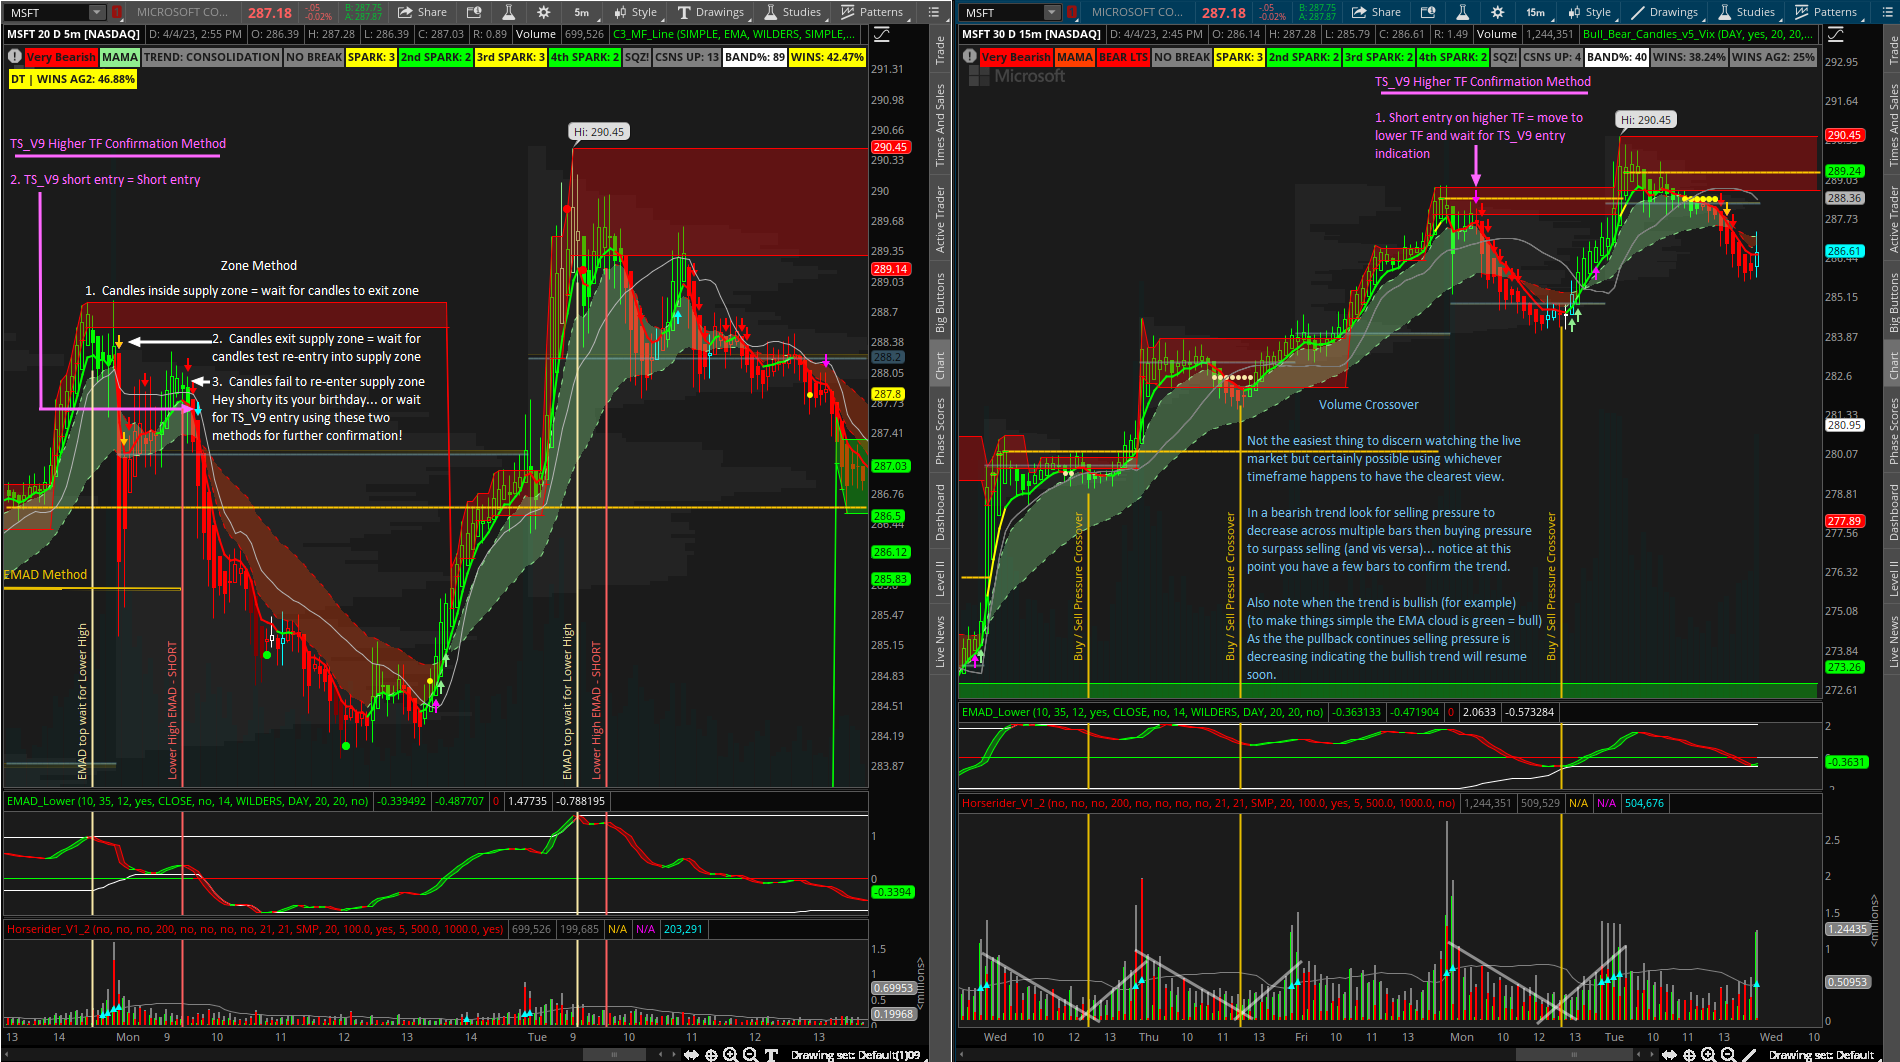
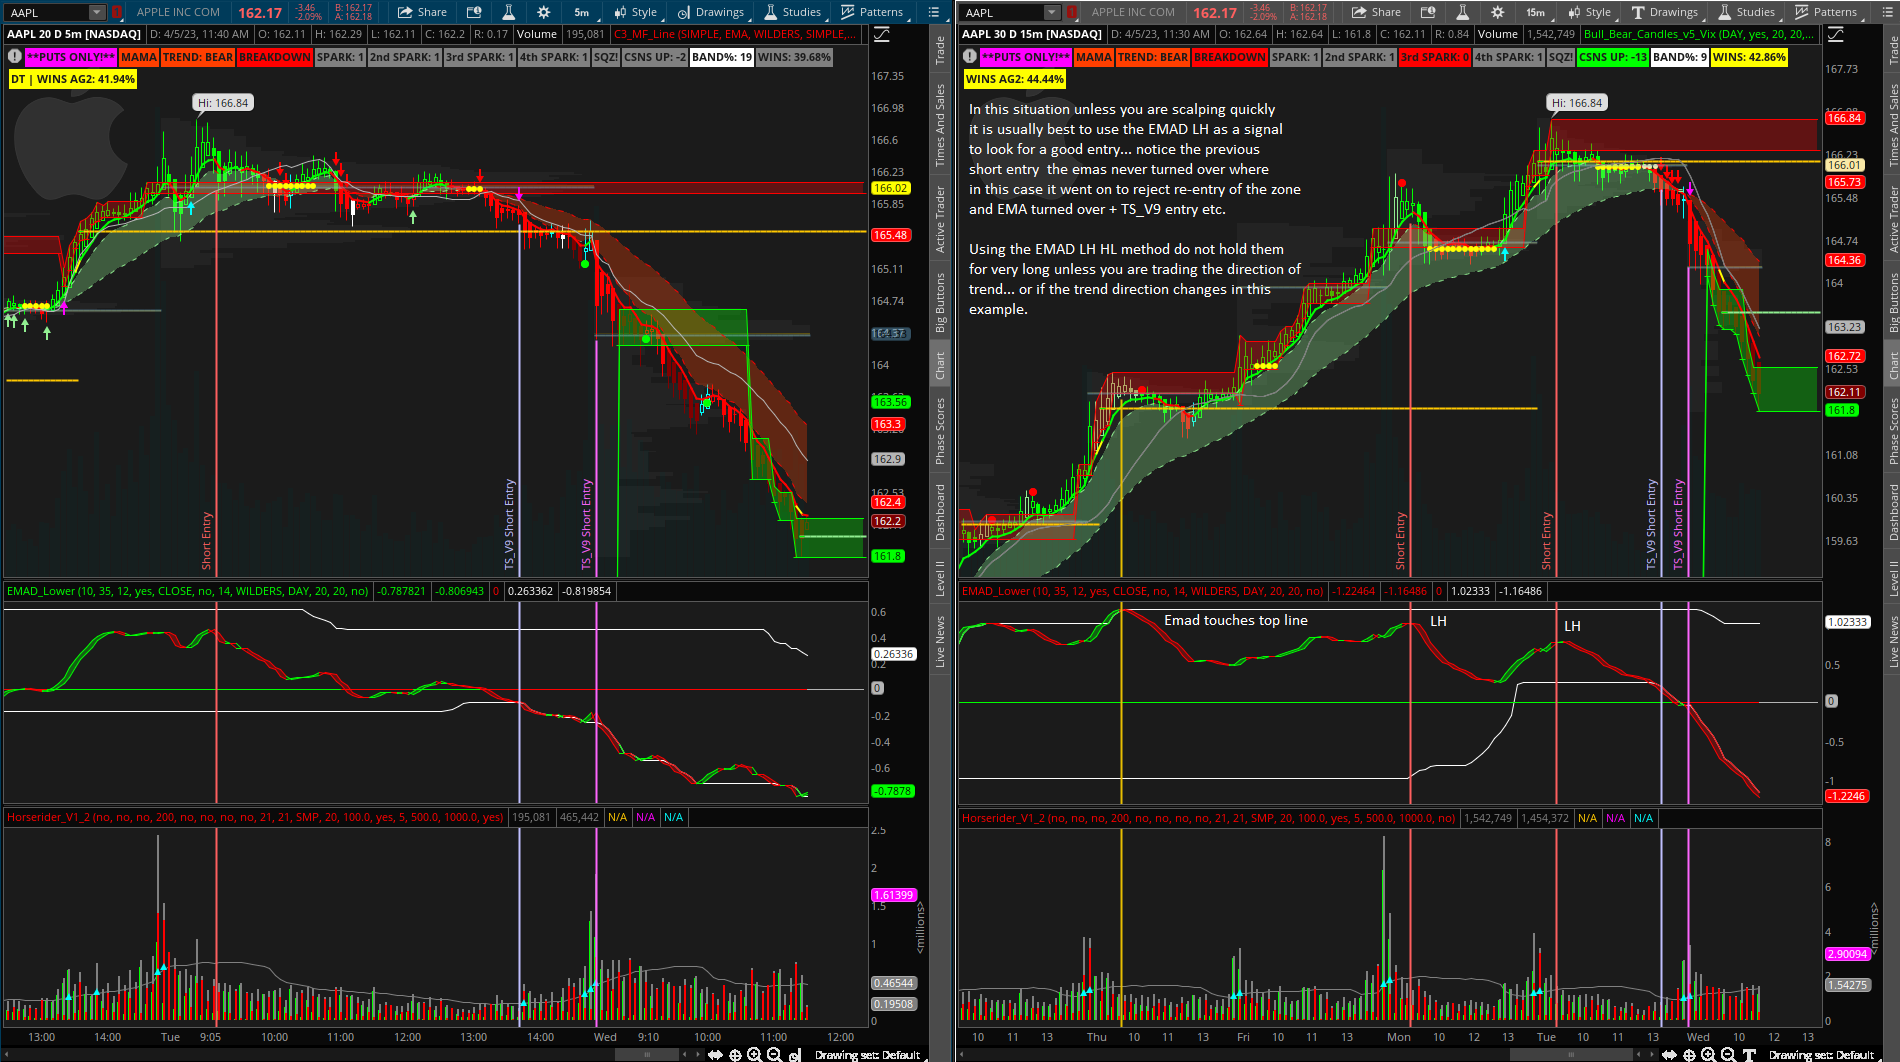
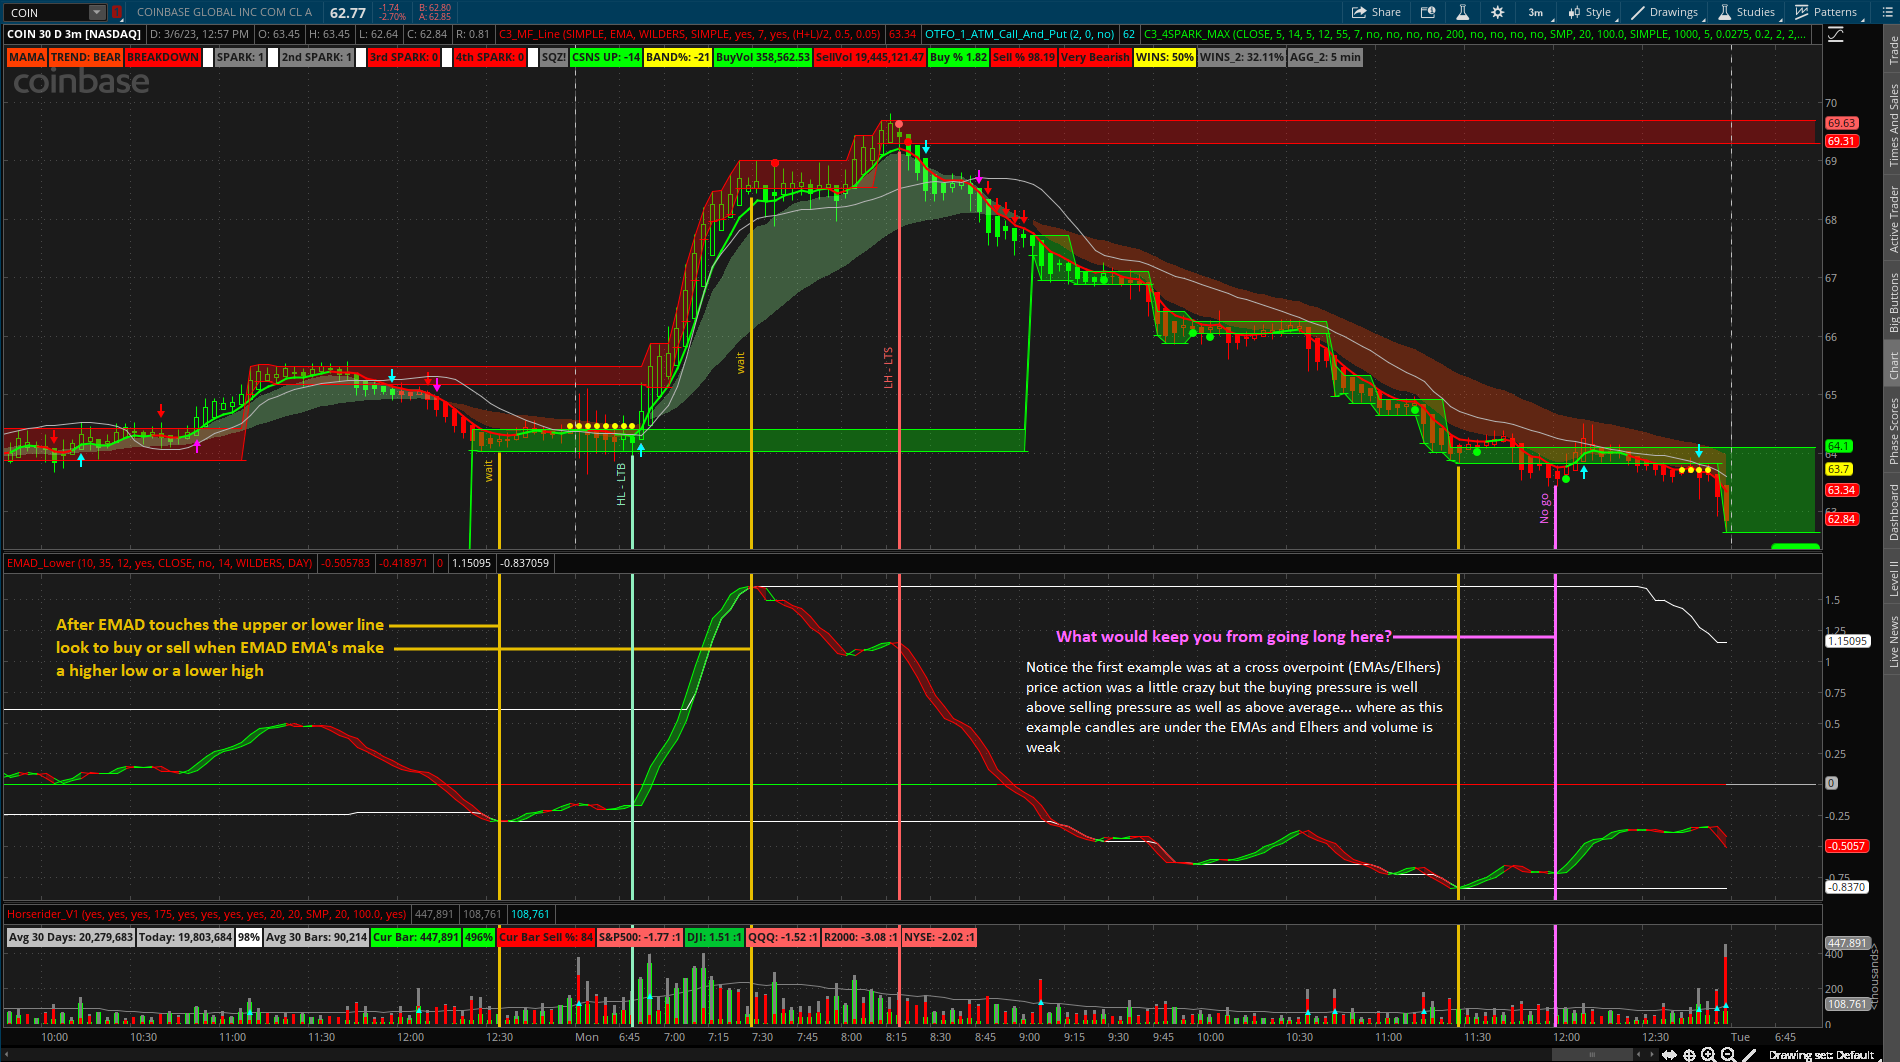
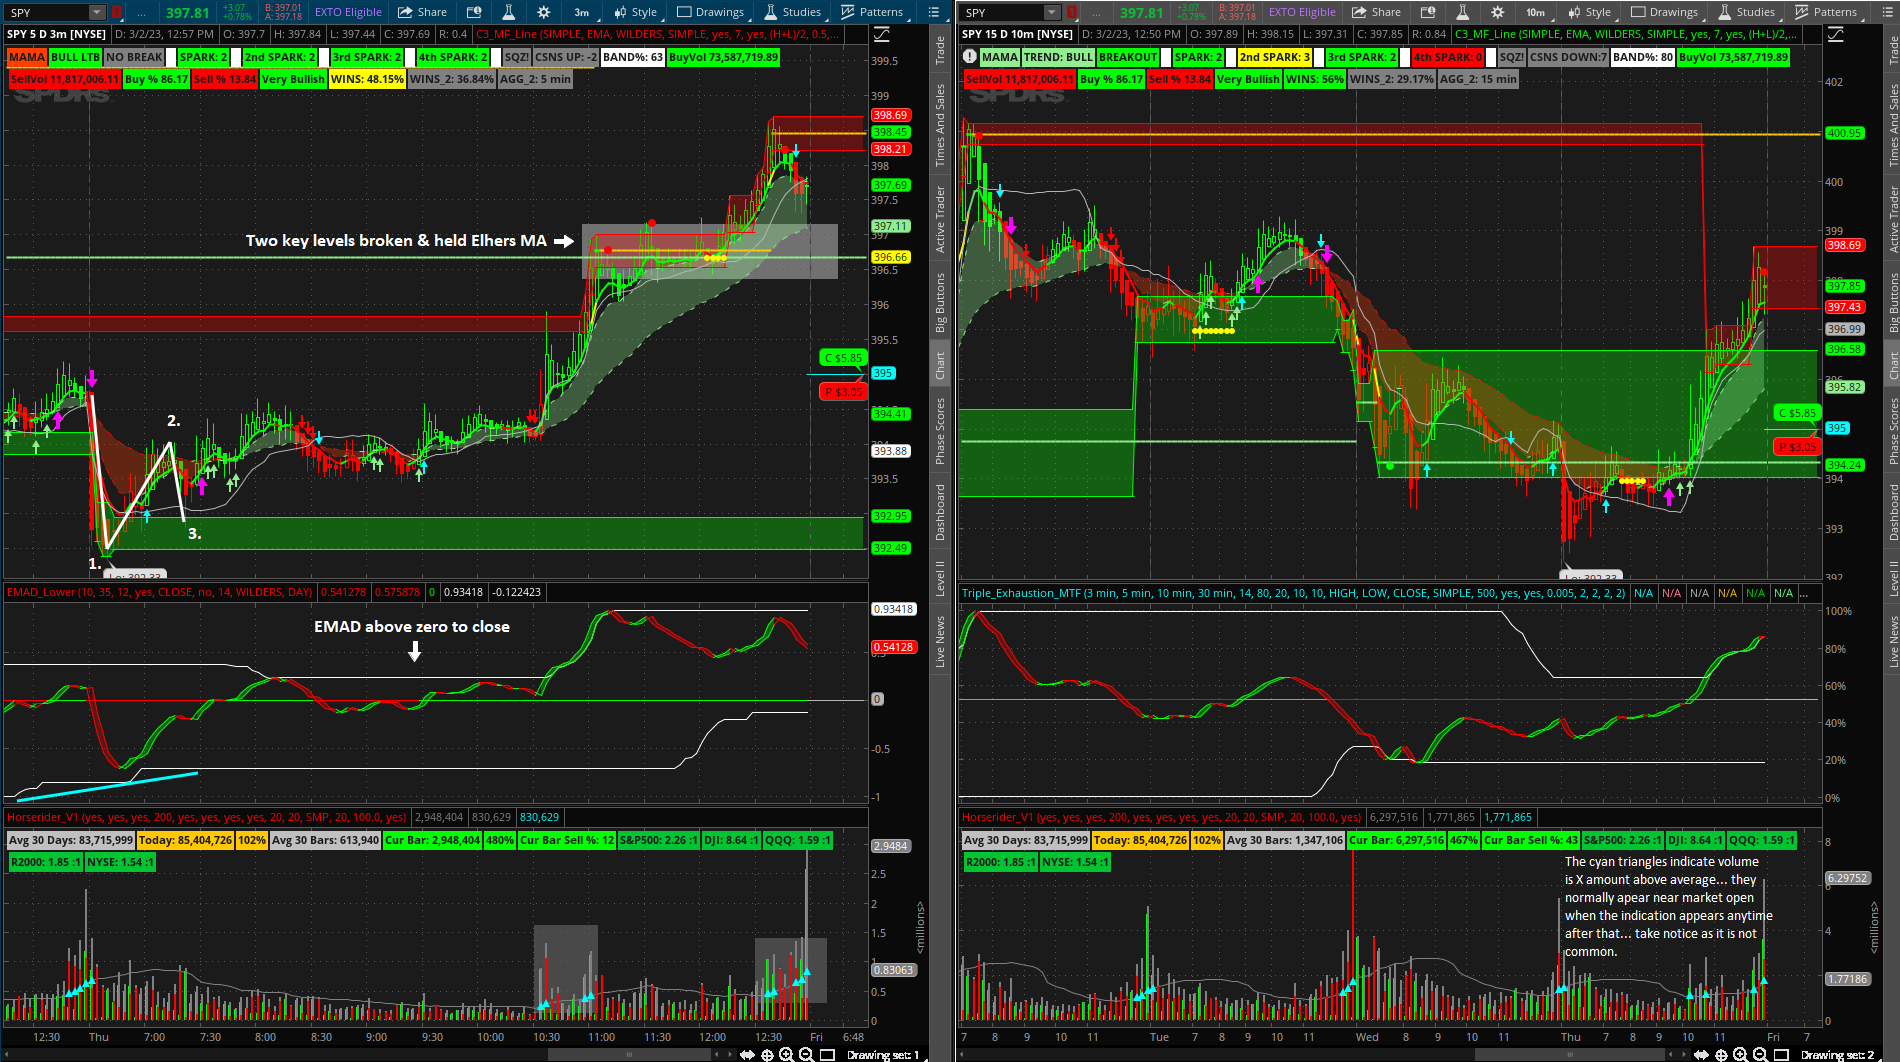
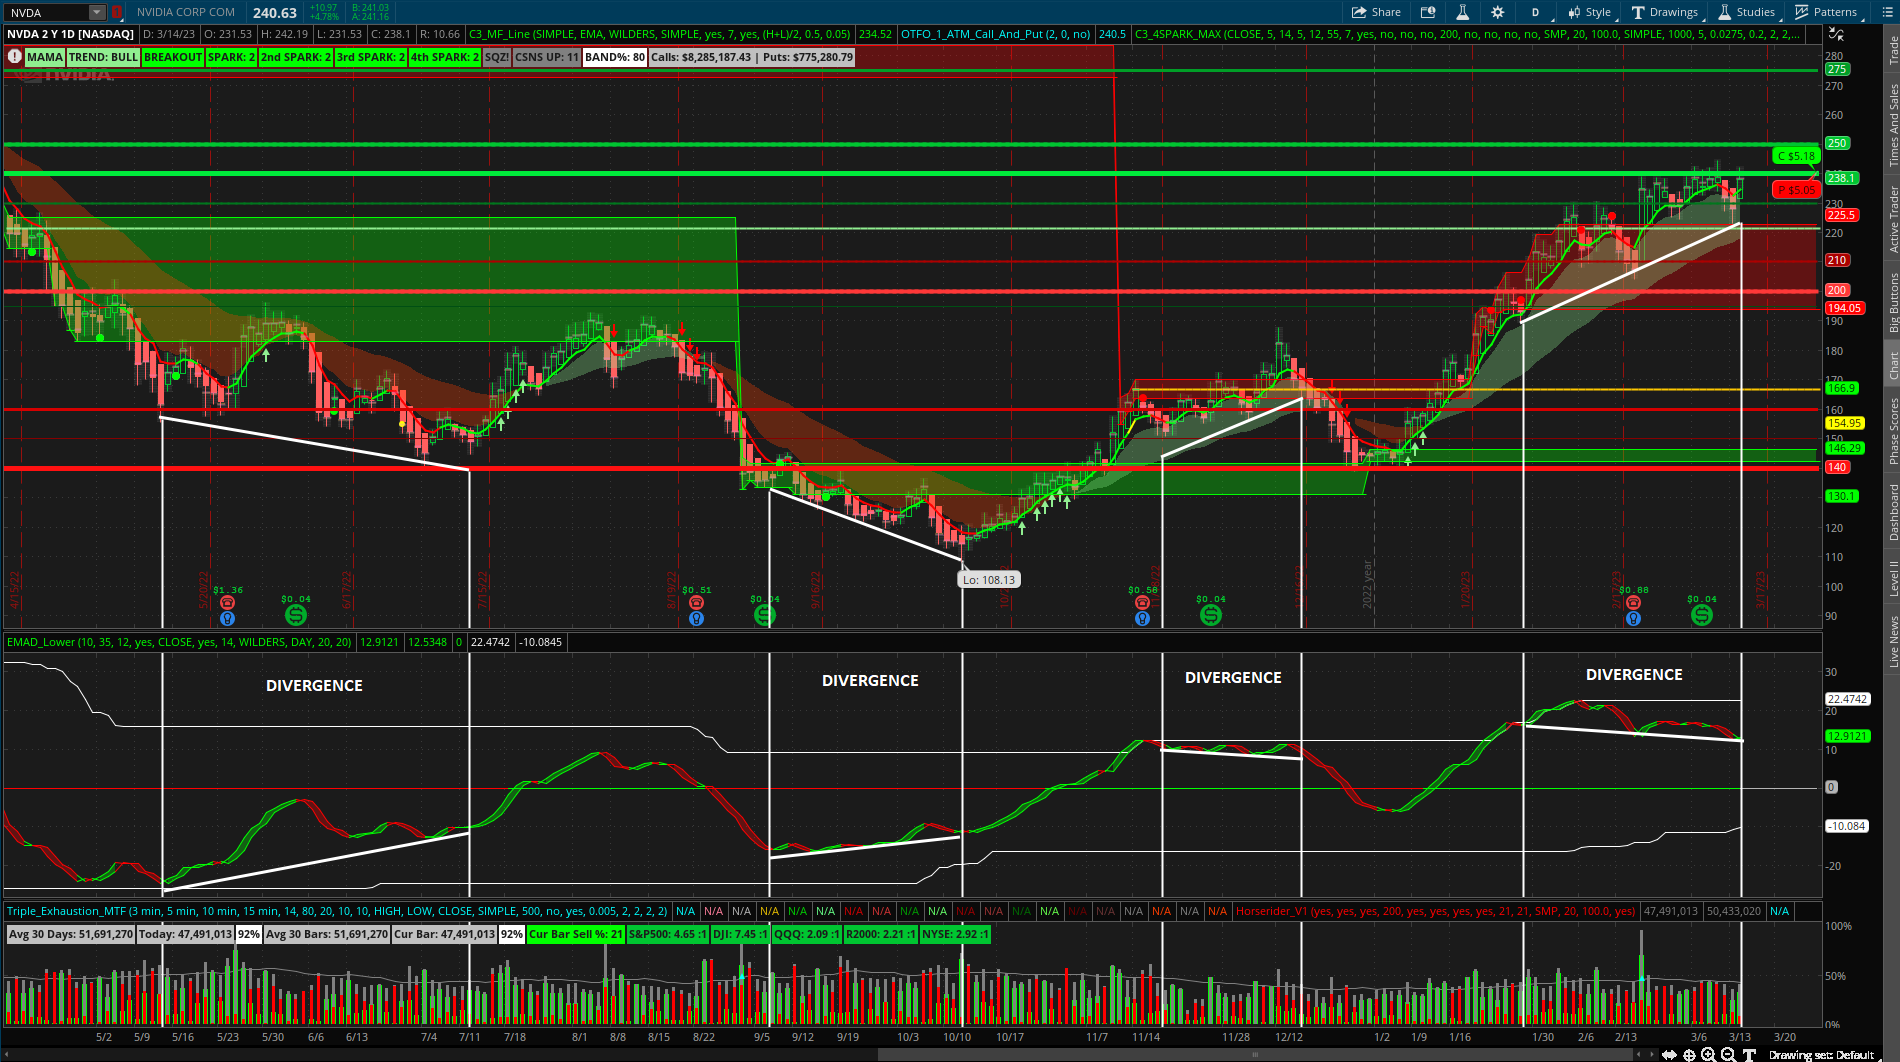
@HODL-Lay-HE-hoo! Nice to see a fellow Houstonian on here! Thanks for posting these very helpful!
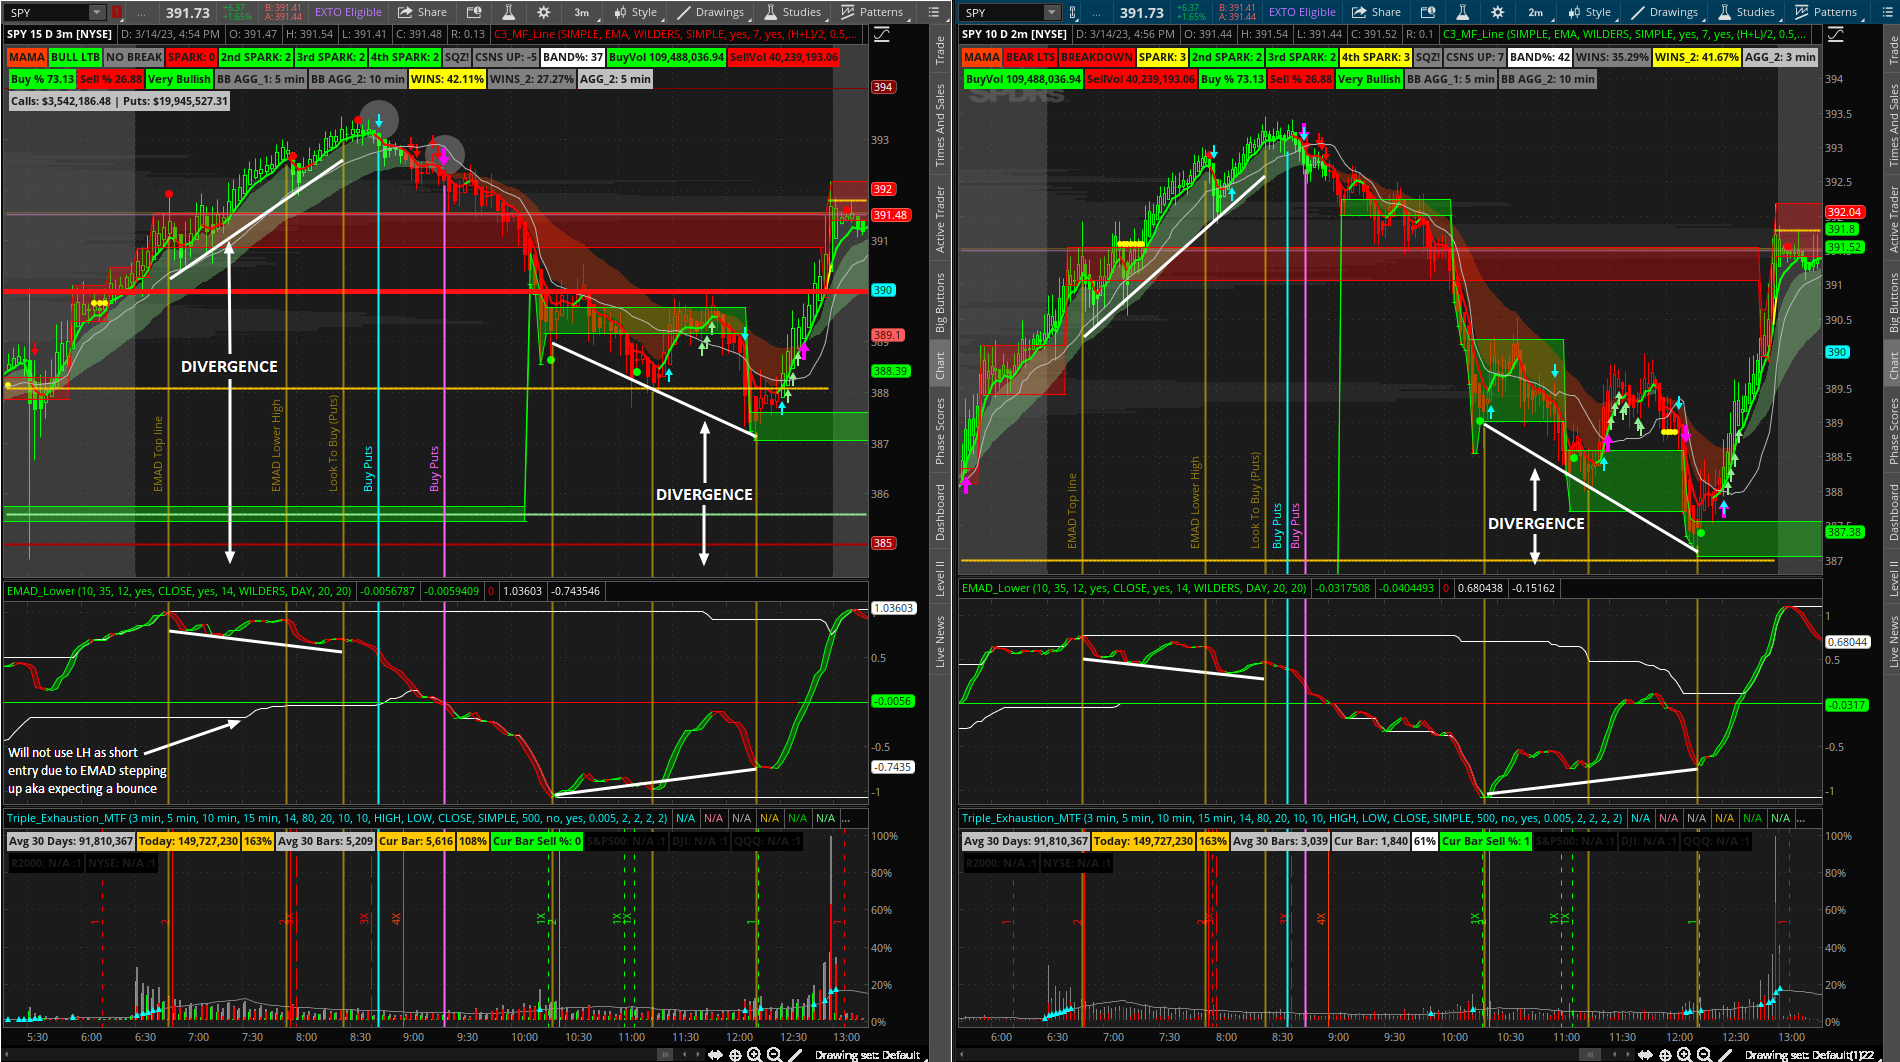
added vertical lines for 2nd aggregation of triple exhaustion (if it lags I will not use it but so far so good - the aggregation is automatically set to ag 2.
also when choose to TF charts most of the time I will choose them as follows... if I like the look of the 3min chart I will choose the 15min for the 2nd chart because the strategy for the 3min chart will show the 3min, 5min, and 10min TS_V9 arrows so I the second chart at 15min will show the 15min 30min and 1hr TS_V9 arrows.
http://tos.mx/lnyJSlh
See that yellow arrow on the EMAD lower? the lower line moving up while the EMAs are moving down.... expect a bounce...
Also notice the vertical triple exhaustion lines that resulted in a very little to no pullback the C3 line did not even turn red nor did the candles so mind the trend no matter the indication...
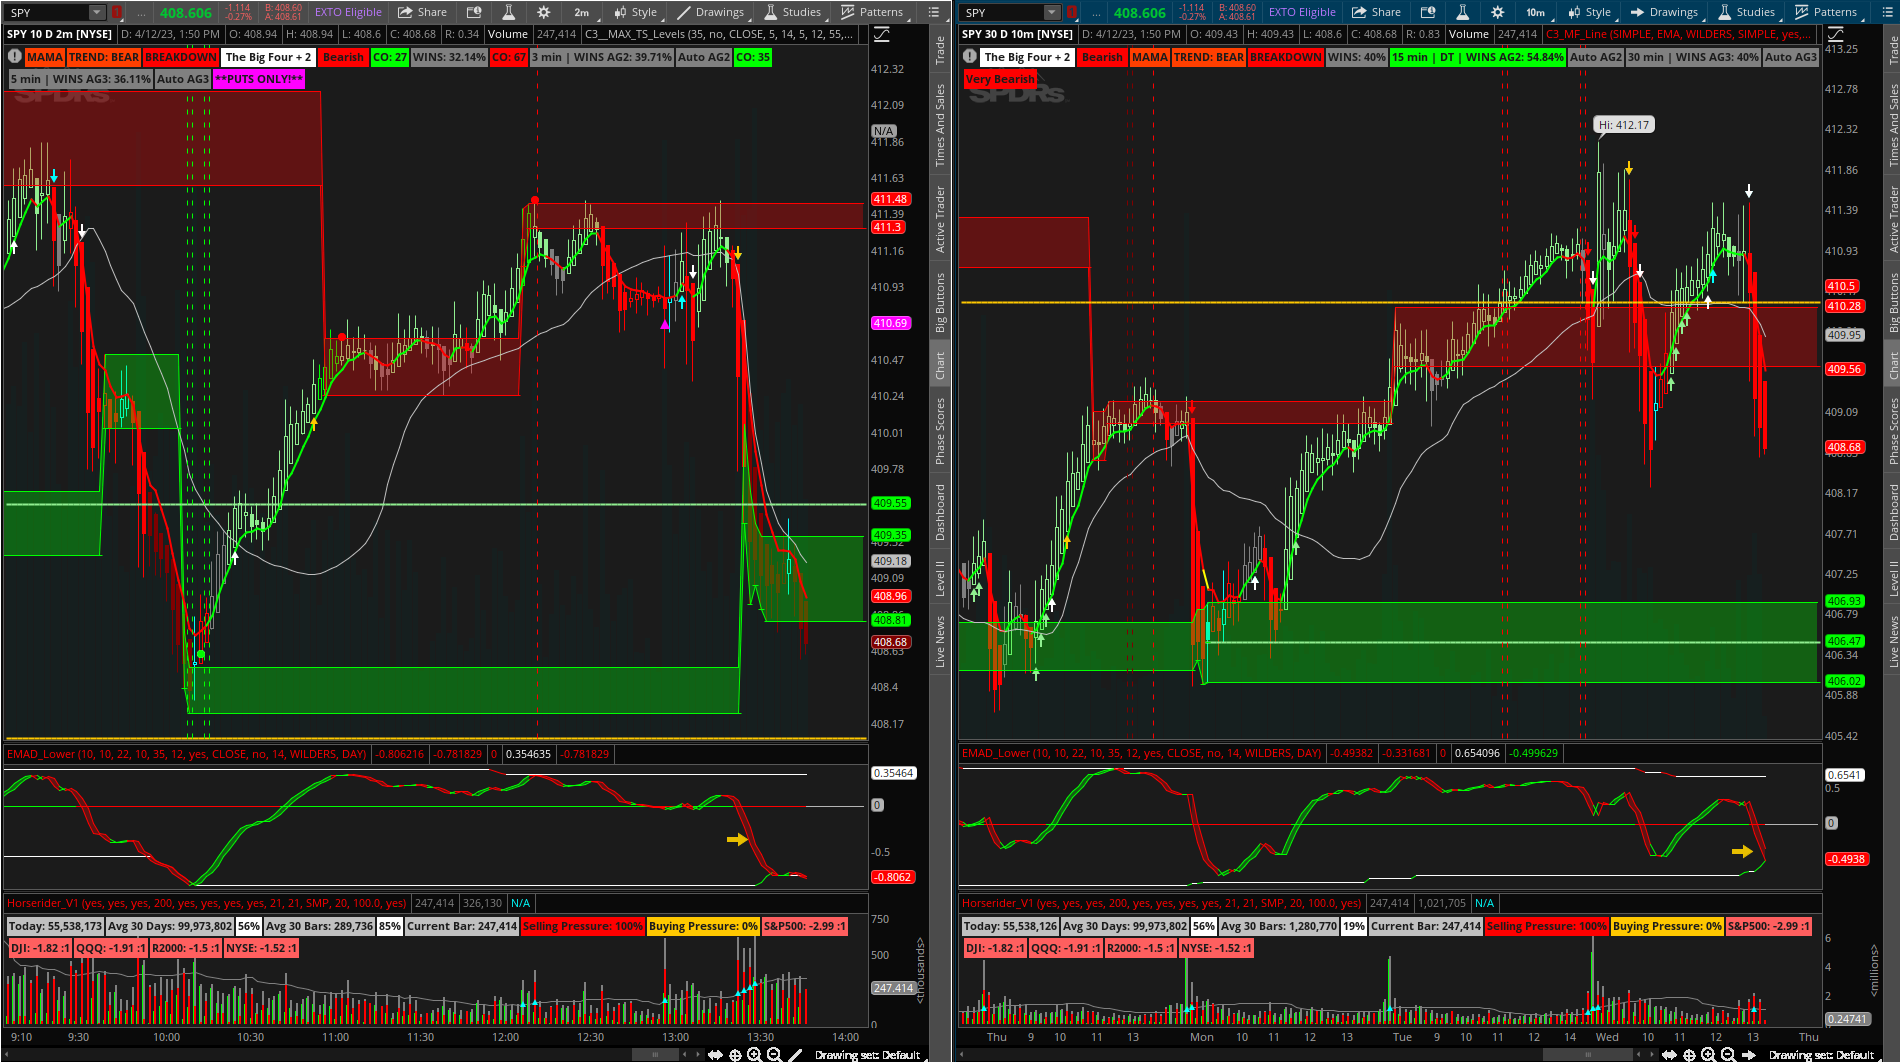
and bounce...
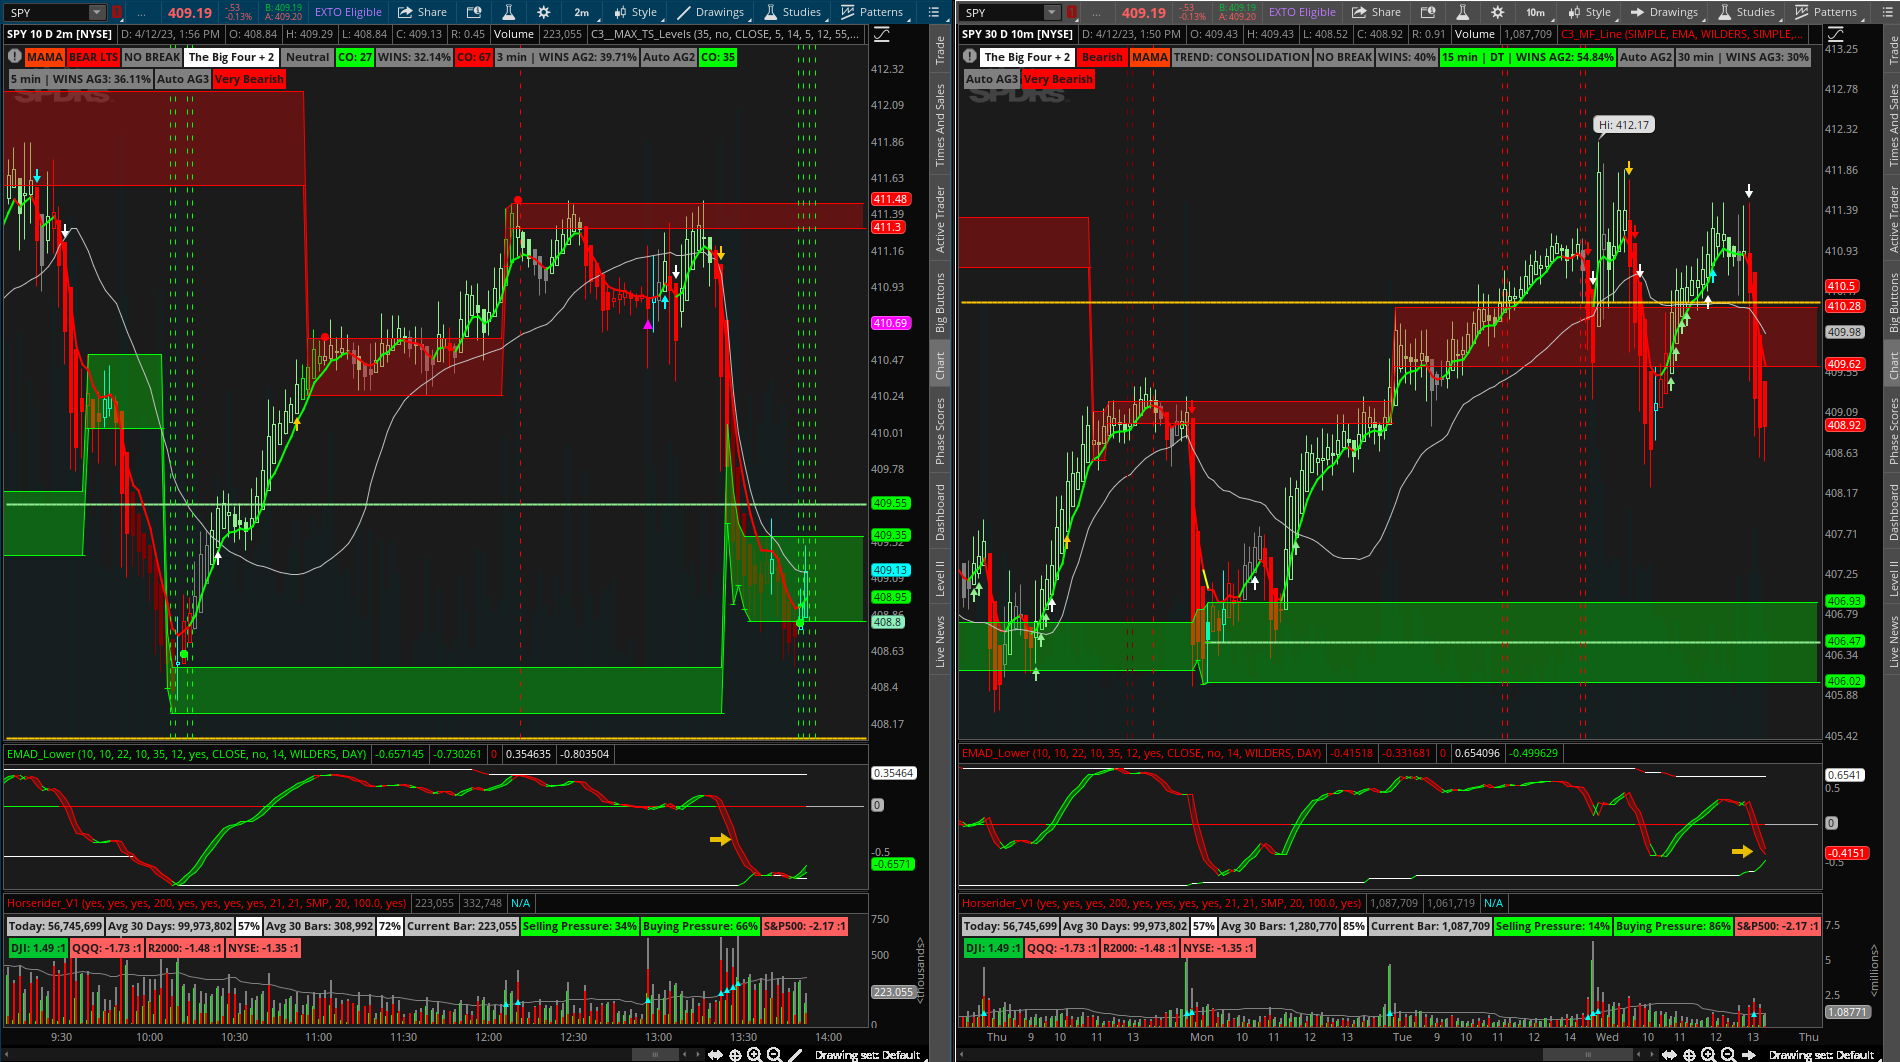
also when choose to TF charts most of the time I will choose them as follows... if I like the look of the 3min chart I will choose the 15min for the 2nd chart because the strategy for the 3min chart will show the 3min, 5min, and 10min TS_V9 arrows so I the second chart at 15min will show the 15min 30min and 1hr TS_V9 arrows.
http://tos.mx/lnyJSlh
See that yellow arrow on the EMAD lower? the lower line moving up while the EMAs are moving down.... expect a bounce...
Also notice the vertical triple exhaustion lines that resulted in a very little to no pullback the C3 line did not even turn red nor did the candles so mind the trend no matter the indication...
and bounce...
Last edited:
- Status
- Not open for further replies.
Join useThinkScript to post your question to a community of 21,000+ developers and traders.
Similar threads
-
Repaints AGAIG A Choice Chart Setup for Trading or Scalping with ThinkOrSwim
- Started by csricksdds
- Replies: 141
-
Repaints AGAIG Visual Options Trading Chart for ThinkOrSwim
- Started by csricksdds
- Replies: 69
-
Repaints AGAIG High Profit Options Trading Chart For ThinkOrSwim
- Started by csricksdds
- Replies: 37
-
Repaints AGAIG Stars Aligned Chart For ThinkOrSwim
- Started by csricksdds
- Replies: 23
-
Repaints AGAIG The Trading Edge Chart for ThinkOrSwim
- Started by csricksdds
- Replies: 9
Not the exact question you're looking for?
Start a new thread and receive assistance from our community.
87k+
Posts
946
Online
Similar threads
-
Repaints AGAIG A Choice Chart Setup for Trading or Scalping with ThinkOrSwim
- Started by csricksdds
- Replies: 141
-
Repaints AGAIG Visual Options Trading Chart for ThinkOrSwim
- Started by csricksdds
- Replies: 69
-
Repaints AGAIG High Profit Options Trading Chart For ThinkOrSwim
- Started by csricksdds
- Replies: 37
-
Repaints AGAIG Stars Aligned Chart For ThinkOrSwim
- Started by csricksdds
- Replies: 23
-
Repaints AGAIG The Trading Edge Chart for ThinkOrSwim
- Started by csricksdds
- Replies: 9
The Market Trading Game Changer
Join 2,500+ subscribers inside the useThinkScript VIP Membership Club
- Exclusive indicators
- Proven strategies & setups
- Private Discord community
- ‘Buy The Dip’ signal alerts
- Exclusive members-only content
- Add-ons and resources
- 1 full year of unlimited support
Frequently Asked Questions
What is useThinkScript?
useThinkScript is the #1 community of stock market investors using indicators and other tools to power their trading strategies. Traders of all skill levels use our forums to learn about scripting and indicators, help each other, and discover new ways to gain an edge in the markets.
How do I get started?
We get it. Our forum can be intimidating, if not overwhelming. With thousands of topics, tens of thousands of posts, our community has created an incredibly deep knowledge base for stock traders. No one can ever exhaust every resource provided on our site.
If you are new, or just looking for guidance, here are some helpful links to get you started.
- The most viewed thread:
https://usethinkscript.com/threads/repainting-trend-reversal-for-thinkorswim.183/ - Our most popular indicator:
https://usethinkscript.com/threads/buy-the-dip-indicator-for-thinkorswim.3553/ - Answers to frequently asked questions:
https://usethinkscript.com/threads/answers-to-commonly-asked-questions.6006/
What are the benefits of VIP Membership?
VIP members get exclusive access to these proven and tested premium indicators: Buy the Dip, Advanced Market Moves 2.0, Take Profit, and Volatility Trading Range. In addition, VIP members get access to over 50 VIP-only custom indicators, add-ons, and strategies, private VIP-only forums, private Discord channel to discuss trades and strategies in real-time, customer support, trade alerts, and much more. Learn all about VIP membership here.
How can I access the premium indicators?
To access the premium indicators, which are plug and play ready, sign up for VIP membership here.
