Opening Range Breakout Indicator for ThinkorSwim

BenTen

Administrative
Staff member
Staff
VIP
Lifetime
Recently came across this cool indicator called Opening Range Breakout by Mobius. This is more than just an indicator. There is also a strategy with risk and target lines included.

Opening Range Breakout is one of the original Floor Trader Strategies.

Why it works: Overnight orders accumulate. Those orders being placed during the first 15 minutes of Regular Trading Hours combined with the typical high volume in the first 30 minutes of trading make this the most volatile trading period of the day. Regularly released reports during the first 30 minutes of trading add to the volatility and effect the days direction.

Original thinkScript Code: https://tos.mx/RiBfIw

You must understand the following notes from the author in order to use it:

Features of this study:

The yellow dashed line is the Day Filter Line and is used to determin the trend direction for the day. The dominant time spent above or below this line during the Opening Range Period typically determines the days trend.

Green points indicate a close at EOD above the yellow line.

Red Points a close below the yellow line. Yellow points a neutral or balanced day, close Between the Opening Range Extremes and often very near the Day Filter Line.

The Opening Range is plotted with a green and red dashed line. Trades can be taken when there is an open outside these range lines. Up to 5 Targets are generated using Average True Range to plot target lines. When price crosses the first target line part of the trade should be taken as Risk Off profit and a stop should be placed at the entry point ensuring a profitable trade.


If price crosses further targets stops should be moved to the proceeding target until stopped or your profit target is met. Initial Risk Stops are an open below the bar's low prior to entry or the Risk Lines plotted below the Opening range Lines. When price tests the opening range lines from below for the upper line or above for the lower lines trades can be taken with a first target to the yellow line from either direction and a Risk Stop line outside the opening range at the First Target lines or a close outside the Opening Range Lines.


FYI the color of Probable close direction points are statistically accurate between 60% and 70% of the time. Trading against the direction of the ORB's Day Filtered Direction should be considered counter trend trades.

As of 01.03.2017 You have just under a 52% probability that a DAILY bar will close green. So a 60% to 70% probability is a nice edge.

thinkScript Code

After adding the indicator, I couldn't quite understand it much. From looking at it, seems more like a support and resistance indicator to me. I watched a few YouTube videos about the Opening Range Breakout and was able to make some changes to the current code. As a result, I was able to have a clear picture of what this indicator does.

Here is my own version of it:

Rich (BB code):
declare Hide_On_Daily;
declare Once_per_bar;

input OrMeanS  = 0930.0; #hint OrMeanS: Begin Mean Period. Usually Market Open EST.
input OrMeanE  = 0935.0; #hint OrMeanE: End Mean period. Usually End of first bar.
input OrBegin  = 0930.0; #hint OrBegin: Beginning for Period of Opening Range Breakout.
input OrEnd    = 1000.0; #hint OrEnd: End of Period of Opening Range Breakout.
input CloudOn  = no;     #hint CloudOn: Clouds Opening Range.
input AlertOn  = yes;    #hint AlertOn: Alerts on cross of Opening Range.
input ShowTodayOnly = {"No", default "Yes"};  
input nAtr = 4;          #hint nATR: Lenght for the ATR Risk and Target Lines.
input AtrTargetMult = 2.0; #hint ATRmult: Multiplier for the ATR calculations.

  def h = high;
  def l = low;
  def c = close;
  def bar = barNumber();
  def s = ShowTodayOnly;
  def ORActive = if secondsTillTime(OrMeanE) > 0 and
                    secondsFromTime(OrMeanS) >= 0
                 then 1
                 else 0;
  def today = if s == 0
              or getDay() == getLastDay() and
                 secondsFromTime(OrMeanS) >= 0
              then 1
              else 0;
  def ORHigh = if ORHigh[1] == 0
               or ORActive[1] == 0 and
                  ORActive == 1
               then h
               else if ORActive and
                       h > ORHigh[1]
               then h
               else ORHigh[1];
  def ORLow = if ORLow[1] == 0
              or ORActive[1] == 0 and
                 ORActive == 1
              then l
              else if ORActive and
                      l < ORLow[1]
              then l
              else ORLow[1];
  def ORWidth = ORHigh - ORLow;
  def na = double.nan;
  def ORHA = if ORActive
             or today < 1
             then na
             else ORHigh;
  def ORLA = if ORActive
             or today < 1
             then na
             else ORLow;
  def O = ORHA - Round(((ORHA - ORLA) / 2) / TickSize(), 0) * TickSize();
  def ORActive2 = if secondsTillTime(OREnd) > 0 and
                     secondsFromTime(ORBegin) >= 0
                  then 1
                  else 0;
  def ORHigh2 = if ORHigh2[1] == 0
                  or ORActive2[1] == 0 and
                     ORActive2 == 1
                then h
                else if ORActive2 and
                        h > ORHigh2[1]
                then h
                else ORHigh2[1];
  def ORLow2 = if ORLow2[1] == 0
                or ORActive2[1] == 0 and
                   ORActive2 == 1
               then l
               else if ORActive2 and
                       l < ORLow2[1]
               then l
               else ORLow2[1];
  def ORWidth2 = ORHigh2 - ORLow2;
  def TimeLine = if secondsTillTime(OREnd) == 0 
                 then 1
                 else 0;
  def ORmeanBar = if !ORActive and ORActive[1]
                  then barNumber()
                  else ORmeanBar[1];
  def ORendBar = if !ORActive2 and ORActive2[1]
                 then barNumber()
                 else ORendBar[1];
  def ORL = if (o == 0 , na, o);
plot ORLext = if barNumber() >= highestAll(ORmeanBar)
              then HighestAll(if isNaN(c[-1])
                              then ORL[1]
                              else double.nan)
              else double.nan;
     ORLext.SetDefaultColor(color.Yellow);
     ORLext.SetStyle(curve.Long_DASH);
     ORLext.SetLineWeight(3);
     ORLext.HideTitle();
  def ORH2 = if ORActive2
             or today < 1
             then na
             else ORHigh2;
plot ORH2ext = if barNumber() >= highestAll(ORendBar)
               then HighestAll(if isNaN(c[-1])
                               then ORH2[1]
                               else double.nan)
               else double.nan;
     ORH2ext.SetDefaultColor(color.Green);
     ORH2ext.SetStyle(curve.Long_DASH);
     ORH2ext.SetLineWeight(3);
     ORH2ext.HideTitle();
  def ORL2 = if ORActive2
               or today < 1
             then na
             else ORLow2;
plot ORL2ext = if barNumber() >= highestAll(ORendBar)
               then HighestAll(if isNaN(c[-1])
                               then ORL2[1]
                               else double.nan)
               else double.nan;
     ORL2ext.SetDefaultColor(color.Red);
     ORL2ext.SetStyle(curve.Long_DASH);
     ORL2ext.SetLineWeight(3);
     ORL2ext.HideTitle();
  def RelDay = (ORL - ORL2) / (ORH2 - ORL2);
  def dColor = if RelDay > .5
               then 5
               else if RelDay < .5
                    then 6
               else 4;
  def pos = (ORH2 - ORL2)/10;
plot d1 = if (TimeLine , ORH2, na);
plot d2 = if (TimeLine , ORH2 - ( pos * 2), na);
plot d3 = if (TimeLine , ORH2 - ( pos * 3), na);
plot d4 = if (TimeLine , ORH2 - ( pos * 4), na);
plot d5 = if (TimeLine , ORH2 - ( pos * 5), na);
plot d6 = if (TimeLine , ORH2 - ( pos * 6), na);
plot d7 = if (TimeLine , ORH2 - ( pos * 7), na);
plot d8 = if (TimeLine , ORH2 - ( pos * 8), na);
plot d9 = if (TimeLine , ORH2 - ( pos * 9), na);
plot d10 = if (TimeLine ,(ORL2), na);
     d1.SetPaintingStrategy(PaintingStrategy.POINTS);
     d2.SetPaintingStrategy(PaintingStrategy.POINTS);
     d3.SetPaintingStrategy(PaintingStrategy.POINTS);
     d4.SetPaintingStrategy(PaintingStrategy.POINTS);
     d5.SetPaintingStrategy(PaintingStrategy.POINTS);
     d6.SetPaintingStrategy(PaintingStrategy.POINTS);
     d7.SetPaintingStrategy(PaintingStrategy.POINTS);
     d8.SetPaintingStrategy(PaintingStrategy.POINTS);
     d9.SetPaintingStrategy(PaintingStrategy.POINTS);
    d10.SetPaintingStrategy(PaintingStrategy.POINTS);
     d1.AssignValueColor(GetColor(Dcolor));
     d2.AssignValueColor(GetColor(Dcolor));
     d3.AssignValueColor(GetColor(Dcolor));
     d4.AssignValueColor(GetColor(Dcolor));
     d5.AssignValueColor(GetColor(Dcolor));
     d6.AssignValueColor(GetColor(Dcolor));
     d7.AssignValueColor(GetColor(Dcolor));
     d8.AssignValueColor(GetColor(Dcolor));
     d9.AssignValueColor(GetColor(Dcolor));
    d10.AssignValueColor(GetColor(Dcolor));
     d1.HideBubble();
     d2.HideBubble();
     d3.HideBubble();
     d4.HideBubble();
     d5.HideBubble();
     d6.HideBubble();
     d7.HideBubble();
     d8.HideBubble();
     d9.HideBubble();
    d10.HideBubble();
     d1.HideTitle();
     d2.HideTitle();
     d3.HideTitle();
     d4.HideTitle();
     d5.HideTitle();
     d6.HideTitle();
     d7.HideTitle();
     d8.HideTitle();
     d9.HideTitle();
    d10.HideTitle();
addCloud(if CloudOn == yes
         then orl
         else double.nan
       , orl2,createColor(244,83,66), createColor(244,83,66));
addCloud(if CloudOn == yes
         then orl
         else double.nan
       , orh2,createColor(66,244,131), createColor(66,244,131));
# Begin Risk Algorithm
# First Breakout or Breakdown bars
  def Bubbleloc1 = isNaN(close[-1]);
  def BreakoutBar = if ORActive
                    then double.nan
                    else if !ORActive and c crosses above ORH2
                         then bar
                         else if !isNaN(BreakoutBar[1]) and c crosses ORH2
                              then BreakoutBar[1]
                    else BreakoutBar[1];
  def ATR = if ORActive2
  then Round((Average(TrueRange(h, c, l), nATR)) / TickSize(), 0) * TickSize()
  else ATR[1];
  def cond1 =  if h > ORH2 and
                  h[1] <= ORH2
               then Round((ORH2  + (ATR * AtrTargetMult)) / TickSize(), 0) * TickSize()
               else cond1[1];
plot ORLriskUP = if bar >= OREndBar and !ORActive and today
                 then HighestAll(ORH2ext - 2)
                 else double.nan;
     ORLriskUP.SetStyle(Curve.Long_Dash);
     ORLriskUP.SetDefaultColor(Color.Green);
     ORLriskUP.HideTitle();
  def crossUpBar = if close crosses above ORH2
                   then bar
                   else double.nan;
AddChartBubble(bar == HighestAll(crossUpBar), ORLriskUP, "RiskON ORH", color.green, no);
plot ORLriskDN = if bar >= OREndBar and !ORActive and close < ORL
                 then HighestAll(ORL2ext + 2)
                 else double.nan;
     ORLriskDN.SetStyle(Curve.Long_Dash);
     ORLriskDN.SetDefaultColor(Color.Red);
     ORLriskDN.HideTitle();
  def crossDnBar = if close crosses below ORL2ext
                   then bar
                   else double.nan;
AddChartBubble(bar == HighestAll(crossDnBar), HighestAll(ORLriskDN), "Risk ON ORL", color.red, yes);
# High Targets
plot Htarget = if bar >= BreakoutBar
               then cond1
               else double.nan;
     Htarget.SetPaintingStrategy(paintingStrategy.Squares);
     Htarget.SetLineWeight(1);
     Htarget.SetDefaultColor(Color.White);
     Htarget.HideTitle();
AddChartBubble(BubbleLoc1, Htarget, "RO", color.white, if c > Htarget then no else yes);
  def condHtarget2 = if c crosses above cond1
  then Round((cond1 + (ATR * AtrTargetMult)) / TickSize(), 0) * TickSize()
  else condHtarget2[1];
plot Htarget2 = if bar >= BreakoutBar
                then  condHtarget2
                else double.nan;
     Htarget2.SetPaintingStrategy(PaintingStrategy.Squares);
     Htarget2.SetLineWeight(1);
     Htarget2.SetDefaultColor(Color.Plum);
     Htarget2.HideTitle();
AddChartBubble(BubbleLoc1, Htarget2, "2nd T", color.plum, if c > Htarget2
                                                          then no
                                                          else yes);
  def condHtarget3 = if c crosses above condHtarget2
  then Round((condHtarget2 + (ATR * AtrTargetMult)) / TickSize(), 0) * TickSize()
  else condHtarget3[1];
plot Htarget3 = if bar >= BreakoutBar
                then condHtarget3
                else double.nan;
     Htarget3.SetPaintingStrategy(PaintingStrategy.Squares);
     Htarget3.SetLineWeight(1);
     Htarget3.SetDefaultColor(Color.Plum);
     Htarget3.HideTitle();
AddChartBubble(isNaN(C[-1]), Htarget3, "3rd T", color.plum, if c > Htarget3 then no else yes);
  def condHtarget4 = if c crosses above condHtarget3
  then Round((condHtarget3 + (ATR * AtrTargetMult)) / TickSize(), 0) * TickSize()
  else condHtarget4[1];
plot Htarget4 = if bar >= HighestAll(BreakoutBar)
                then condHtarget4
                else double.nan;
     Htarget4.SetPaintingStrategy(PaintingStrategy.Squares);
     Htarget4.SetLineWeight(1);
     Htarget4.SetDefaultColor(Color.Plum);
     Htarget4.HideTitle();
AddChartBubble(BubbleLoc1, Htarget4, "4th T", color.plum, if c > Htarget4 then no else yes);
  def condHtarget5 = if c crosses above condHtarget4
  then Round((condHtarget4 + (ATR * AtrTargetMult)) / TickSize(), 0) * TickSize()
  else condHtarget5[1];
plot Htarget5 = if bar >= BreakoutBar
                then condHtarget5
                else double.nan;
     Htarget5.SetPaintingStrategy(PaintingStrategy.Squares);
     Htarget5.SetLineWeight(1);
     Htarget5.SetDefaultColor(Color.Plum);
     Htarget5.HideTitle();
AddChartBubble(BubbleLoc1, Htarget5, "5th T", color.plum, if c > Htarget5 then no else yes);
# Low Targets
  def cond2 = if L < ORL2 and
                 L[1] >= ORL2
              then Round((ORL2  - (AtrTargetMult * ATR)) / TickSize(), 0) * TickSize()
              else cond2[1];
plot Ltarget =  if bar >= HighestAll(OREndBar)
                then highestAll(if isNaN(c[-1])
                                then cond2
                                else double.nan)
                else double.nan;
     Ltarget.SetPaintingStrategy(PaintingStrategy.Squares);
     Ltarget.SetLineWeight(1);
     Ltarget.SetDefaultColor(Color.White);
     Ltarget.HideTitle();
AddChartBubble(BubbleLoc1, cond2, "RO", color.white, if c < Ltarget
                                                     then yes
                                                     else no);
  def condLtarget2 = if c crosses below cond2
  then Round((cond2 - (AtrTargetMult * ATR)) / TickSize(), 0) * TickSize()
  else condLtarget2[1];
plot Ltarget2 =  if bar >= HighestAll(OREndBar)
                 then highestAll(if isNaN(c[-1])
                                 then condLtarget2
                                 else double.nan)
                 else double.nan;
     Ltarget2.SetPaintingStrategy(PaintingStrategy.Squares);
     Ltarget2.SetLineWeight(1);
     Ltarget2.SetDefaultColor(Color.Plum);
     Ltarget2.HideTitle();
AddChartBubble(BubbleLoc1, condLtarget2, "2nd T", color.plum, if c < condLtarget2
                                                              then yes
                                                              else no);
  def condLtarget3 = if c crosses below condLtarget2
  then Round((condLtarget2 - (AtrTargetMult * ATR)) / TickSize(), 0) * TickSize()
  else condLtarget3[1];
plot Ltarget3 = if bar >= HighestAll(OREndBar)
                then highestAll(if isNaN(c[-1])
                                then condLtarget3
                                else double.nan)
                else double.nan;
     Ltarget3.SetPaintingStrategy(PaintingStrategy.Squares);
     Ltarget3.SetLineWeight(1);
     Ltarget3.SetDefaultColor(Color.Plum);
     Ltarget3.HideTitle();
AddChartBubble(BubbleLoc1, condLtarget3, "3rd T", color.plum, if c < Ltarget3
                                                              then yes
                                                              else no);
  def condLtarget4 = if c crosses condLtarget3
  then Round((condLtarget3 - (AtrTargetMult * ATR)) / TickSize(), 0) * TickSize()
  else condLtarget4[1];
plot Ltarget4 = if bar >= HighestAll(OREndBar)
                then highestAll(if isNaN(c[-1])
                                then condLtarget4
                                else double.nan)
                else double.nan;
     Ltarget4.SetPaintingStrategy(PaintingStrategy.Squares);
     Ltarget4.SetLineWeight(1);
     Ltarget4.SetDefaultColor(Color.Plum);
     Ltarget4.HideTitle();
AddChartBubble(BubbleLoc1, condLtarget4, "4th T", color.plum, if c < Ltarget4
                                                              then yes
                                                              else no);
  def condLtarget5 = if c crosses condLtarget4
  then Round((condLtarget4 - (AtrTargetMult * ATR)) / TickSize(), 0) * TickSize()
  else condLtarget5[1];
plot Ltarget5 = if bar >= HighestAll(OREndBar)
                then highestAll(if isNaN(c[-1])
                                then condLtarget5
                                else double.nan)
                else double.nan;
     Ltarget5.SetPaintingStrategy(PaintingStrategy.Squares);
     Ltarget5.SetLineWeight(1);
     Ltarget5.SetDefaultColor(Color.Plum);
     Ltarget5.HideTitle();
AddChartBubble(BubbleLoc1, condLtarget5, "5th T", color.plum, if c < Ltarget5
                                                              then yes
                                                              else no);
def last = if secondsTillTime(1600) == 0 and
              secondsFromTime(1600) == 0
           then c[1]
           else last[1];
plot LastClose = if Today and last != 0
                 then last
                 else Double.NaN;
     LastClose.SetPaintingStrategy(PaintingStrategy.Dashes);
     LastClose.SetDefaultColor(Color.White);
     LastClose.HideBubble();
     LastClose.HideTitle();
AddChartBubble(SecondsTillTime(0930) == 0, LastClose, "PC", color.gray, yes);
alert(c crosses above ORH2, "", Alert.Bar, Sound.Bell);
alert(c crosses below ORL2, "", Alert.Bar, Sound.Ring);
# End Code ORB with Risk and targets

Shareable Link: https://tos.mx/qu3Cu0

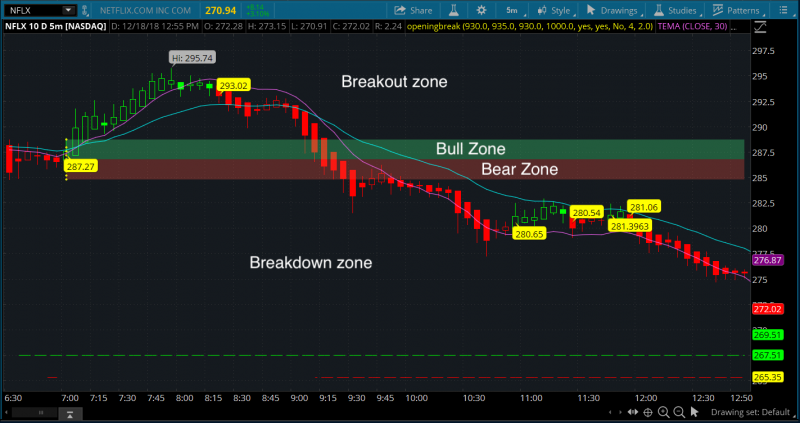
Now that you have the indicator added, let's get some terminology out of the way.
  • The green shadow is called the Bull Zone
  • The red shadow is called Bear Zone
  • Anywhere above the Bull Zone is called the Breakout Zone
  • Anywhere below the Bear Zone is called the Breakdown Zone

Hopefully you were able to understand those terms from this picture.
6TYzeF5.png


The Setup

  • 5 or 15 minutes timeframe
  • Heikin-Ashi candlestick
  • Disable pre-market and after-hour market
  • TEMA (30)
  • EMA (20)
  • Supertrend Indicator

Usage #1: Taking Advantage of Breakout Zone

Once the stock reaches above the breakout zone, we buy calls.

Usage #2: Taking Advantage of Breakdown Zone

Do the same as above. If the stock start to go from Bear Zone to breakdown zone, we start shorting it.

Usage #3: Avoid Misleading Signals given by Supertrend

A lot of people brought up a really good point about Supertrend. That is sometimes it would give false signals. And I also seen it first hand too. The Opening Range Breakout Indicator will allows us to resolve that.

Example #1: Don't short when the candles are still in the Bull Zone.
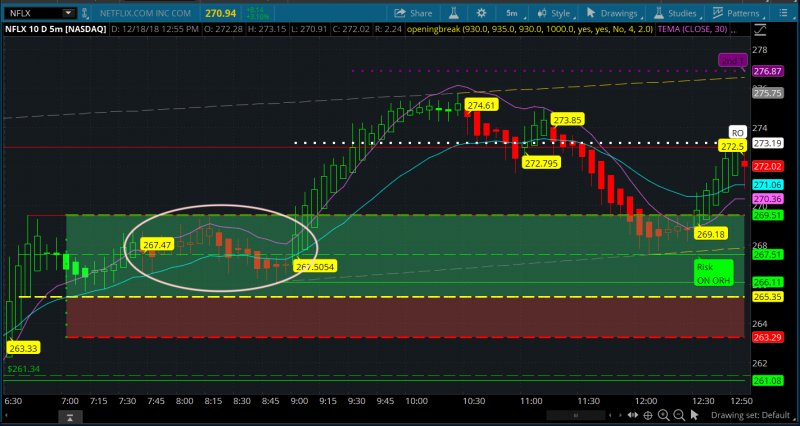
ITKLEOm.png


The only time that it is reasonable to short while the candles are still in Bull Zone is: IF the candle are by the border of Bull Zone and Bear Zone. Even better if it's already crossing the border into Bear Zone.

Example #2: Don't Buy Calls in Breakdown Zone

If you think the Bear Zone is worst, wait until you buy calls in the Breakdown Zone. That's a hard pass.
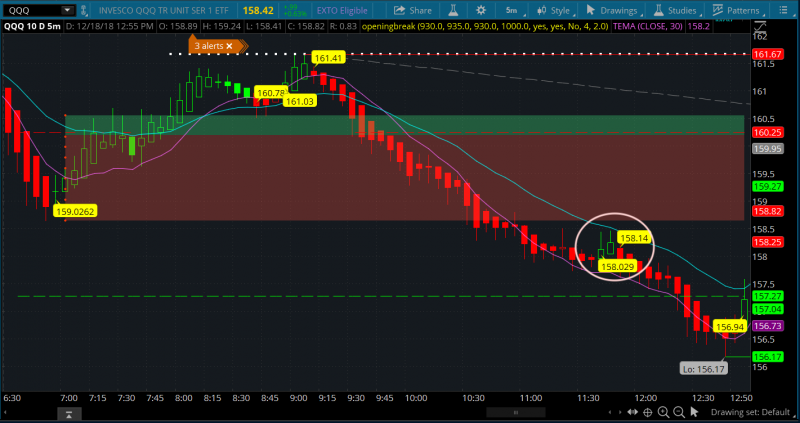
35EW7Rf.png


Again, sometimes it may be reasonable to buy calls if the candles are crossing the border going back to Bear Zone, then you may have a chance to pull thru and get above it. But anywhere between the Bear Zone and Breakdown Zone, be cautious, especially if you're already deep down in the Breakdown Zone.

Here is another example of "don't buy calls in the Breakdown zone"
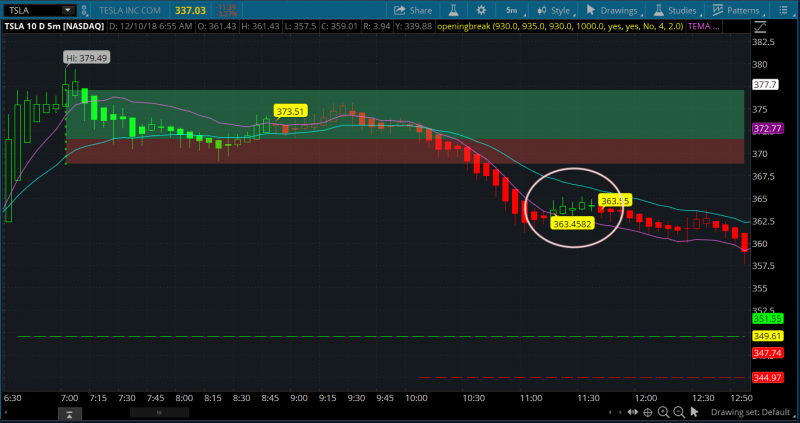
EUamb16.png


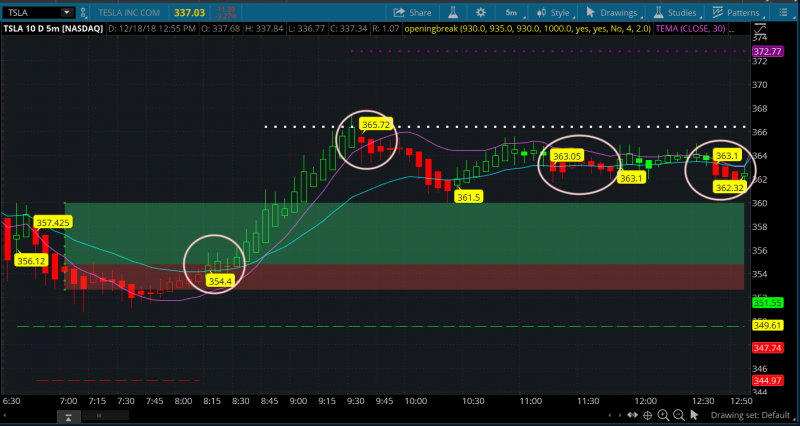
The following screenshot will tell us a few things.
telbFSl.png


  1. When the Supertrend is giving us a buy signal, and that candle is crossing from Bear Zone into Bull Zone, then it's potentially setting up for a call play. (circle #1)
  2. Unlike the rule of not buying calls when you're in Breakdown Zone, shorting when in Breakout Zone could potentially be profitable too. But only if it's reasonable. Look at circle #2. It rejected the white dotted line, which is an additional border to enter another Breakout Zone. Since it rejected the second breakout area, we could take advantage of the Supertrend signal to go short.
  3. Circle #3 and #4, don't short in Breakout Zone without reasonable evidence (I like to use Support and Resistance during the Breakout and Breakdown Zone).

When the Supertrend is showing a buy signal while the candle is in Bull Zone then it's fairly safe to take it. When Supertrend is showing a short signal while the candle s in Bear Zone, then it's fairly safe to short at that point. Treat these zones as the home of Bears and Bulls.

I think the concept is pretty simple and straightforward here. Give it a spin and let me know how it goes for you guys.

Feel free to post questions, ideas, or any additional finding from this indicator.

P.S: I'll let Steve talk more about the usage of TEMA and EMA when he's on.

Update: A different version with Fibonacci Levels.

Here is the scanner for anyone interested.
 
Last edited:
When in Breakout or Breakdown Zone, Support and Resistance can be a great help if you want to go against the trend.

 
Last edited:

Learning log v12.19

Today is the first day I got the chance to use this indicator using real money. The learning experience has been phenomenal.

Apple Calls

First position I got into was AAPL 165.5 call. I got in at 6:56 am PST (yellow arrow). I saw that the candle was really near the border of Bull Zone and Breakout Zone. Market was pulling up so I thought Apple may follow suit. I got in but then 10-15 mins later it rejected Breakout Zone and fall back down (orange arrow).

mg7259g.png


Note to self: Wait for confirmation.

P/L: -15% / -$54

Netflix Puts

The second position was NFLX 277.5 put. For this one, the reasoning was pretty simple and straightforward. Partially went above Breakout Zone, rejected it. Supertrend signaled a short so I took it. Rode it down but market kinda reversed a bit. I saw that NFLX was very weak in term of that reversal so I continue to hold to see what happen.

Later on, NFLX tested entering the Breakout Zone but it failed. Furthermore, Supertrend signaled a short so I added an additional contract and rode it down again.

QBzfIOu.png


Note to self: pay attention to trend line, support / resistance for additional confirmation.

P/L: +$73

Microsoft Put

Microsoft was really strong today compared to other tickers. As soon as the 30-min opening range is over, it just skipped the Bull Zone and went straight toward the Breakout Zone.

I knew it was gonna pullback some how, but then again, it's still in Breakout Zone so I needed more confirmations than just my opinion. Supertrend signaled a short, the candle was below the TEMA (30) and both trend lines. So i took a small bite at it.

BmFJJim.png


Glad it worked out well.

P/L: +$16.00.

Note to self: stop the weak hands.

OS' Apple Alert

Option Snipper alerted to buy a Apple call today as a lotto. I didn't enter because Apple was trying to enter the Breakout Zone (it tried to earlier and failed), so I was cautious and I waited for it to enter the zone before I start buying. It never did.

ZucOylX.png
 
Last edited:
This is a very cool indicator/strategy, thanks for sharing! I"ve tried to import the code directly, and the shared link, but i'm not getting the shadowed Bear/Bull zones. That and I can't seem to find the SuperTrend indicator on your site any more, looks like the path may have changed? Any thoughts on why i'm not seeing the red/green zones?

 
Last edited:
@ClintusMaximus Thanks for that. Make sure the settings of your indicator is like this.

FqI8qtV.png


Click on the Supertrend again. You should be able to see it.

 
Last edited:
Learning log v12.20

Second day of using the indicator. Great result!

Amazon Put Play

Like I mentioned earlier, once a stock start entering Breakdown zone, most likely it is going to _breakdown_. In the case of Amazon. It did exactly just that.

Take a look:

gMK4Rzc.png


A few things to note:

  • 1. I entered at the yellow arrow, which was a risky play. Why? Because only the wick entered the Breakout Zone. This could have bounced up and my put would have been in trouble. Next time I would be more cautious and wait for confirmation of the break below Bear Zone entering Breakdown Zone.
  • 2. I sold at the blue arrow. Nothing wrong with taking profit. But I did not follow what I usually preached. I should have let Amazon break down further.

All and all. Great play in my opinion. I'll take another bite again when the opportunity presents itself.

8r7l3kk.png


P/S: +$119 / 43% in 7 minutes.

 
Last edited:
Learning log v12.21

I'll keep this one short. Day traded several tickers today. Made about +$110 in the morning but then lost it all to one mistake. Which was not waiting for confirmation...again!

It was the case of Netflix. Around 8:30 PST I took a Netflix call because I thought it was trying to break above the resistance. I tend to get overly confident after making money from other trades. So I took the call. Did not work out well. There was obviously no confirmation there. The market was in a downtrend as well. And I also stressed in the first post that you shouldn't be buying calls when the stock is already in _Breakdown_ Zone.

I went against that with no obvious confirmation. All profit was gone.

M8cAPpv.png


Ended the day with $0.

 
Last edited:
Here is an Opening Range Breakout (ORB) indicator for ThinkorSwim with Volume Profile included.

thinkScript Code

Rich (BB code):
# Volume Profile for ORB
# V01.05.02.2018
# TOS Volume Profile with cond altered for a user input Time Range. Labels added for ORH, ORL, OR POC, Opening Range Value Percents upper and lower.
# For Intraday use only

input valueAreaPercent = 70.0;
input opacity = 15;
input RthBegin = 0930;
input OREnd = 1000;
input TimeLength = 30; #hint TimeLenght: In Minutes

def o = open;
def h = high;
def l = low;
def c = close;
def x = BarNumber();
def t = GetTime();
def RTS = RegularTradingStart(GetYYYYMMDD());
def RTE = RegularTradingEnd(GetYYYYMMDD());
def Active = SecondsFromTime(RthBegin) >= 0 and
SecondsTillTime(OREnd) > 0;
def firstBar = if Active and !Active[1]
then x
else Double.NaN;
def agg = GetAggregationPeriod();
def ORperiod_1 = if t crosses above RTS - agg + 300000
then Round(((Highest(h, 3) + Lowest(l, 3)) / 2) / TickSize(), 0) * TickSize()
else ORperiod_1[1];
plot OR_M = if x >= HighestAll(firstBar)
then HighestAll(if IsNaN(c[-1])
then ORperiod_1
else Double.NaN)
else Double.NaN;
OR_M.SetStyle(Curve.LONG_DASH);
OR_M.SetLineWeight(2);
OR_M.SetDefaultColor(Color.YELLOW);
AddChartBubble(x == firstBar, OR_M, "ORM", OR_M.TakeValueColor());
def timeSegment = (SecondsFromTime(0000) / 60) % TimeLength == 0;
def profiles = 1440 / TimeLength; # Profiles for 24 hours
def cond = if Active and !Active[1]
then 1
else timeSegment;
profile vol = VolumeProfile("startNewProfile" = cond,
"onExpansion" = 0,
"numberOfProfiles" = 20,
"pricePerRow" = TickSize(),
"value area percent" = valueAreaPercent);
def pc = if IsNaN(vol.GetPointOfControl())
then pc[1]
else vol.GetPointOfControl();
def hVA = if IsNaN(vol.GetHighestValueArea())
then hVA[1]
else vol.GetHighestValueArea();
def lVA = if IsNaN(vol.GetLowestValueArea())
then lVA[1]
else vol.GetLowestValueArea();
def hProfile = if IsNaN(vol.GetHighest())
then hProfile[1]
else vol.GetHighest();
def lProfile = if IsNaN(vol.GetLowest())
then lProfile[1]
else vol.GetLowest();
def POC_ = if Active
then Round(pc / TickSize(), 0) * TickSize()
else POC_[1];
plot POC = if x >= HighestAll(firstBar)
then HighestAll(if IsNaN(c[-1])
then POC_
else Double.NaN)
else Double.NaN;
def ProfileHigh_ = if Active
then hProfile
else ProfileHigh_[1];
plot ProfileHigh = if x >= HighestAll(firstBar)
then ProfileHigh_
else Double.NaN;
def ProfileLow_ = if Active
then lProfile
else ProfileLow_[1];
plot ProfileLow = if x >= HighestAll(firstBar)
then ProfileLow_
else Double.NaN;
def VAHigh_ = if Active
then Round(hVA / TickSize(), 0) * TickSize()
else VAHigh_[1];
plot VAHigh = if x >= HighestAll(firstBar)
then HighestAll(if IsNaN(c[-1])
then VAHigh_
else Double.NaN)
else Double.NaN;
def VALow_ = if Active
then Round(lVA / TickSize(), 0) * TickSize()
else VALow_[1];
plot VALow = if x >= HighestAll(firstBar)
then HighestAll(if IsNaN(c[-1])
then VALow_
else Double.NaN)
else Double.NaN;
vol.Show(color.current, Color.YELLOW, Color.current, opacity);
POC.SetStyle(Curve.LONG_DASH);
POC.SetLineWeight(3);
POC.SetDefaultColor(Color.YELLOW);
VAHigh.SetStyle(Curve.LONG_DASH);
VAHigh.SetLineWeight(1);
VALow.SetStyle(Curve.LONG_DASH);
VALow.SetLineWeight(1);
VAHigh.SetDefaultColor(Color.GRAY);
VALow.SetDefaultColor(Color.GRAY);
ProfileHigh.SetStyle(Curve.LONG_DASH);
ProfileHigh.SetLineWeight(3);
ProfileLow.SetStyle(Curve.LONG_DASH);
ProfileLow.SetLineWeight(3);
ProfileHigh.SetDefaultColor(Color.GREEN);
ProfileLow.SetDefaultColor(Color.RED);
def bubble = IsNaN(c[2]) and !IsNaN(c[3]);
AddChartBubble(bubble, VAHigh, "OR %" + valueAreaPercent, VAHigh.TakeValueColor(), yes);
AddChartBubble(bubble, VALow, "OR %" + valueAreaPercent, VALow.TakeValueColor(), no);
AddChartBubble(bubble, POC, "OR POC", POC.TakeValueColor(), no);
AddChartBubble(bubble, ProfileHigh, "ORH", ProfileHigh.TakeValueColor(), yes);
AddChartBubble(bubble, ProfileLow, "ORL", ProfileLow.TakeValueColor(), no);
AddVerticalLine(Active and !Active[1], "RTH", Color.CYAN, Curve.SHORT_DASH);
AddVerticalLine(!Active and Active[1], "ORend", Color.CYAN, Curve.SHORT_DASH);
AddVerticalLine(t crosses above RTE, "RTHend", Color.CYAN, Curve.SHORT_DASH);
def prevClose = if t crosses above RTE
then vwap
else prevClose[1];
def prevCloseBar = if t crosses above RTE
then BarNumber()
else Double.NaN;
plot prevCloseLine = if x >= HighestAll(prevCloseBar)
then HighestAll(if IsNaN(c[-1])
then prevClose
else Double.NaN)
else Double.NaN;
prevCloseLine.SetStyle(Curve.SHORT_DASH);
prevCloseLine.SetDefaultColor(Color.GRAY);
AddChartBubble(x == HighestAll(x), prevCloseLine, "RTH C", prevCloseLine.TakeValueColor(), no);
def RTHopen = if Active and !Active[1]
then o
else RTHopen[1];
plot RTHopen_ = if x >= HighestAll(firstBar)
then HighestAll(if IsNaN(c[-1])
then RTHopen
else Double.NaN)
else Double.NaN;
RTHopen_.SetStyle(Curve.SHORT_DASH);
RTHopen_.SetDefaultColor(Color.GRAY);
AddChartBubble(x == HighestAll(x), RTHopen, "RTH O", RTHopen_.TakeValueColor(), no);
# End Code ORB using Volume Profile

Shareable Link

https://tos.mx/2TscIe
 
Last edited:
@Gildes You can also check out this simplified version of ORB.


Rich (BB code):
# Clayburgs Directional Day Filter 

# Written by KumoBob Dec 31 2009 

# I removed the Price Bulbs and added Arrows 

# Thanks to ThinkScriptor and aPPLE_PI for helping me with the secondsfromtime() function by showing me the code writen by Prospectus in his Opening Range study. 

# Directional Day Filter Line - After the first five minutes calculate the average range for this 5-minute bar. Draw a horizontal line at this level. 

# Time Line - Draw a vertical line at 60-minute bar (Low to High of the day so far). 

# (slower value for faster moving charts like currency and S&P – Faster value for slower moving charts) (45 minutes to 90 minutes) 

# Determine the amount of activity above and below the Directional Day Filter Line prior to the Time Line. 

# (A rectangle can be drawn with Blue shading above and Red below the Directional Day Filter Line) 

# If the majority of the activity is above the Directional Day Filter Line the trend bias for the day will be higher. 

# If the majority of the activity is below the Directional Day Filter Line the trend bias for the day will be lower. 

# If it's even the day will most likely be flat. 

# If the closing bar on the Time Line is within 1/3 the distance from the Directional Day Filter Line then added bias can be anticipated. 

#hint: Best used in a 1 to 5 minute chart period 

def na = double.nan; 
Directional Day Filter Line 

input ORBegin = 0930; 

input OREnd = 0935; 

# Show Today only? (Default Yes) 

input ShowTodayOnly = { default "No", "Yes"}; 

def s = ShowTodayOnly; 

# Create logic for OR definition: 1 if between fist 5 minutes 

Def ORActive = if secondsTillTime(OREnd) > 0 AND secondsFromTime(ORBegin) >= 0 then 1 else 0; 

# Create logic to paint only current day post-open: 

def today = if s == 0 OR getDay() == getLastDay() AND secondsFromTime(ORBegin) >= 0 then 1 else 0; 

# Track OR High: 

Rec ORHigh = if ORHigh[1] == 0 or ORActive[1] == 0 AND ORActive == 1 then high else if ORActive AND high > ORHigh[1] then high else ORHigh[1]; 

# Track OR Low: 

Rec ORLow = if ORLow[1] == 0 or ORActive[1] == 0 AND ORActive == 1 then low else if ORActive AND low < ORLow[1] then low else ORLow[1]; 

# Calculate OR width: 

Def ORWidth = ORHigh - ORLow; 

# Define all the plots: 

Def ORHA = if ORActive OR today < 1 then na else ORHigh; 

Def ORLA = if ORActive OR today < 1 then na else ORLow; 

Def O = ORHA - (ORHA - ORLA) / 2; 

Plot ORL = if (o == 0 , na, o); 

ORL.SetDefaultColor(color.Yellow); 

ORL.SetStyle(curve.Long_DASH); 

ORL.SetLineWeight(3); 
Time Line 

input ORBegin2 = 0930; 

# Define time that OR is finished (in hhmm format, 

# 10:00 is the default): 

input OREnd2 = 1030; 

# Show Today only? (Default Yes) 

#input ShowTodayOnly={"No", default "Yes"}; 

#def s=ShowTodayOnly; 

# Create logic for OR definition: 

Def ORActive2 = if secondsTillTime(OREnd2) > 0 AND secondsFromTime(ORBegin2) >= 0 then 1 else 0; 

# Create logic to paint only current day post-open: 

def today=if s==0 OR getday()==getlastday() AND secondsfromtime(ORBegin2)>=0 then 1 else 0; 

# Track OR High: 

Rec ORHigh2 = if ORHigh2[1] == 0 or ORActive2[1] == 0 AND ORActive2 == 1 then high else if ORActive2 AND high > ORHigh2[1] then high else ORHigh2[1]; 

# Track OR Low: 

Rec ORLow2 = if ORLow2[1] == 0 or ORActive2[1] == 0 AND ORActive2 == 1 then low else if ORActive2 AND low < ORLow2[1] then low else ORLow2[1]; 

# Calculate OR width: 

Def ORWidth2 = ORHigh2 - ORLow2; 

# Define all the plots: 

Plot ORH2 = if ORActive2 OR today < 1 then na else ORHigh2; 

Plot ORL2 = if ORActive2 OR today < 1 then na else ORLow2; 

# Formatting: 

ORH2.SetDefaultColor(color.green); 

ORH2.SetStyle(curve.Long_DASH); 

ORH2.SetLineWeight(3); 

ORL2.SetDefaultColor(color.red); 

ORL2.SetStyle(curve.Long_DASH); 

ORL2.SetLineWeight(3); 


Def TimeLine = if secondsTillTime(OREnd2) == 0 then 1 else 0; 

Def pos = (ORH2 - ORL2) / 10; 

plot d1 = if (TimeLine , ORH2, na); 

plot d2 = if (TimeLine , ORH2 - ( pos * 2), na); 

plot d3 = if (TimeLine , ORH2 - ( pos * 3), na); 

plot d4 = if (TimeLine , ORH2 - ( pos * 4), na); 

plot d5 = if (TimeLine , ORH2 - ( pos * 5), na); 

plot d6 = if (TimeLine , ORH2 - ( pos * 6), na); 

plot d7 = if (TimeLine , ORH2 - ( pos * 7), na); 

plot d8 = if (TimeLine , ORH2 - ( pos * 8), na); 

plot d9 = if (TimeLine , ORH2 - ( pos * 9), na); 

plot d10 = if (TimeLine , (ORL2), na); 

d1.SetPaintingStrategy(PaintingStrategy.arrow_down); 

d10.SetPaintingStrategy(PaintingStrategy.ARROW_UP); 

d2.HideBubble(); 

d3.HideBubble(); 

d4.HideBubble(); 

d5.HideBubble(); 

d6.HideBubble(); 

d7.HideBubble(); 

d8.HideBubble(); 

d9.HideBubble(); 
 
DEF Span = (O - ORL2) / (ORH2 - ORL2); 

rec colorState = if Span > 0.66 then -1 

else if Span < 0.33 then 1 else 0; 

d1.AssignValueColor( 

if colorState < 0 then Color.RED else 

if colorState > 0 then Color.GREEN else 

Color.Yellow 

); 

d2.AssignValueColor( 

if colorState < 0 then Color.RED else 

if colorState > 0 then Color.GREEN else 

Color.Yellow 

); 

d3.AssignValueColor( 

if colorState < 0 then Color.RED else 

if colorState > 0 then Color.GREEN else 

Color.Yellow 

); 

d4.AssignValueColor( 

if colorState < 0 then Color.RED else 

if colorState > 0 then Color.GREEN else 

Color.Yellow 

); 

d5.AssignValueColor( 

if colorState < 0 then Color.RED else 

if colorState > 0 then Color.GREEN else 

Color.Yellow 

); 

d6.AssignValueColor( 

if colorState < 0 then Color.RED else 

if colorState > 0 then Color.GREEN else 

Color.Yellow 

); 

d7.AssignValueColor( 

if colorState < 0 then Color.RED else 

if colorState > 0 then Color.GREEN else 

Color.Yellow 

); 

d8.AssignValueColor( 

if colorState < 0 then Color.RED else 

if colorState > 0 then Color.GREEN else 

Color.Yellow 

); 

d9.AssignValueColor( 

if colorState < 0 then Color.RED else 

if colorState > 0 then Color.GREEN else 

Color.Yellow 

); 

d10.AssignValueColor( 

if colorState < 0 then Color.RED else 

if colorState > 0 then Color.red else 

Color.Yellow 

); 

d1.SetLineWeight(5); 

d2.SetLineWeight(5); 

d3.SetLineWeight(5); 

d4.SetLineWeight(5); 

d5.SetLineWeight(5); 

d6.SetLineWeight(5); 

d7.SetLineWeight(5); 

d8.SetLineWeight(5); 

d9.SetLineWeight(5); 

d10.SetLineWeight(5); 


Def TimeLineb = if secondsTillTime(OREND) == 0 then 1 else 0; 

Def posbd = (ORHA - ORLA) / 10; 

plot bd1 = if (TimeLineb , ORHA, na); 

plot bd2 = if (TimeLineb , ORHA - ( posbd * 2), na); 

plot bd3 = if (TimeLineb , ORHA - ( posbd * 3), na); 

plot bd4 = if (TimeLineb , ORHA - ( posbd * 4), na); 

plot bd5 = if (TimeLineb , ORHA - ( posbd * 5), na); 

plot bd6 = if (TimeLineb , ORHA - ( posbd * 6), na); 

plot bd7 = if (TimeLineb , ORHA - ( posbd * 7), na); 

plot bd8 = if (TimeLineb , ORHA - ( posbd * 8), na); 

plot bd9 = if (TimeLineb , ORHA - ( posbd * 9), na); 

plot bd10 = if (TimeLineb , (ORL2), na); 


bd1.SetDefaultColor(Color.YELLOW); 

bd2.SetDefaultColor(Color.YELLOW); 

bd3.SetDefaultColor(Color.YELLOW); 

bd4.SetDefaultColor(Color.YELLOW); 

bd5.SetDefaultColor(Color.YELLOW); 

bd6.SetDefaultColor(Color.YELLOW); 

bd7.SetDefaultColor(Color.YELLOW); 

bd8.SetDefaultColor(Color.YELLOW); 

bd9.SetDefaultColor(Color.YELLOW); 

bd10.SetDefaultColor(Color.YELLOW); 


bd1.HideBubble(); 

bd2.HideBubble(); 

bd3.HideBubble(); 

bd4.HideBubble(); 

bd5.HideBubble(); 

bd6.HideBubble(); 

bd7.HideBubble(); 

bd8.HideBubble(); 

bd9.HideBubble(); 

bd10.HideBubble(); 

#def aggregation = if getAggregationPeriod() == (AggregationPeriod.MIN * 5) or (AggregationPeriod.MIN * 10) or (AggregationPeriod.MIN * 15) then 1 else 0 ; 

def aggregation = 1;
 
Last edited:
Rich (BB code):
# Mobius from TSL April, 2019
# Opening Range Breakout - UP 
# Highest and Best use for this scan is as a Dynamic WatchList 
# Scan Resets Every Day
 
# Set Aggregation Period to 5 minutes or less  
# Mobius 
# Scan 
 
def Active = if SecondsFromTime(0930) > 0 and 

                SecondsTillTime(0945) >= 0 

             then 1 

             else 0; 

def ActiveHigh = if Active and !Active[1] 

                 then high 

                 else if Active and 

                         high > ActiveHigh[1] 

                       then high 

                       else ActiveHigh[1]; 

plot Breakout = if !Active and close > ActiveHigh 

                then 1 

                else 0;
 
Last edited by a moderator:
@BbenSD Here's the ORB breakout (bullish) scan that Mobius posted a few months ago. Run that on a 5 min aggregation scan. A breakdown (bearish) scan can be written in no time

Code:
# Opening Range Breakout - UP
# Highest and Best use for this scan is as a Dynamic WatchList
# Scan Resets Every Day
# Set Aggregation Period to 5 minutes or less 
# Mobius
# Scan

def Active = if SecondsFromTime(0930) > 0 and
                SecondsTillTime(1000) >= 0
             then 1
             else 0;
def ActiveHigh = if Active and !Active[1]
                 then high
                 else if Active and
                         high > ActiveHigh[1]
                       then high
                       else ActiveHigh[1];
plot Breakout = if !Active and close > ActiveHigh
                then 1
                else 0;
 
@BbenSD While the ORB is still active in my mind, I have written the ORB breakdown scan for you.
Just ran a scan on the S&P 500 on a 5 min aggregation and obtained 85 results

Code:
# ORB Breakdown Scan
# tomsk
# 11.27.2019
# Run the scan at 5 min aggregation

def Active = SecondsFromTime(0930) > 0 and SecondsTillTime(1000) >= 0;
def ActiveLow = if Active and !Active[1]
                then low
                else if Active and
                        low < ActiveLow[1]
                      then low
                      else ActiveLow[1];
plot Breakdown = !Active and close < ActiveLow;
 
I added the
  • Momentum Keltner Channel
  • Ultimate MACD
  • VWAP
to the Openign Range Breakout.

Look at the possibel trade entry:
  • Price in Bull Zone
  • Prive above VWAP
  • Long Siganl on Momentum Keltner "green arrow"
MACD crosses aboge yellow signal line

Does that make sense?

MRgivPD.png


Maybe you can add the BB Stop for taking profit

zFGQqTy.png
 

New Indicator: Buy the Dip

Check out our Buy the Dip indicator and see how it can help you find profitable swing trading ideas. Scanner, watchlist columns, and add-ons are included.

Download the indicator

Join useThinkScript to post your question to a community of 21,000+ developers and traders.

Similar threads

Not the exact question you're looking for?

Start a new thread and receive assistance from our community.

87k+ Posts
544 Online
Create Post

Similar threads

Similar threads

The Market Trading Game Changer

Join 2,500+ subscribers inside the useThinkScript VIP Membership Club
  • Exclusive indicators
  • Proven strategies & setups
  • Private Discord community
  • ‘Buy The Dip’ signal alerts
  • Exclusive members-only content
  • Add-ons and resources
  • 1 full year of unlimited support

Frequently Asked Questions

What is useThinkScript?

useThinkScript is the #1 community of stock market investors using indicators and other tools to power their trading strategies. Traders of all skill levels use our forums to learn about scripting and indicators, help each other, and discover new ways to gain an edge in the markets.

How do I get started?

We get it. Our forum can be intimidating, if not overwhelming. With thousands of topics, tens of thousands of posts, our community has created an incredibly deep knowledge base for stock traders. No one can ever exhaust every resource provided on our site.

If you are new, or just looking for guidance, here are some helpful links to get you started.

What are the benefits of VIP Membership?
VIP members get exclusive access to these proven and tested premium indicators: Buy the Dip, Advanced Market Moves 2.0, Take Profit, and Volatility Trading Range. In addition, VIP members get access to over 50 VIP-only custom indicators, add-ons, and strategies, private VIP-only forums, private Discord channel to discuss trades and strategies in real-time, customer support, trade alerts, and much more. Learn all about VIP membership here.
How can I access the premium indicators?
To access the premium indicators, which are plug and play ready, sign up for VIP membership here.
Back
Top