
Liquidity Map
(Updated: V1.1)
Liquidity Map — Microstructure Study (WIP)
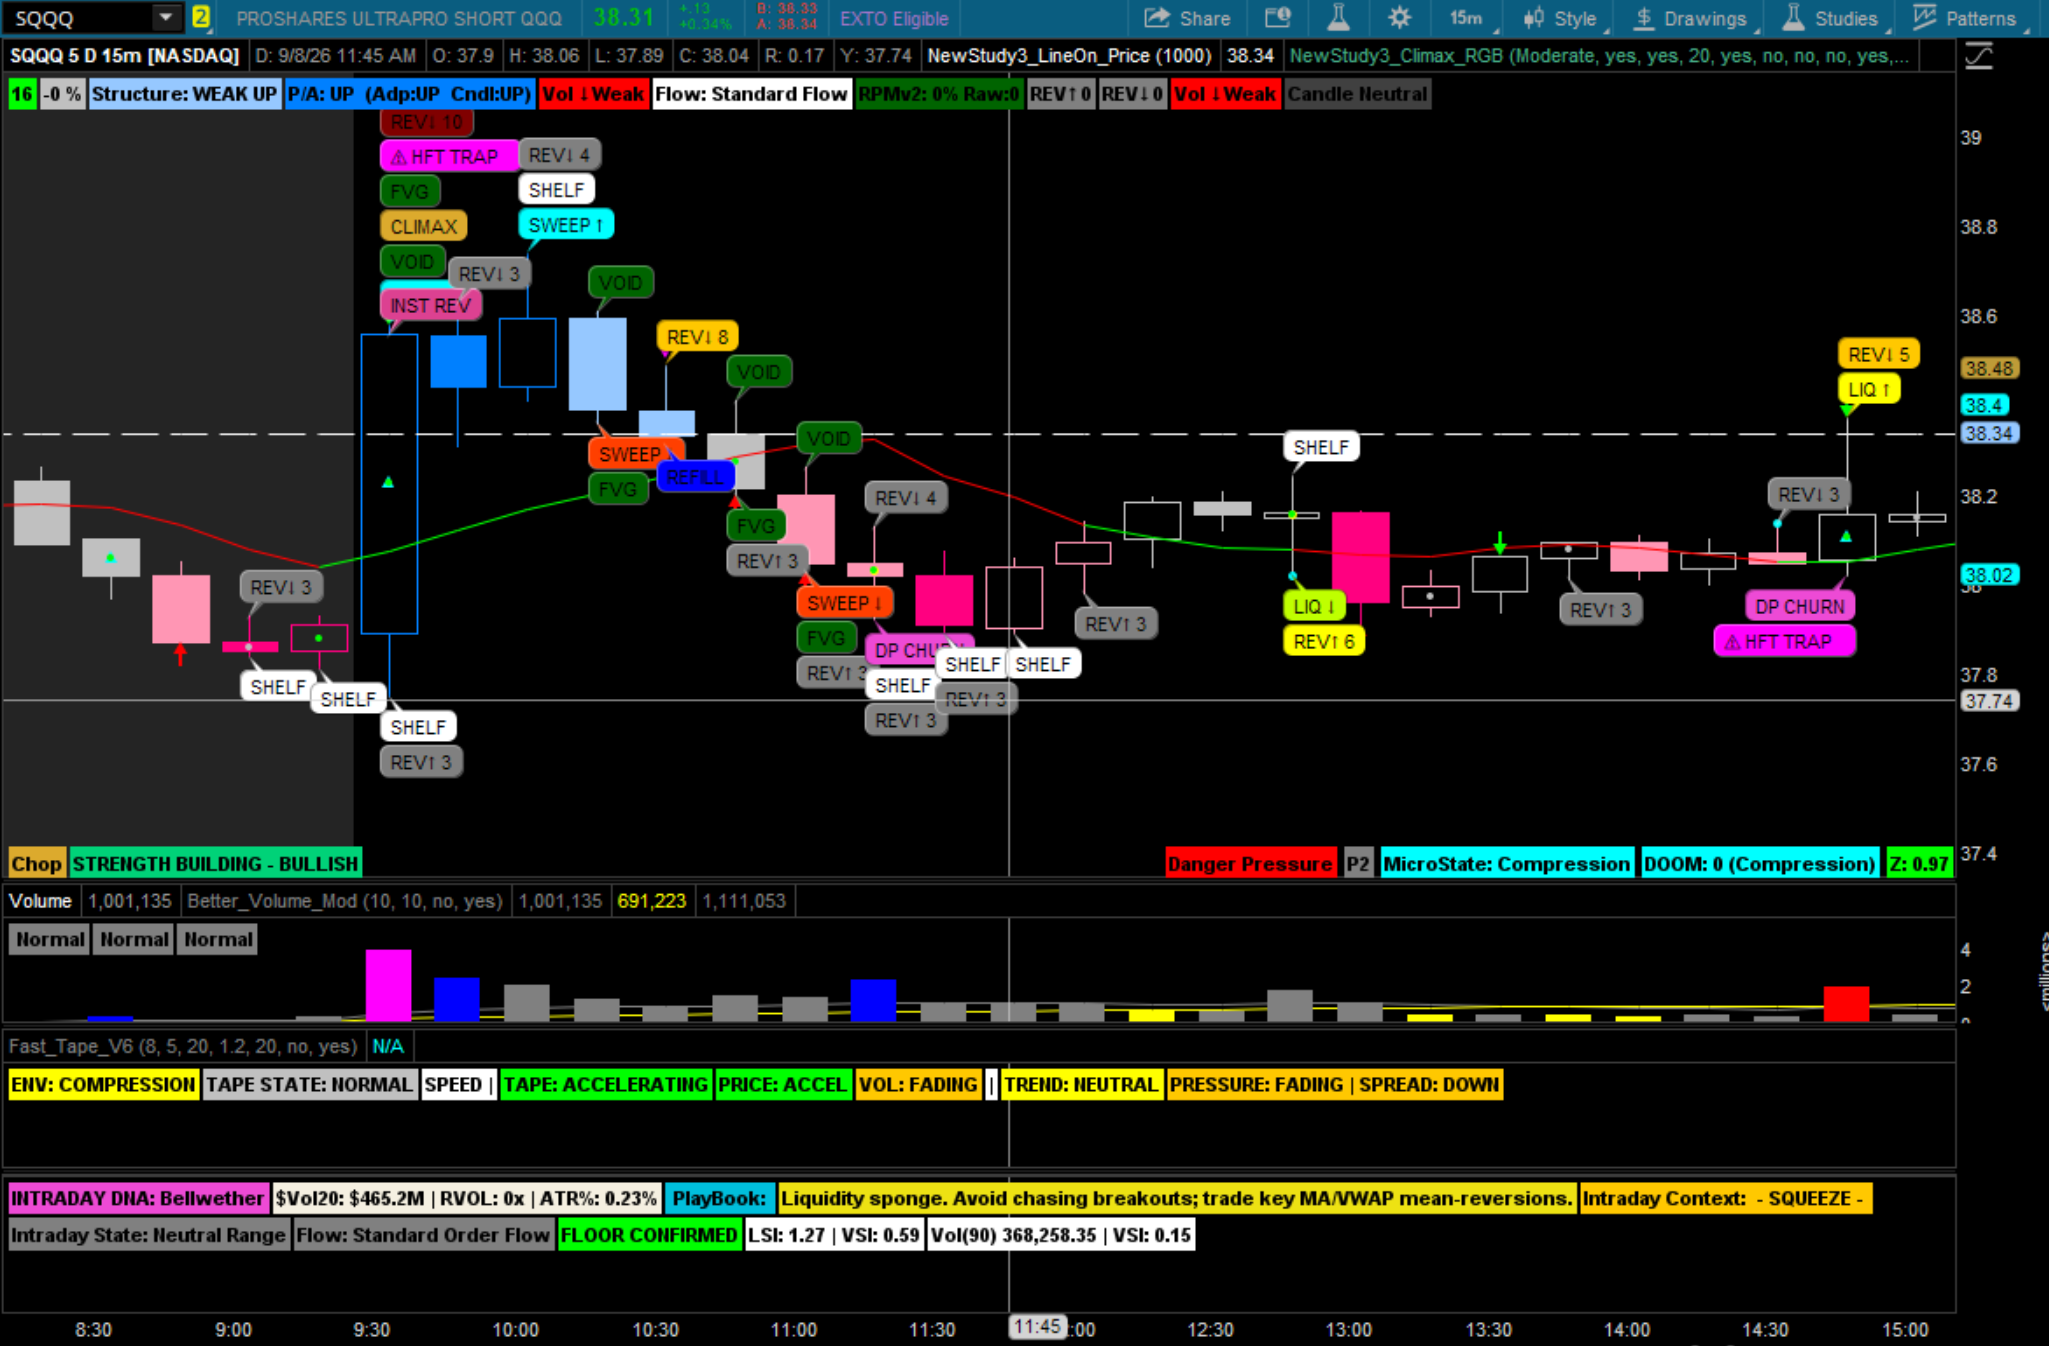
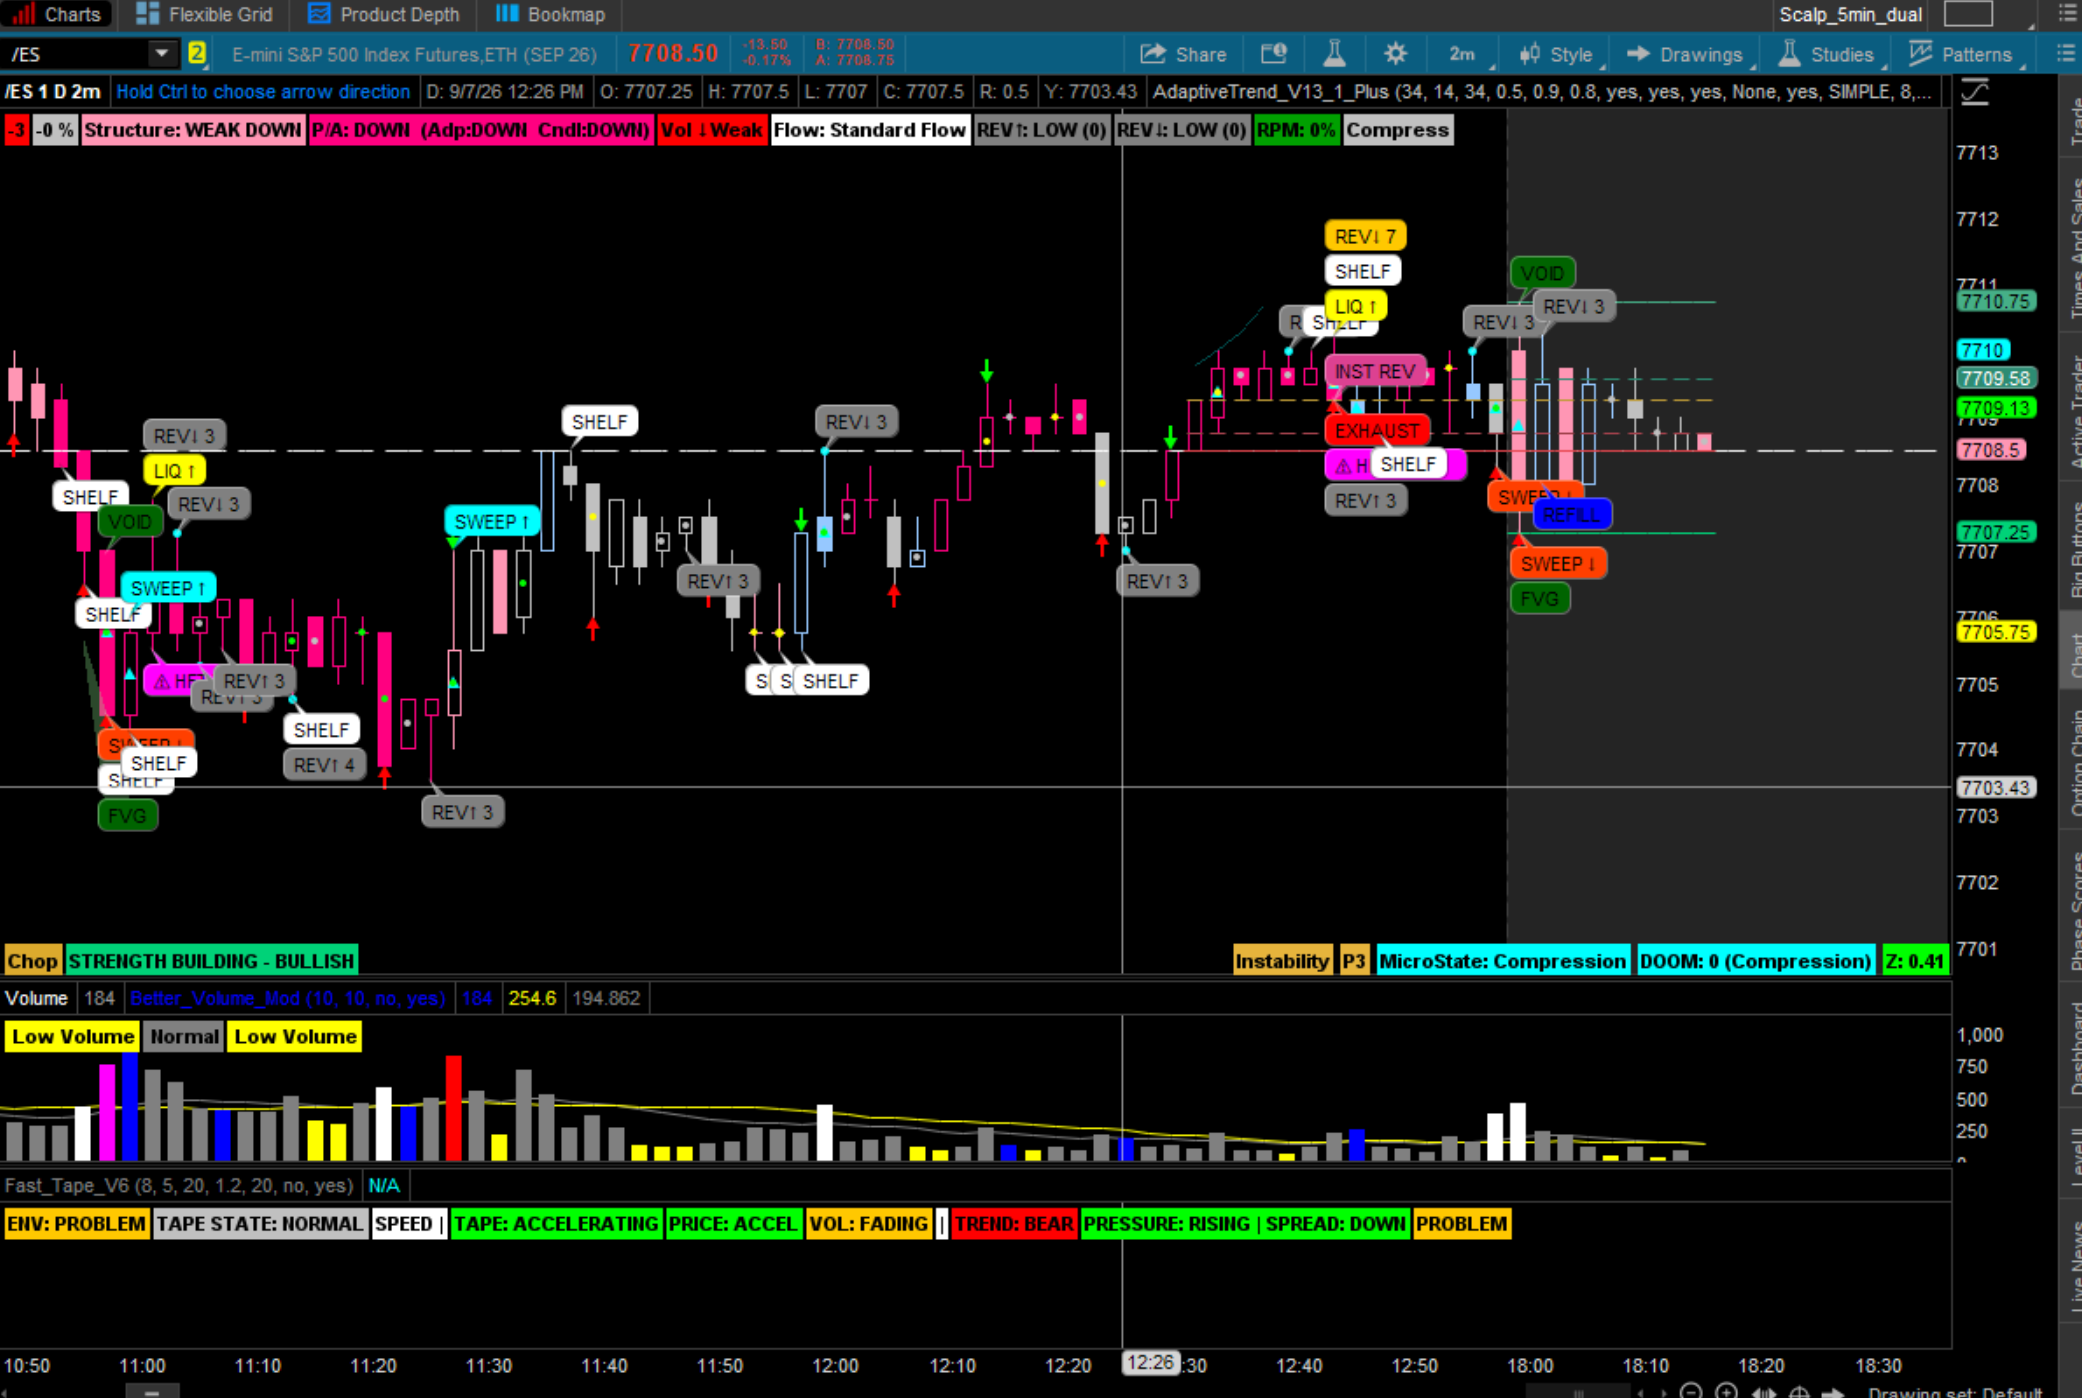
Ventured deep into the liquidity‑programming rabbit hole and built a microstructure engine to visualize how liquidity actually behaves on the chart. It maps 15 structural zones, RPM confluence, directional REV↑/REV↓ probability, volume pressure, and candle‑behavior footprints.
This is a new arena for me, so if you spot anything in the code that can be improved, tightened, or optimized — I’m all ears.
Surprisingly, it plays extremely well with the Climax Trap study and YTC lines.
Testing Chart with All studies
Liquidity Test Chart
Method to the Madness…..
 Liquidity Map — Zone & Math Breakdown
ZONE 1 — Dark Pool Churn
High volume, low movement → hidden accumulation/distribution. Math: RVOL20 > 1.8 and body < 35% of range.
ZONES 2–3 — Sweeps (Up/Down)
Aggressive runs through highs/lows. Math: RVOL20 > 1.5, body > ATR20 * 0.65, directional close.
ZONES 4–5 — Stop‑Grabs (Up/Down)
Wick‑heavy stop runs that fail to continue. Math: Wick > 45% of range, RVOL20 > 1.5, close back inside mid‑range.
ZONE 6 — Hidden Absorption
Institutions absorbing flow without moving price. Math: RVOL20 ≥ 2.0, body ≤ ATR20 * 0.30, wick sum ≤ 50% of body.
ZONES 7–8 — Voids & Refills
True displacement beyond prior high/low → imbalance → correction. Void Math: Break prior high/low, body > ATR20 * 0.6, wick < 15%, RVOL20 > 1.5. Refill Math: Void[1] and price returns to prior boundary.
ZONE 9 — Volume Climax
Exhaustive push with extreme volume. Math: RVOL20 > 3.0, body > ATR20 * 0.8, wick sum < 30%.
ZONE 10 — Trend Exhaustion
Strong effort → weak result. Math: RVOL20 > 1.5, body > ATR20 * 0.5, opposite wick > 40%.
ZONE 11 — Liquidity Shelves (High/Medium/Institutional)
Multi‑bar liquidity storage zones. Math: Highest/lowest of last 5 bars + RVOL/range/wick filters depending on mode.
ZONE 12 — Pivot Cluster
Compression of highs/lows + range + volume. Math: Pivot band compression + range compression + volume compression + structural confluence.
ZONE 13 — Institutional Reversal Signature
Multi‑zone reversal confluence. Math: Exhaustion + refill, or climax + shelf, or stop‑grab + exhaustion.
ZONE 14 — Fair Value Gap (FVG)
Void without refill. Math: isVoid AND NOT isVoidRefill.
ZONE 15 — HFT VWAP Trap
VWAP deviation + structural trap. Math: High/low outside VWAP bands + stop‑grab/climax/exhaustion confluence.
The Liquidity Map started as a way to sanity‑check the math and ended up becoming a full microstructure engine. Every zone, footprint, and probability score is built from observable behavior — no indicators, no predictions, no shortcuts. Just structure, volume, displacement, exhaustion, and the footprints left behind when liquidity is taken, defended, or trapped.
If you dig into the code, focus on the zone logic. That’s the heart of the study. The visuals, RPM, REV↑/REV↓, volume pressure, and candle‑behavior engine all exist to make that math readable on the chart.
Still a work in progress, and still learning — so any technical feedback, corrections, or improvements are appreciated. The goal is simple: map liquidity honestly and let the market tell its own story.
Study Link
Study Liquidity_Map
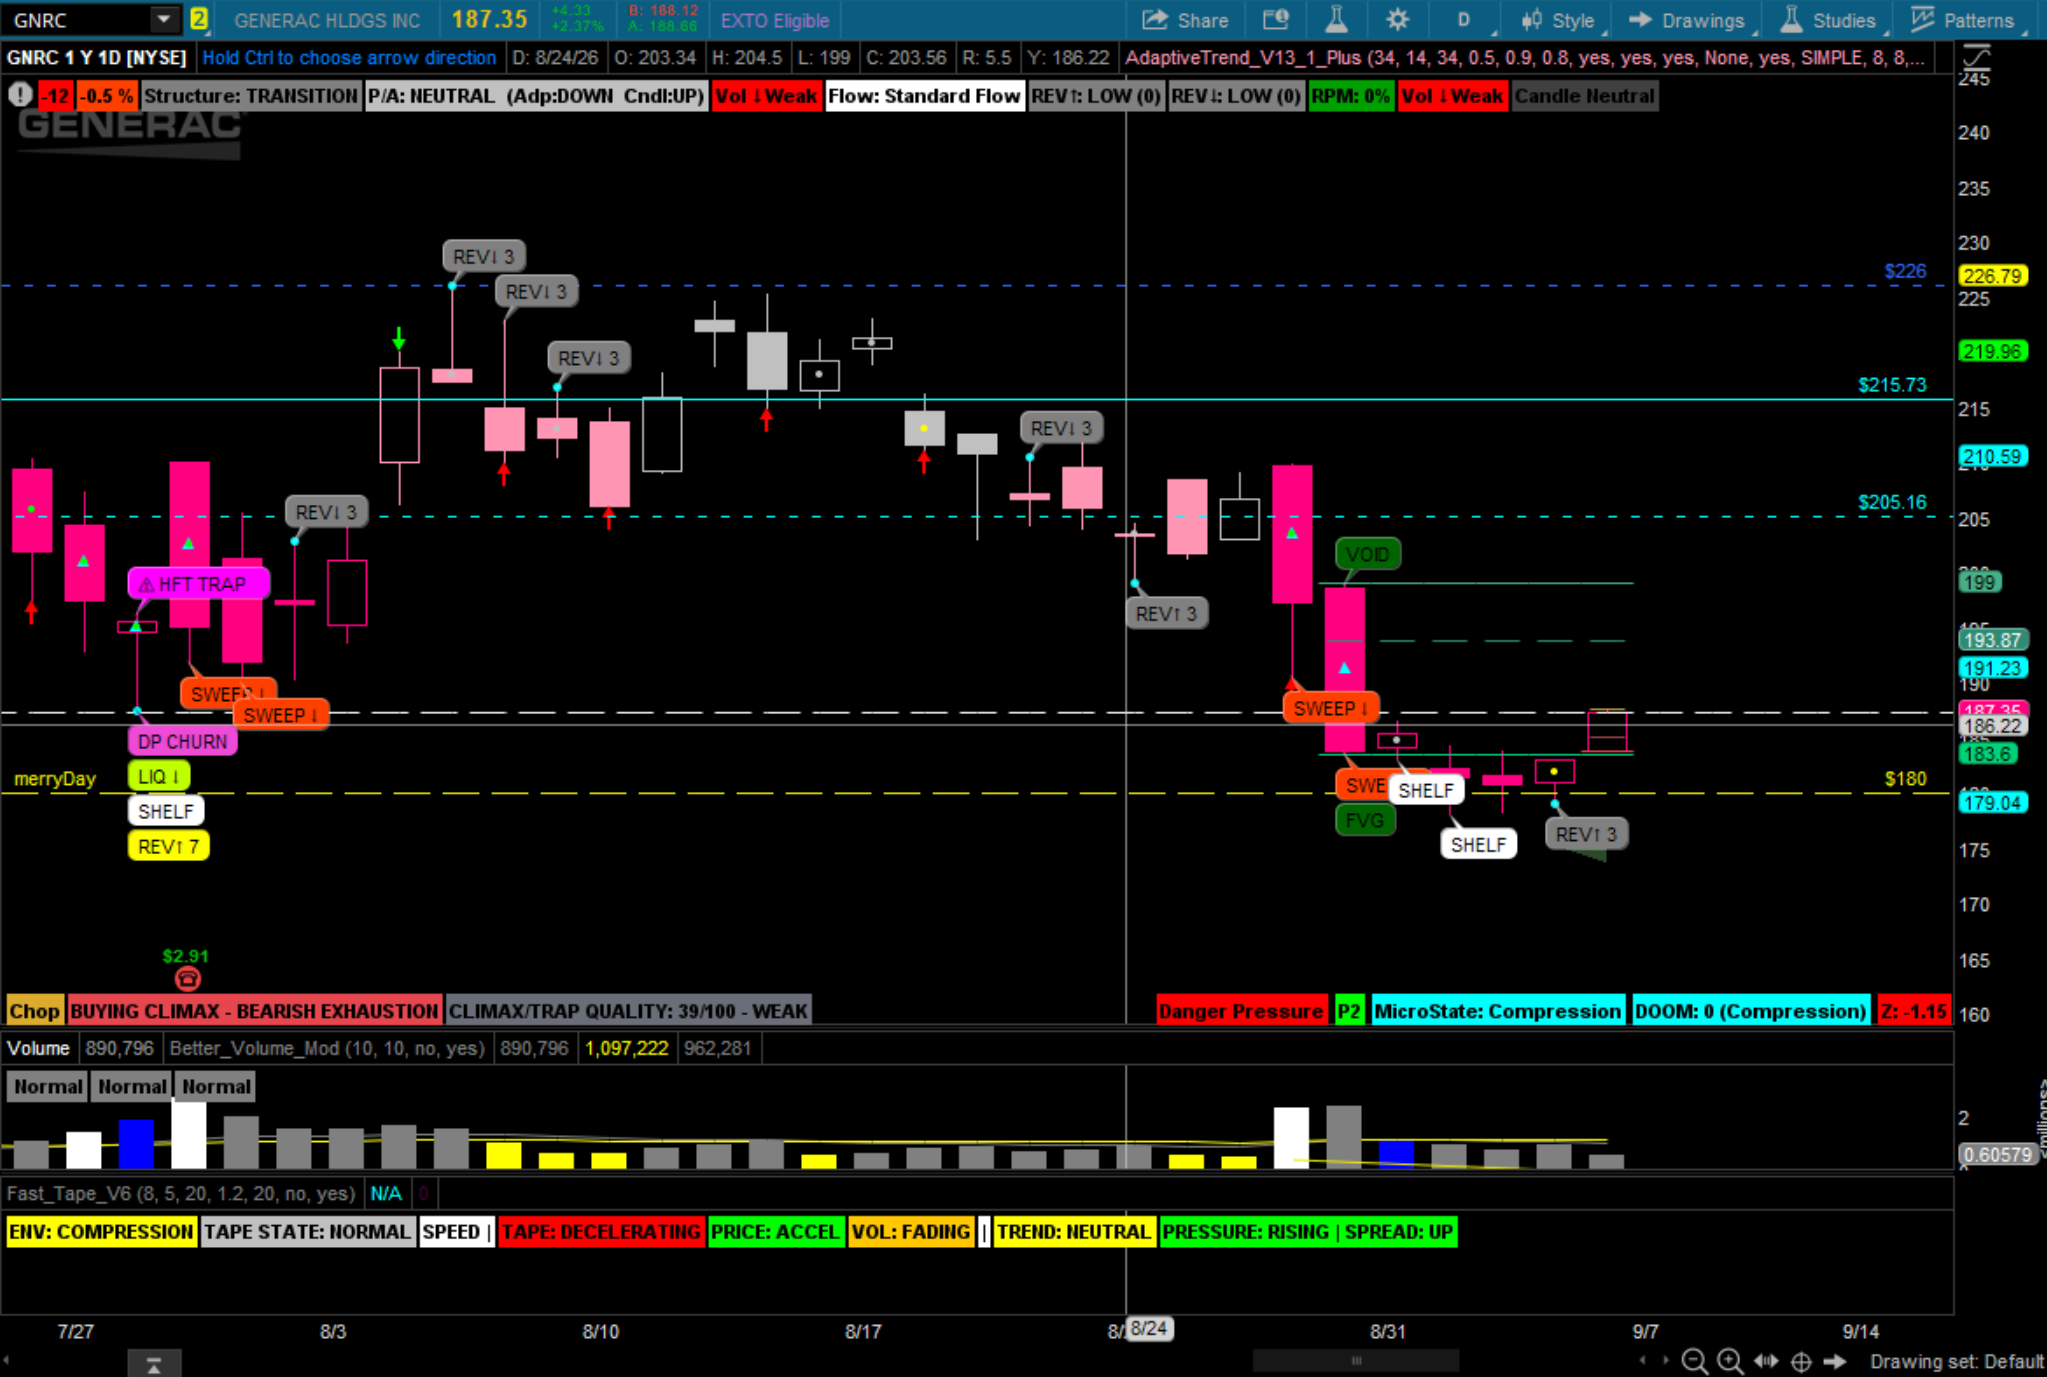
My latest snafu, GNRC walk down: D,30min/15min/5minEOD
Daily
30min
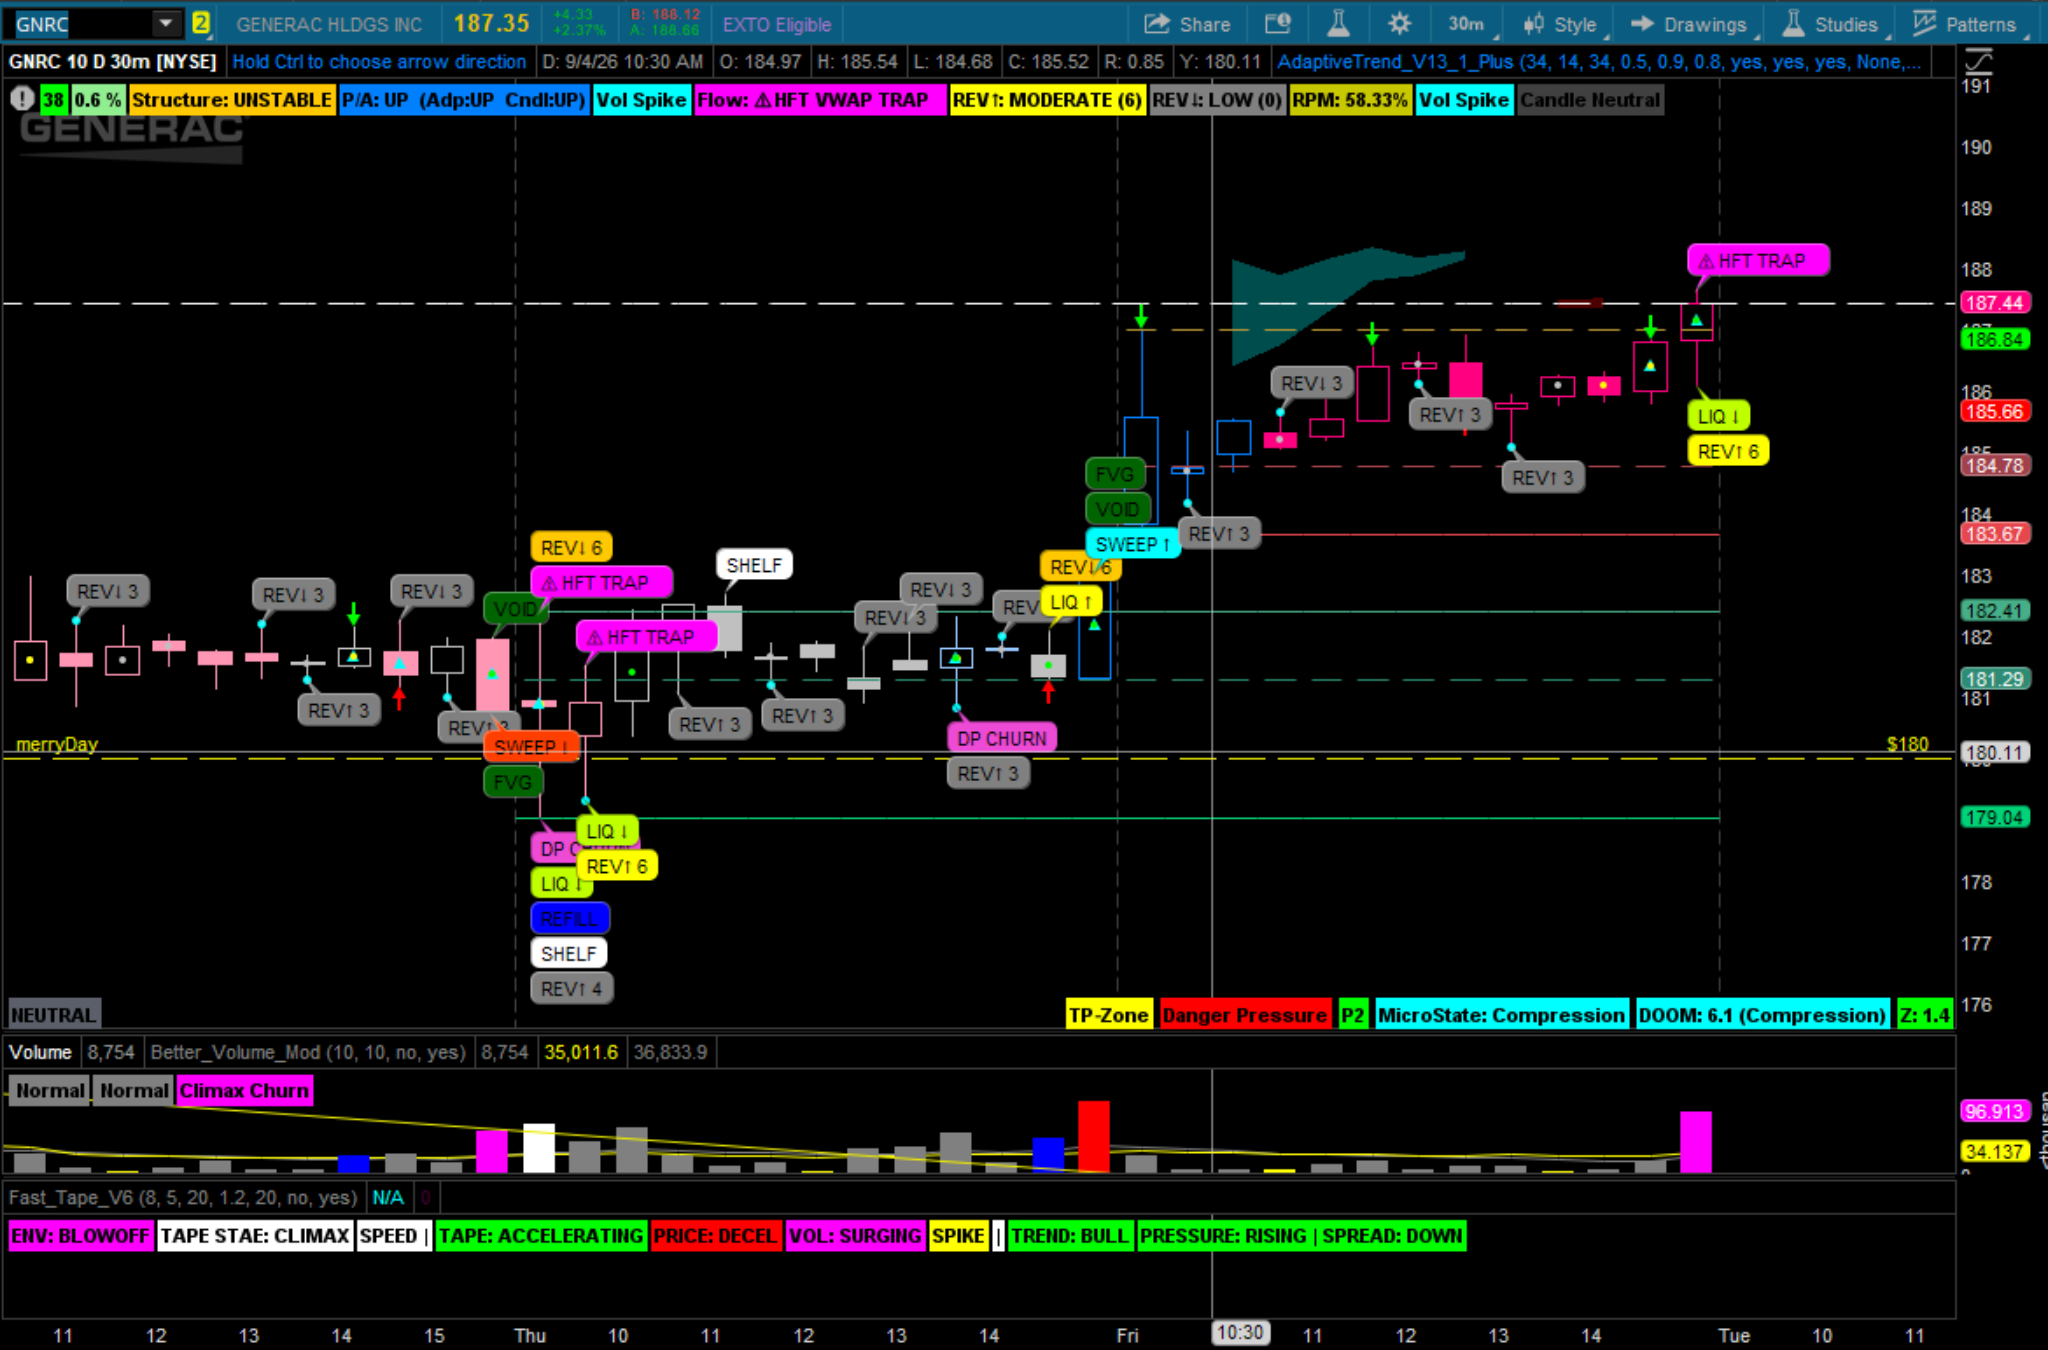
15min
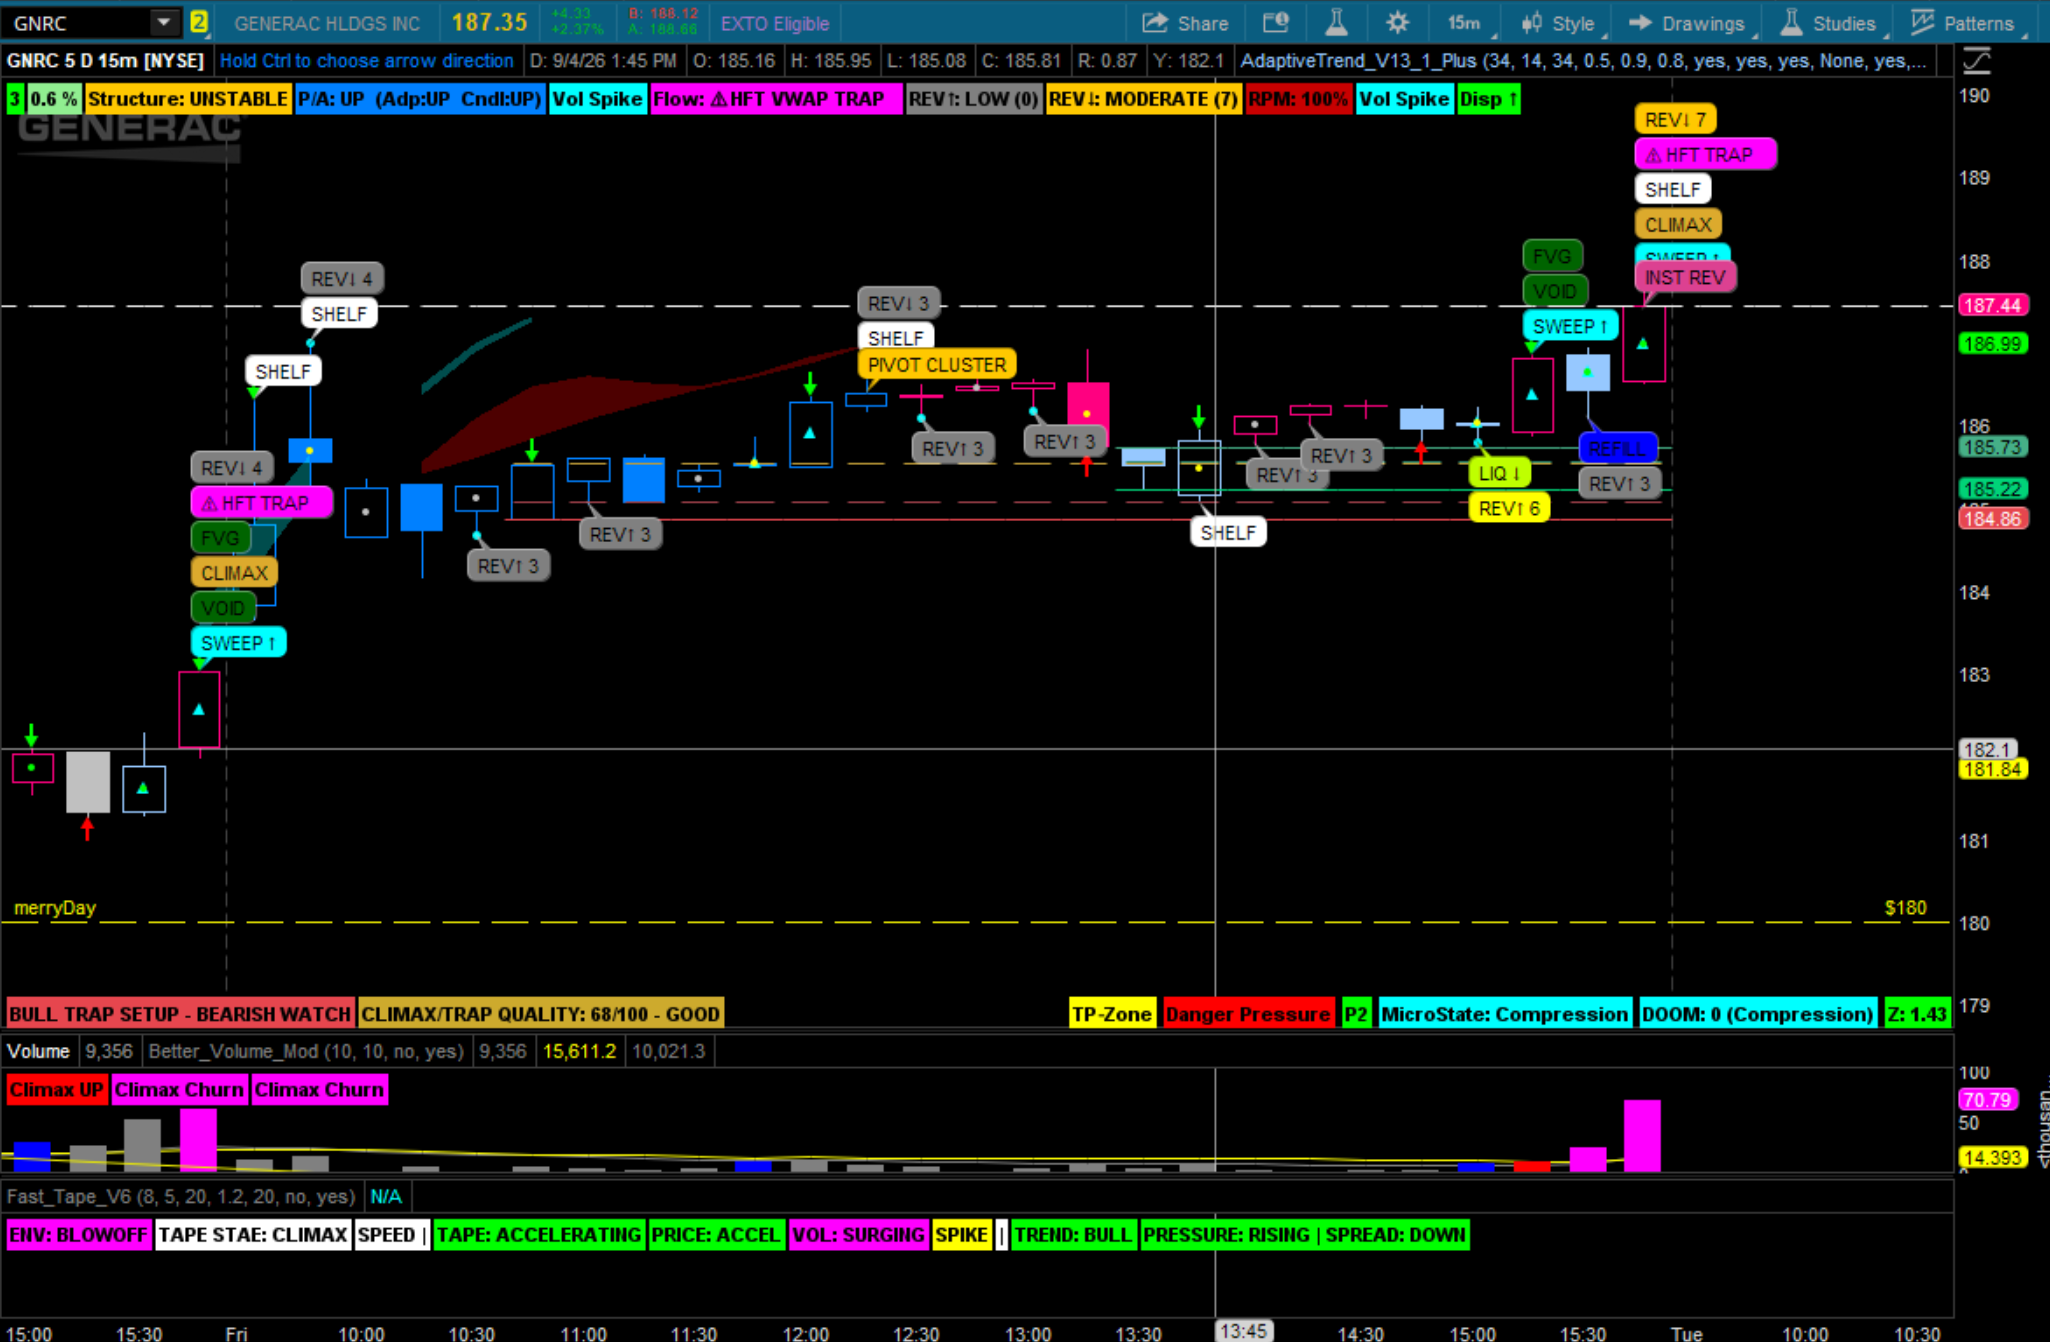
5min
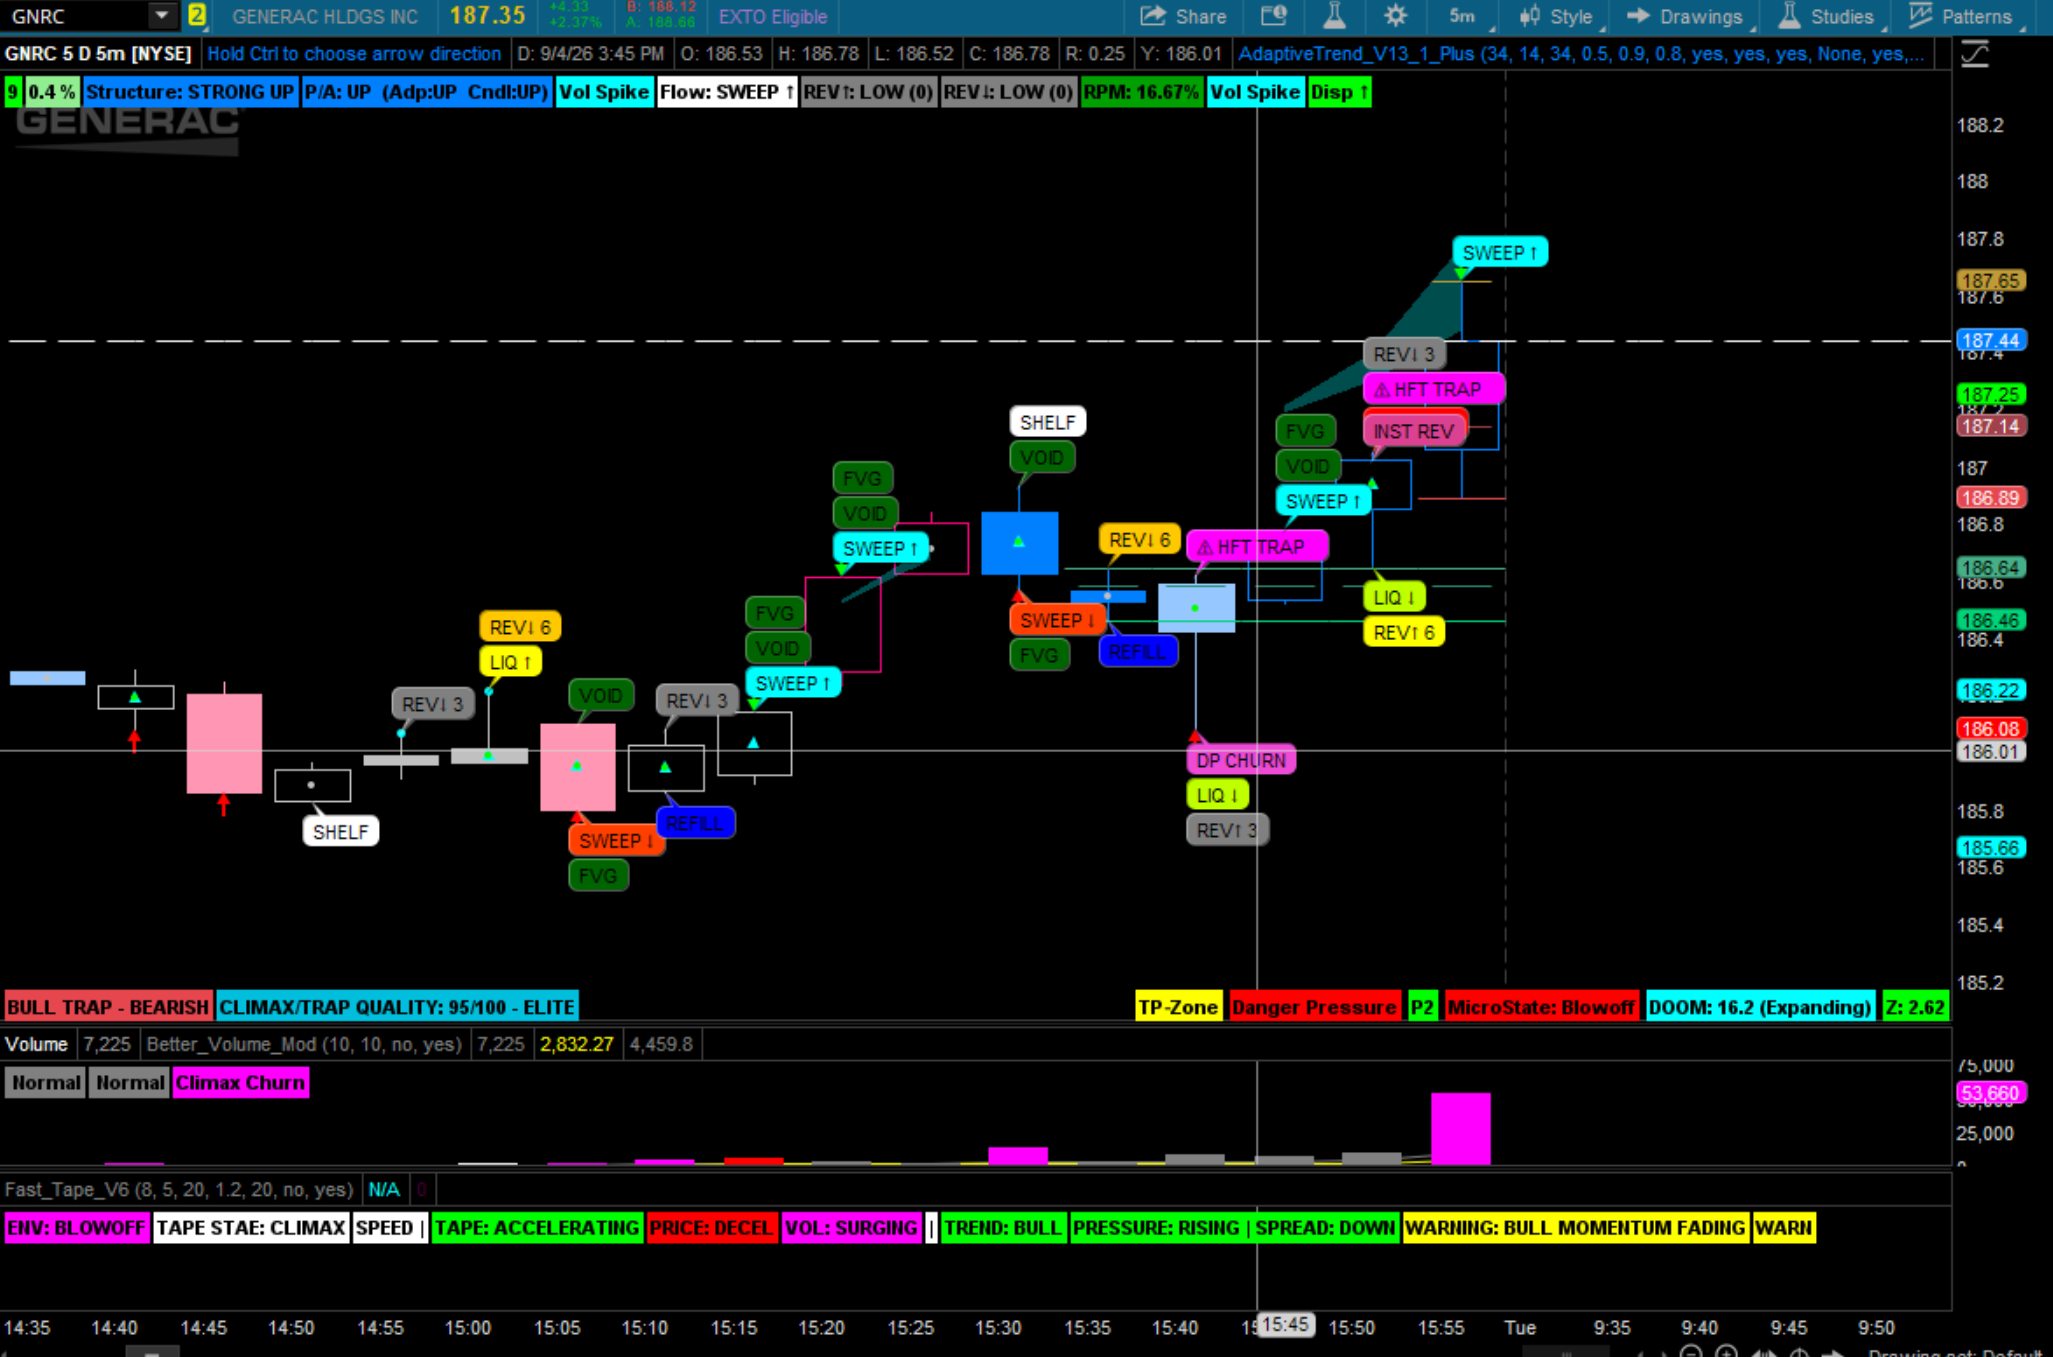
(Updated: V1.1)
Liquidity Map — Microstructure Study (WIP)
Ventured deep into the liquidity‑programming rabbit hole and built a microstructure engine to visualize how liquidity actually behaves on the chart. It maps 15 structural zones, RPM confluence, directional REV↑/REV↓ probability, volume pressure, and candle‑behavior footprints.
This is a new arena for me, so if you spot anything in the code that can be improved, tightened, or optimized — I’m all ears.
Surprisingly, it plays extremely well with the Climax Trap study and YTC lines.
Testing Chart with All studies
Liquidity Test Chart
Method to the Madness…..
Liquidity Map — Zone & Math BreakdownZONE 1 — Dark Pool Churn
High volume, low movement → hidden accumulation/distribution. Math: RVOL20 > 1.8 and body < 35% of range.
ZONES 2–3 — Sweeps (Up/Down)
Aggressive runs through highs/lows. Math: RVOL20 > 1.5, body > ATR20 * 0.65, directional close.
ZONES 4–5 — Stop‑Grabs (Up/Down)
Wick‑heavy stop runs that fail to continue. Math: Wick > 45% of range, RVOL20 > 1.5, close back inside mid‑range.
ZONE 6 — Hidden Absorption
Institutions absorbing flow without moving price. Math: RVOL20 ≥ 2.0, body ≤ ATR20 * 0.30, wick sum ≤ 50% of body.
ZONES 7–8 — Voids & Refills
True displacement beyond prior high/low → imbalance → correction. Void Math: Break prior high/low, body > ATR20 * 0.6, wick < 15%, RVOL20 > 1.5. Refill Math: Void[1] and price returns to prior boundary.
ZONE 9 — Volume Climax
Exhaustive push with extreme volume. Math: RVOL20 > 3.0, body > ATR20 * 0.8, wick sum < 30%.
ZONE 10 — Trend Exhaustion
Strong effort → weak result. Math: RVOL20 > 1.5, body > ATR20 * 0.5, opposite wick > 40%.
ZONE 11 — Liquidity Shelves (High/Medium/Institutional)
Multi‑bar liquidity storage zones. Math: Highest/lowest of last 5 bars + RVOL/range/wick filters depending on mode.
ZONE 12 — Pivot Cluster
Compression of highs/lows + range + volume. Math: Pivot band compression + range compression + volume compression + structural confluence.
ZONE 13 — Institutional Reversal Signature
Multi‑zone reversal confluence. Math: Exhaustion + refill, or climax + shelf, or stop‑grab + exhaustion.
ZONE 14 — Fair Value Gap (FVG)
Void without refill. Math: isVoid AND NOT isVoidRefill.
ZONE 15 — HFT VWAP Trap
VWAP deviation + structural trap. Math: High/low outside VWAP bands + stop‑grab/climax/exhaustion confluence.
The Liquidity Map started as a way to sanity‑check the math and ended up becoming a full microstructure engine. Every zone, footprint, and probability score is built from observable behavior — no indicators, no predictions, no shortcuts. Just structure, volume, displacement, exhaustion, and the footprints left behind when liquidity is taken, defended, or trapped.
If you dig into the code, focus on the zone logic. That’s the heart of the study. The visuals, RPM, REV↑/REV↓, volume pressure, and candle‑behavior engine all exist to make that math readable on the chart.
Still a work in progress, and still learning — so any technical feedback, corrections, or improvements are appreciated. The goal is simple: map liquidity honestly and let the market tell its own story.
Study Link
Study Liquidity_Map
Ruby:
############################################
# LIQUIDITY MAP
# Version: 1.1 (Work In Progress)
# atcsam — 09/07/26
#
# Description:
# A microstructure model that maps liquidity behavior
# across 15 structural zones, directional reversal probability (REV↑/REV↓),
# RPM confluence scoring, volume pressure, and candle‑behavior micro‑footprints.
# 1.1 — RTH‑aware, NaN‑safe zone engine with enhanced 5‑bar RPM (meter)_v2.

############################################

#-----------------------------------------
# USER TOGGLES
#-----------------------------------------
input useRTH = no;
input shelfMode = {default "High", "Medium", "Institutional"};
input showBubbles        = yes;   # Zone Bubbles
input showRPM            = yes;   # RPM confluence meter
input showREV            = yes;   # Directional REV↑ / REV↓ scoring + bubbles
input showrevlb          = yes;
input showVolumeEngine   = yes;   # Pulse, Spike, RVOL dots

input showFlowLabel      = yes;   # Flow label at top

input showCandleBubbles  = yes;   # Candle behavior bubbles
input showCandleLabels   = no;    # Candle behavior label


# GlobalColors
DefineGlobalColor("MagLt", CreateColor(237, 74, 213));
DefineGlobalColor("Amber", CreateColor(220, 170, 45));
DefineGlobalColor("Trap", CreateColor(220, 65, 145));
DefineGlobalColor("RPM_DownStrong", Color.RED);
DefineGlobalColor("RPM_Down", Color.DARK_RED);
DefineGlobalColor("RPM_Neutral", Color.YELLOW);
DefineGlobalColor("RPM_Up", Color.GREEN);
DefineGlobalColor("RPM_UpStrong", Color.DARK_GREEN);


# ====================================================
# RTH FILTER (Optional)
# ====================================================

def isRTH =
    SecondsFromTime(0930) >= 0 and
    SecondsTillTime(1600) >= 0;

# --- RTH-Filtered Volume ---
def rawVol = volume;
def vol    = if useRTH and !isRTH then 0 else rawVol;


def price = close;
def candleRange = high - low;
def candleBody  = AbsValue(close - open);
def upperWick   = high - Max(open, close);
def lowerWick   = Min(open, close) - low;

# --- Volume Math ---
def avgVol20 = Average(vol, 20);
def RVOL20   = if avgVol20 != 0 then vol / avgVol20 else 1;

# --- ATR  ---
def atr20 = ATR(20);


# ====================================================
# ZONE 1 — DARK POOL CHURN
# ====================================================
def _isChurn =
    RVOL20 > 1.8 and
    candleBody / candleRange < 0.35;
def isChurn = if IsNaN(_isChurn) then 0 else _isChurn;

# ====================================================
# ZONES 2–5 — SWEEPS & STOP GRABS
# ====================================================
def _isUpSweep = RVOL20 > 1.5 and candleBody > atr20 * 0.65 and close > open;
def isUpSweep = if IsNaN(_isUpSweep) then 0 else _isUpSweep;

def _isDnSweep = RVOL20 > 1.5 and candleBody > atr20 * 0.65 and close <= open;
def isDnSweep = if IsNaN(_isDnSweep) then 0 else _isDnSweep;

def _isUpStopGrab =
    RVOL20 > 1.5 and
    upperWick > candleRange * 0.45 and
    close < (high + low) / 2;
def isUpStopGrab = if IsNaN(_isUpStopGrab) then 0 else _isUpStopGrab;

def _isDnStopGrab =
    RVOL20 > 1.5 and
    lowerWick > candleRange * 0.45 and
    close > (high + low) / 2;
def isDnStopGrab = if IsNaN(_isDnStopGrab) then 0 else _isDnStopGrab;

# ====================================================
# ZONE 6 — HIDDEN ABSORPTION
# ====================================================
def _isHiddenAbsorb =
    RVOL20 >= 2.0 and
    candleBody <= atr20 * 0.30 and
    (upperWick + lowerWick) <= candleBody * 0.50;
def isHiddenAbsorb = if IsNaN(_isHiddenAbsorb) then 0 else _isHiddenAbsorb;

# ====================================================
# ZONES 7–8 — VOIDS & REFILLS
# ====================================================
def prevHigh = high[1];
def prevLow  = low[1];

# --- VOID ---
def _voidUp =
    close > prevHigh and
    candleBody > atr20 * 0.6 and
    upperWick < candleRange * 0.15 and
    RVOL20 > 1.5;
def voidUp = if IsNaN(_voidUp) then 0 else _voidUp;

def _voidDown =
    close < prevLow and
    candleBody > atr20 * 0.6 and
    lowerWick < candleRange * 0.15 and
    RVOL20 > 1.5;
def voidDown = if IsNaN(_voidDown) then 0 else _voidDown;

def isVoid = voidUp or voidDown;

# --- REFILL ---
def _refillUp   = voidUp[1] and low <= prevHigh[1];
def refillUp    = if IsNaN(_refillUp) then 0 else _refillUp;

def _refillDown = voidDown[1] and high >= prevLow[1];
def refillDown  = if IsNaN(_refillDown) then 0 else _refillDown;

def isVoidRefill = refillUp or refillDown;

# ====================================================
# ZONE 9 — VOLUME CLIMAX
# ====================================================
def _isVolClimax =
    RVOL20 > 3.0 and
    candleBody > atr20 * 0.8 and
    (upperWick + lowerWick) < candleRange * 0.30;
def isVolClimax = if IsNaN(_isVolClimax) then 0 else _isVolClimax;

# ====================================================
# ZONE 10 — TREND EXHAUSTION
# ====================================================
def _effortHigh = RVOL20 > 1.5 and candleBody > atr20 * 0.5;
def effortHigh  = if IsNaN(_effortHigh) then 0 else _effortHigh;

def _resultWeakUp = close < open and upperWick > candleRange * 0.4;
def resultWeakUp  = if IsNaN(_resultWeakUp) then 0 else _resultWeakUp;

def _effortLow = RVOL20 > 1.5 and candleBody > atr20 * 0.5;
def effortLow  = if IsNaN(_effortLow) then 0 else _effortLow;

def _resultWeakDown = close > open and lowerWick > candleRange * 0.4;
def resultWeakDown  = if IsNaN(_resultWeakDown) then 0 else _resultWeakDown;

def _isTrendExhaustion = (effortHigh and resultWeakUp) or (effortLow and resultWeakDown);
def isTrendExhaustion  = if IsNaN(_isTrendExhaustion) then 0 else _isTrendExhaustion;

# ====================================================
# ZONE 11 — LIQUIDITY SHELVES
# ====================================================
def shelfHigh_H =
    high == Highest(high, 5) and
    high[1] == Highest(high[1], 5) and
    high[2] == Highest(high[2], 5);

def shelfLow_H =
    low == Lowest(low, 5) and
    low[1] == Lowest(low[1], 5) and
    low[2] == Lowest(low[2], 5);

def shelfHigh_M =
    shelfHigh_H and RVOL20 < 0.8 and candleRange < atr20 * 0.6;

def shelfLow_M =
    shelfLow_H and RVOL20 < 0.8 and candleRange < atr20 * 0.6;

def shelfHigh_I =
    shelfHigh_H and RVOL20 < 0.6 and candleBody < atr20 * 0.4 and upperWick < candleRange * 0.3;

def shelfLow_I =
    shelfLow_H and RVOL20 < 0.6 and candleBody < atr20 * 0.4 and lowerWick < candleRange * 0.3;

def _isShelf =
    if shelfMode == shelfMode."High" then (shelfHigh_H or shelfLow_H)
    else if shelfMode == shelfMode."Medium" then (shelfHigh_M or shelfLow_M)
    else (shelfHigh_I or shelfLow_I);
def isShelf = if IsNaN(_isShelf) then 0 else _isShelf;

def shelfLow  = shelfLow_H or shelfLow_M or shelfLow_I;
def shelfHigh = shelfHigh_H or shelfHigh_M or shelfHigh_I;

# ====================================================
# ZONE 12 — PIVOT CLUSTER (Compression)
# ====================================================
def pivotHigh20 = Highest(high, 20);
def pivotLow20  = Lowest(low, 20);

def _pivotHighCompression =
    AbsValue(pivotHigh20 - pivotHigh20[5]) <= atr20 * 0.4;
def pivotHighCompression = if IsNaN(_pivotHighCompression) then 0 else _pivotHighCompression;

def _pivotLowCompression =
    AbsValue(pivotLow20 - pivotLow20[5]) <= atr20 * 0.4;
def pivotLowCompression = if IsNaN(_pivotLowCompression) then 0 else _pivotLowCompression;

def pivotBandCompression = pivotHighCompression and pivotLowCompression;

def _rangeCompression =
    candleRange < atr20 * 0.6 and candleRange < candleRange[1];
def rangeCompression = if IsNaN(_rangeCompression) then 0 else _rangeCompression;

def _volCompression =
    RVOL20 < 0.8 and RVOL20 < RVOL20[1];
def volCompression = if IsNaN(_volCompression) then 0 else _volCompression;

def _pivotCluster =
    pivotBandCompression and
    rangeCompression and
    volCompression and
    (isShelf or isHiddenAbsorb or isUpStopGrab or isDnStopGrab or isVoid or isVoidRefill);
def pivotCluster = if IsNaN(_pivotCluster) then 0 else _pivotCluster;

# ====================================================
# ZONE 13 — INSTITUTIONAL REVERSAL SIGNATURE
# ====================================================
def _isInstReversal =
    (isTrendExhaustion and isVoidRefill) or
    (isVolClimax and isShelf) or
    (isUpStopGrab and isTrendExhaustion) or
    (isDnStopGrab and isTrendExhaustion);
def isInstReversal = if IsNaN(_isInstReversal) then 0 else _isInstReversal;

# ====================================================
# ZONE 14 — FAIR VALUE GAP (FVG)
# ====================================================
def _isFVG = isVoid and !isVoidRefill;
def isFVG = if IsNaN(_isFVG) then 0 else _isFVG;

# ====================================================
# ZONE 15 — HFT VWAP TRAP
# ====================================================
def vwapValue = vwap;
def vwapDist = AbsValue(close - vwapValue);
def vwapStDev = StDev(vwapDist, 50);

def upperVwapBand = vwapValue + (2.0 * vwapStDev);
def lowerVwapBand = vwapValue - (2.0 * vwapStDev);

def _isHftVwapTrap =
    (high > upperVwapBand and (isUpStopGrab or isVolClimax or isTrendExhaustion)) or
    (low < lowerVwapBand and (isDnStopGrab or isVolClimax or isTrendExhaustion));
def isHftVwapTrap = if IsNaN(_isHftVwapTrap) then 0 else _isHftVwapTrap;

# ====================================================
# FLOW LABEL
# ====================================================
AddLabel(showFlowLabel,
    "Flow: " +
    (if isHftVwapTrap then "⚠️ HFT VWAP TRAP"
     else if isInstReversal then "INST REVERSAL"
     else if pivotCluster then "PIVOT CLUSTER"
     else if isChurn then "DP CHURN"
     else if isUpStopGrab then "LIQ GRAB ↑"
     else if isDnStopGrab then "LIQ GRAB ↓"
     else if isUpSweep then "SWEEP ↑"
     else if isDnSweep then "SWEEP ↓"
     else if isHiddenAbsorb then "HIDDEN ABSORB"
     else if isVoid then "VOID"
     else if isVoidRefill then "REFILL"
     else if isVolClimax then "CLIMAX"
     else if isTrendExhaustion then "EXHAUSTION"
     else if isShelf then "SHELF"
     else if isFVG then "FVG"
     else "Standard Flow"),
    if isHftVwapTrap then Color.MAGENTA else Color.WHITE
);

# ====================================================
# CHART BUBBLES FOR ALL 15 ZONES
# ====================================================


AddChartBubble(showBubbles and isChurn, low, "DP CHURN", GlobalColor("MagLt"), no);
AddChartBubble(showBubbles and isUpStopGrab, high, "LIQ ↑", Color.YELLOW, yes);
AddChartBubble(showBubbles and isDnStopGrab, low, "LIQ ↓", Color.LIME, no);
AddChartBubble(showBubbles and isUpSweep, high, "SWEEP ↑", Color.CYAN, yes);
AddChartBubble(showBubbles and isDnSweep, low, "SWEEP ↓", Color.LIGHT_RED, no);
AddChartBubble(showBubbles and isHiddenAbsorb, low, "ABSORB", Color.CYAN, no);
AddChartBubble(showBubbles and isVoid, high, "VOID", Color.DARK_GREEN, yes);
AddChartBubble(showBubbles and isVoidRefill, low, "REFILL", Color.BLUE, no);
AddChartBubble(showBubbles and isVolClimax, high, "CLIMAX", GlobalColor("Amber"), yes);
AddChartBubble(showBubbles and isTrendExhaustion,
    if close > open then high else low,
    "EXHAUST",
    Color.RED,
    close > open
);
AddChartBubble(showBubbles and isShelf,
    if shelfHigh_H or shelfHigh_M or shelfHigh_I then high else low,
    "SHELF",
    Color.WHITE,
    shelfHigh_H or shelfHigh_M or shelfHigh_I
);
AddChartBubble(showBubbles and pivotCluster, close, "PIVOT CLUSTER", Color.ORANGE, yes);
AddChartBubble(showBubbles and isInstReversal, close, "INST REV", GlobalColor("Trap"), yes);
AddChartBubble(showBubbles and isFVG,
    if voidUp then high else low,
    "FVG",
    Color.DARK_GREEN,
    voidUp
);
AddChartBubble(showBubbles and isHftVwapTrap,
    if close > vwapValue then high else low,
    "⚠️ HFT TRAP",
    Color.MAGENTA,
    close > vwapValue
);


# ====================================================
# RPM v2 — Multi‑Bar, Pattern‑Aware Reversal Engine
# ====================================================

# 1) Multi‑bar memory (5‑bar window)
def _recentSweep    = Highest(isUpSweep or isDnSweep, 5);
def recentSweep     = if IsNaN(_recentSweep) then 0 else _recentSweep;

def _recentExhaust  = Highest(isTrendExhaustion, 5);
def recentExhaust   = if IsNaN(_recentExhaust) then 0 else _recentExhaust;

def _recentClimax   = Highest(isVolClimax, 5);
def recentClimax    = if IsNaN(_recentClimax) then 0 else _recentClimax;

def _recentTrap     = Highest(isHftVwapTrap, 5);
def recentTrap      = if IsNaN(_recentTrap) then 0 else _recentTrap;

def _recentShelf    = Highest(isShelf, 5);
def recentShelf     = if IsNaN(_recentShelf) then 0 else _recentShelf;

def _recentVoid     = Highest(isVoid, 5);
def recentVoid      = if IsNaN(_recentVoid) then 0 else _recentVoid;

def _recentRefill   = Highest(isVoidRefill, 5);
def recentRefill    = if IsNaN(_recentRefill) then 0 else _recentRefill;

def _recentStopGrab = Highest(isUpStopGrab or isDnStopGrab, 5);
def recentStopGrab  = if IsNaN(_recentStopGrab) then 0 else _recentStopGrab;

def _recentChurn    = Highest(isChurn, 5);
def recentChurn     = if IsNaN(_recentChurn) then 0 else _recentChurn;

# 2) Weighted RPM components (current vs recent)

def rpmSweep_v2   = (isUpSweep or isDnSweep) * 2 + recentSweep * 1;
def rpmExhaust_v2 = isTrendExhaustion * 2 + recentExhaust * 1;
def rpmClimax_v2  = isVolClimax * 3 + recentClimax * 1;
def rpmTrap_v2    = isHftVwapTrap * 3 + recentTrap * 1;
def rpmShelf_v2   = isShelf * 1 + recentShelf * 1;
def rpmVoid_v2    = isVoid * 2 + recentVoid * 1;
def rpmRefill_v2  = isVoidRefill * 2 + recentRefill * 1;
def rpmChurn_v2   = isChurn * 1 + recentChurn * 1;
def rpmStop_v2    = (isUpStopGrab or isDnStopGrab) * 3 + recentStopGrab * 1;

# 3) Swing‑within‑5‑bars
def recentSwingHigh = high == Highest(high, 5);
def recentSwingLow  = low  == Lowest(low, 5);

def swingBonus_v2 =
    (recentSwingHigh and recentExhaust) * 3 +
    (recentSwingLow  and recentExhaust) * 3 +
    (recentSwingHigh and recentTrap)    * 4 +
    (recentSwingLow  and recentTrap)    * 4 +
    (recentSwingHigh and voidDown)      * 2 +
    (recentSwingLow  and voidUp)        * 2;

# 4) Sequence bonuses (pattern detection)
def seq_Reversal_v2     = (recentSweep and recentShelf and recentExhaust);
def seq_Trap_v2         = (recentVoid and recentRefill and recentTrap);
def seq_SCBC_v2         = (recentClimax and recentExhaust and recentShelf);
def seq_Prop_v2         = (recentShelf and recentSweep and recentChurn);
def seq_VoidExhaust_v2  = (recentVoid and recentRefill and recentExhaust);
def seq_SweepExhaust_v2 = (recentSweep and recentExhaust);

def seqBonus_v2 =
    (seq_Reversal_v2     * 5) +
    (seq_Trap_v2         * 4) +
    (seq_SCBC_v2         * 6) +
    (seq_Prop_v2         * 3) +
    (seq_VoidExhaust_v2  * 4) +
    (seq_SweepExhaust_v2 * 3);


# 5) Enhanced RPM score
def rpmScore_v2 =
    rpmSweep_v2 +
    rpmExhaust_v2 +
    rpmClimax_v2 +
    rpmTrap_v2 +
    rpmShelf_v2 +
    rpmVoid_v2 +
    rpmRefill_v2 +
    rpmChurn_v2 +
    rpmStop_v2 +
    swingBonus_v2 +
    seqBonus_v2;

def rpmPercent_v2 = Min(100, (rpmScore_v2 / 18) * 100);

# 6) RPM v2 label

AddLabel(showRPM,
    "RPMv2: " + AsPercent(rpmPercent_v2 / 100) + " Raw:" + rpmScore_v2,
    if rpmPercent_v2 >= 85 then GlobalColor("RPM_DownStrong")
    else if rpmPercent_v2 >= 65 then GlobalColor("RPM_Down")
    else if rpmPercent_v2 >= 45 then GlobalColor("RPM_Neutral")
    else if rpmPercent_v2 >= 25 then GlobalColor("RPM_Up")
    else GlobalColor("RPM_UpStrong")
);

# ====================================================
# --- DIRECTIONAL REVERSAL PROBABILITY METER (REV↑ / REV↓)
# ====================================================

def revUpScore =
    (isDnStopGrab * 3) +
    (isHiddenAbsorb * 2) +
    (refillUp * 3) +
    (resultWeakDown * 3) +
    ((isVolClimax and close < open) * 3) +
    ((isInstReversal and close < open) * 3) +
    ((shelfLow_H or shelfLow_M or shelfLow_I) * 1) +
    ((pivotCluster and close < open) * 2) +
    ((voidDown and !refillDown) * 1);

def revDnScore =
    (isUpStopGrab * 3) +
    (isHiddenAbsorb * 2) +
    (refillDown * 3) +
    (resultWeakUp * 3) +
    ((isVolClimax and close > open) * 3) +
    ((isInstReversal and close > open) * 3) +
    ((shelfHigh_H or shelfHigh_M or shelfHigh_I) * 1) +
    ((pivotCluster and close > open) * 2) +
    ((voidUp and !refillUp) * 1);

def revUpLow      = revUpScore <= 4;
def revUpModerate = revUpScore > 4 and revUpScore <= 9;
def revUpHigh     = revUpScore > 9 and revUpScore <= 14;
def revUpExtreme  = revUpScore > 14;

def revDnLow      = revDnScore <= 4;
def revDnModerate = revDnScore > 4 and revDnScore <= 9;
def revDnHigh     = revDnScore > 9 and revDnScore <= 14;
def revDnExtreme  = revDnScore > 14;

# ====================================================
# REVv2 — Directional Boosters
# ====================================================

def revUpBoost =
    (rpmScore_v2 >= 4 and recentSwingLow) +
    (rpmScore_v2 >= 6 and recentRefill) +
    (rpmScore_v2 >= 8 and recentTrap) +
    (rpmScore_v2 >= 10 and recentExhaust);

def revDnBoost =
    (rpmScore_v2 >= 4 and recentSwingHigh) +
    (rpmScore_v2 >= 6 and recentVoid) +
    (rpmScore_v2 >= 8 and recentTrap) +
    (rpmScore_v2 >= 10 and recentExhaust);

def revUpScore_v2 = revUpScore + revUpBoost;
def revDnScore_v2 = revDnScore + revDnBoost;


AddChartBubble(
    showREV and revUpScore_v2 > 2,
    low,
    "REV↑ " + revUpScore_v2,
    if revUpScore_v2 > 14 then Color.GREEN
    else if revUpScore_v2 > 9 then Color.DARK_GREEN
    else if revUpScore_v2 > 4 then Color.YELLOW
    else Color.GRAY,
    no
);

AddChartBubble(
    showREV and revDnScore_v2 > 2,
    high,
    "REV↓ " + revDnScore_v2,
    if revDnScore_v2 > 14 then Color.RED
    else if revDnScore_v2 > 9 then Color.DARK_RED
    else if revDnScore_v2 > 4 then Color.ORANGE
    else Color.GRAY,
    yes
);

AddLabel(showREV,
    "REV↑ " + revUpScore_v2,
    if revUpScore_v2 > 14 then Color.GREEN
    else if revUpScore_v2 > 9 then Color.DARK_GREEN
    else if revUpScore_v2 > 4 then Color.YELLOW
    else Color.GRAY
);

AddLabel(showREV,
    "REV↓ " + revDnScore_v2,
    if revDnScore_v2 > 14 then Color.RED
    else if revDnScore_v2 > 9 then Color.DARK_RED
    else if revDnScore_v2 > 4 then Color.ORANGE
    else Color.GRAY
);

#-----------------------------------------
# Volume Engine V13
#-----------------------------------------

input ShowVlabel          = no;
input ShowVolumeMarkers  = yes;

input type        = { default SMP, EXP };
input length1     = 20;
input RelVLenght  = 50;

#-----------------------------------------
# 1) CORE VOLUME SERIES
#-----------------------------------------

def v13p_vol = volume;

# 10-bar average volume (for Pulse + Spike)
def v13p_volAvg10 = Average(v13p_vol, 10);

#-----------------------------------------
# 2) PULSE ENGINE (MACRO CONTEXT)
#-----------------------------------------

# 3-bar pulse (stable, minimal noise)
def v13p_pulse3 = (v13p_vol + v13p_vol[1] + v13p_vol[2]) / 3;

# Pulse ratio vs 10-bar average
def v13p_pulseRatio =
    if v13p_volAvg10 != 0 then v13p_pulse3 / v13p_volAvg10
    else 1;

# Pulse classification
def v13p_pulseStrong  = v13p_pulseRatio > 1.25;
def v13p_pulseNeutral = v13p_pulseRatio >= 0.75 and v13p_pulseRatio <= 1.25;
def v13p_pulseWeak    = v13p_pulseRatio < 0.75;

# Spike detection (expansion event)
def v13p_spike =
    v13p_vol > Highest(v13p_vol[1], 3) and
    v13p_vol > v13p_volAvg10 * 1.5;

#-----------------------------------------
# 3) RVOL DOT ENGINE (MICRO ACCELERATION)
#-----------------------------------------

def v13m_RelPrevVol = v13p_vol / v13p_vol[1];
def v13m_longAvg = Average(v13p_vol, RelVLenght);
def v13m_dotSignal = v13m_RelPrevVol >= 1.25;
def v13m_dotHigh = v13p_vol >= v13m_longAvg;
def v13m_dotLow  = v13p_vol <  v13m_longAvg;
def v13m_midBody = MidBodyVal();

#-----------------------------------------
# 4) DOT PLOT (MID-BODY
#-----------------------------------------

plot v13m_Dot =
    if ShowVolumeMarkers
       and v13m_dotSignal
       and !v13p_pulseWeak
    then v13m_midBody
    else Double.NaN;

v13m_Dot.SetPaintingStrategy(PaintingStrategy.POINTS);
v13m_Dot.SetLineWeight(1);
v13m_Dot.AssignValueColor(
    if v13m_dotHigh then Color.GREEN
    else Color.YELLOW
);

#-----------------------------------------
# 5) SPIKE TRIANGLE (MID-BODY, WEIGHT 2)
#-----------------------------------------

plot v13m_SpikePlot =
    if ShowVolumeMarkers and v13p_spike then v13m_midBody
    else Double.NaN;

v13m_SpikePlot.SetPaintingStrategy(PaintingStrategy.TRIANGLES);
v13m_SpikePlot.SetLineWeight(2);
v13m_SpikePlot.AssignValueColor(Color.CYAN);

#-----------------------------------------
# 6) VOLUME LABEL (MACRO NARRATIVE)
#-----------------------------------------

AddLabel(
   ShowVlabel,
    if v13p_spike then "Vol Spike"
    else if v13p_pulseStrong then "Vol ↑ Strong"
    else if v13p_pulseWeak then "Vol ↓ Weak"
    else "Vol Neutral",

    if v13p_spike then Color.CYAN
    else if v13p_pulseStrong then Color.GREEN
    else if v13p_pulseWeak then Color.RED
    else Color.LIGHT_GRAY
);

#-----------------------------------------
# Candle Behavior Engine (Micro Footprints)
#-----------------------------------------


# Core candle components
def body      = AbsValue(close - open);
def range     = high - low;
def prevBody  = AbsValue(close[1] - open[1]);
def prevRange = high[1] - low[1];

def bodyPctOfRange =
    if range != 0 then body / range else 0;

#def upperWick =
#    if close >= open then high - close else high - open;

#def lowerWick =
#    if close >= open then open - low else close - low;

def upperWickPct =
    if range != 0 then upperWick / range else 0;

def lowerWickPct =
    if range != 0 then lowerWick / range else 0;

#-----------------------------------------
# 1) DISPLACEMENT BARS (Engulfing)
#-----------------------------------------

def isDispUp =
    body > prevBody and
    range > prevRange and
    close > high[1];

def isDispDn =
    body > prevBody and
    range > prevRange and
    close < low[1];
#-----------------------------------------
# TR1 DIRECTION (2‑bar trend)
#-----------------------------------------

def tr1Up = close > close[1]; # and close[1] > close[2]
def tr1Dn = close < close[1] ; #and close[1] < close[2]

def tr1 =
    if tr1Up then 1
    else if tr1Dn then -1
    else 0;

#-----------------------------------------
# 2) REJECTION BARS (Liquidity Refusal)
#-----------------------------------------

def isRejectUp =
    lowerWickPct > 0.4 and
    close > open and
    close < high[1];   # closes inside / below prior high

def isRejectDn =
    upperWickPct > 0.4 and
    close < open and
    close > low[1];    # closes inside / above prior low

#-----------------------------------------
# 3) ABSORPTION BARS (Defense at Structure)
#-----------------------------------------

# Small body, decent range, volume present
def isAbsorb =
    bodyPctOfRange < 0.25 and
    range > prevRange * 0.75 and
    v13p_vol > v13p_volAvg10 and
    (isShelf or isVoid or isHiddenAbsorb or isChurn);

#-----------------------------------------
# 4) COMPRESSION (Coiling / Pressure Buildup)
#-----------------------------------------

def isCompression =
    range < prevRange * 0.7 and
    range < Average(range, 5) * 0.8 and
    !isVoid and !isUpSweep and !isDnSweep;

#-----------------------------------------
# Candle Footprints
#-----------------------------------------

#-----------------------------------------
# DISPLACEMENT ARROWS + Tr
#-----------------------------------------

plot cb_DispUp =
    if showCandleBubbles and isDispUp and tr1 == 1
    then high
    else Double.NaN;
cb_DispUp.SetPaintingStrategy(PaintingStrategy.BOOLEAN_ARROW_Up);
cb_DispUp.SetLineWeight(1);
cb_DispUp.AssignValueColor(Color.GREEN);

plot cb_DispDn =
    if showCandleBubbles and isDispDn and tr1 == -1
    then low
    else Double.NaN;
cb_DispDn.SetPaintingStrategy(PaintingStrategy.BOOLEAN_ARROW_DOWN);
cb_DispDn.SetLineWeight(1);
cb_DispDn.AssignValueColor(Color.RED);

plot cb_RejectUp =
    if showCandleBubbles and isRejectUp then low else Double.NaN;
cb_RejectUp.SetPaintingStrategy(PaintingStrategy.POINTS);
cb_RejectUp.SetLineWeight(2);
cb_RejectUp.AssignValueColor(Color.CYAN);

plot cb_RejectDn =
    if showCandleBubbles and isRejectDn then high else Double.NaN;
cb_RejectDn.SetPaintingStrategy(PaintingStrategy.POINTS);
cb_RejectDn.SetLineWeight(2);
cb_RejectDn.AssignValueColor(Color.CYAN);

plot cb_Absorb =
    if showCandleBubbles and isAbsorb then MidBodyVal() else Double.NaN;
cb_Absorb.SetPaintingStrategy(PaintingStrategy.POINTS);
cb_Absorb.SetLineWeight(2);
cb_Absorb.AssignValueColor(Color.YELLOW);

plot cb_Compress =
    if showCandleBubbles and isCompression then MidBodyVal() else Double.NaN;
cb_Compress.SetPaintingStrategy(PaintingStrategy.POINTS);
cb_Compress.SetLineWeight(1);
cb_Compress.AssignValueColor(Color.LIGHT_GRAY);

#-----------------------------------------
# (Narrative)
#-----------------------------------------

AddLabel(
    showCandleLabels,
    if isDispUp then "Disp ↑"
    else if isDispDn then "Disp ↓"
    else if isRejectUp then "Reject ↑"
    else if isRejectDn then "Reject ↓"
    else if isAbsorb then "Absorb"
    else if isCompression then "Compress"
    else "Candle Neutral",
    if isDispUp then Color.GREEN
    else if isDispDn then Color.RED
    else if isRejectUp or isRejectDn then Color.CYAN
    else if isAbsorb then Color.YELLOW
    else if isCompression then Color.LIGHT_GRAY
    else Color.DARK_GRAY
);
My latest snafu, GNRC walk down: D,30min/15min/5minEOD
Daily
30min
15min
5min
Last edited: